Sending money to friends and family has never been easier, and with Apple’s iMessage, it’s integrated right into your messaging app. At money-central.com, we are committed to providing you with clear and actionable advice on how to manage your finances effectively. This article will provide a comprehensive guide on How To Send Money Through Imessage, ensuring a smooth and secure experience. Whether you’re splitting a bill, sending a gift, or helping out a loved one, learn how to utilize this convenient feature to its full potential and discover additional resources for financial management.
1. What is Apple Cash and How Does It Relate to iMessage?
Apple Cash is a digital card stored in your Wallet app, enabling you to send and receive money directly through your Apple devices. Using Apple Cash within iMessage provides a seamless way to transfer funds to contacts without needing third-party apps. This integration makes sending money as simple as sending a text message, offering convenience and speed.
Apple Cash is a feature within Apple Wallet that allows users to send and receive money digitally. When you send or receive money through iMessage, the funds are managed through your Apple Cash account. Here’s how it works:
- Digital Card: Apple Cash functions as a digital card stored in the Wallet app on your iPhone, iPad, or Apple Watch.
- Integration with iMessage: You can send money to other Apple users directly through the Messages app.
- Funds Management: Money received is stored in your Apple Cash account and can be used for purchases, sent to others, or transferred to your bank account.
- Security: Transactions are secured using Face ID, Touch ID, or your passcode, ensuring that your money transfers are protected.
2. What Are the Requirements for Sending Money Through iMessage?
To send money through iMessage, you need a compatible Apple device, an active Apple Cash account, and a linked debit card for funding. Ensure your device is running the latest iOS version to access all features. These prerequisites guarantee a secure and seamless transaction process.
Here are the specific requirements:
- Compatible Apple Device:
- iPhone: iPhone 6 or later
- iPad: iPad Pro, iPad Air 2, iPad mini 4, or later
- Apple Watch: Apple Watch Series 1 or later
- Latest iOS Version: Ensure your device is running the latest version of iOS, iPadOS, or watchOS.
- Apple Cash Account: An active Apple Cash account is required. If you don’t have one, you can set it up in the Wallet app.
- Debit Card: A linked debit card is needed to fund your Apple Cash account if your balance is insufficient.
- iMessage Enabled: iMessage must be enabled on your device. Go to Settings > Messages and make sure iMessage is turned on.
- Age Requirement: You must be 18 years or older and a U.S. resident to use Apple Cash. If you’re under 18, your family organizer can set up Apple Cash for you as part of their Apple Cash Family account.
- Identity Verification: For full functionality and FDIC insurance eligibility, you may be asked to verify your identity.
3. How Do I Set Up Apple Cash on My iPhone?
Setting up Apple Cash involves opening the Wallet app, agreeing to the terms and conditions, and verifying your identity if prompted. This setup process is straightforward and ensures your account is ready for sending and receiving money.
Follow these steps to set up Apple Cash:
- Open the Wallet App: Locate and open the Wallet app on your iPhone.
- Select Apple Cash: If you already have an Apple Cash card, it will be visible. If not, scroll down and tap “Add Card.”
- Choose Apple Cash: Select “Apple Cash” from the list of available cards.
- Agree to Terms and Conditions: Review and agree to the terms and conditions.
- Verify Identity (If Prompted): You may be asked to verify your identity by providing personal information such as your name, address, date of birth, and Social Security number. This is to comply with federal regulations and ensure the security of your account.
- Add a Debit Card (Optional): While not required initially, adding a debit card allows you to add funds to your Apple Cash account if your balance is low and to send money directly from the card.
- To add a card, tap the plus sign (+) in the Wallet app.
- Select “Debit or Credit Card.”
- Follow the on-screen instructions to add your card manually or scan it using your camera.
- Enable Apple Cash: Once the setup is complete, ensure that Apple Cash is enabled. You can do this by going to Settings > Wallet & Apple Pay and verifying that Apple Cash is turned on.
4. How Can I Send Money via iMessage on My iPhone?
Sending money through iMessage involves opening a conversation, selecting the Apple Cash option, entering the amount, and confirming the transaction with Face ID, Touch ID, or your passcode. This process is quick and secure.
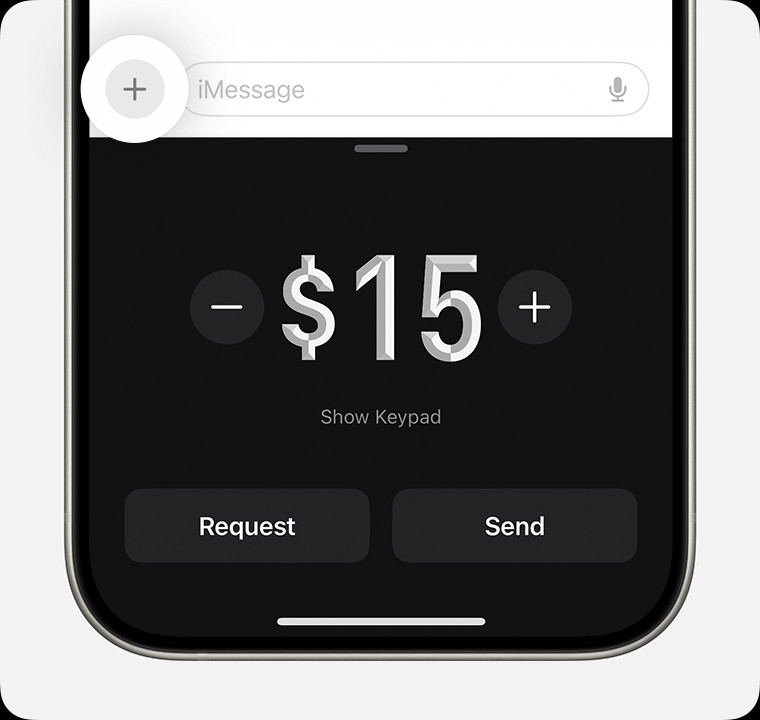 Image of iPhone sending money in the Messages app
Follow these detailed steps to send money via iMessage:
- Open the Messages App: Launch the Messages app on your iPhone.
- Select or Start a Conversation: Choose an existing conversation with the person you want to send money to, or start a new conversation.
- Access Apple Cash:
- Tap the plus icon (+) located to the left of the text input field.
- Tap the Apple Cash icon.
- Enter the Amount: Use the keypad to enter the amount of money you wish to send.
- Add a Comment (Optional): You can add a comment to the transaction, which will appear in the transaction history for both you and the recipient. This can be useful for noting what the money is for.
- Review Payment: Tap the Send button to review the payment details.
- Choose Payment Method (If Needed):
- By default, your Apple Cash balance will be used.
- If you prefer to use a debit card, tap “Change Payment Method.”
- Turn off the Apple Cash slider.
- Select your debit card.
- Confirm Payment:
- Double-click the side button on your iPhone to initiate the payment.
- Confirm the payment using Face ID, Touch ID, or your passcode.
- Payment Confirmation: Once the payment is confirmed, you and the recipient will receive a notification in the Messages app indicating that the transaction was successful.
5. How Do I Send Money via iMessage on My Apple Watch?
Sending money on Apple Watch via iMessage involves opening the Messages app, selecting a conversation, tapping the Apple Cash icon, adjusting the amount, and confirming the payment with a double-click of the side button. This is ideal for quick, on-the-go transactions.
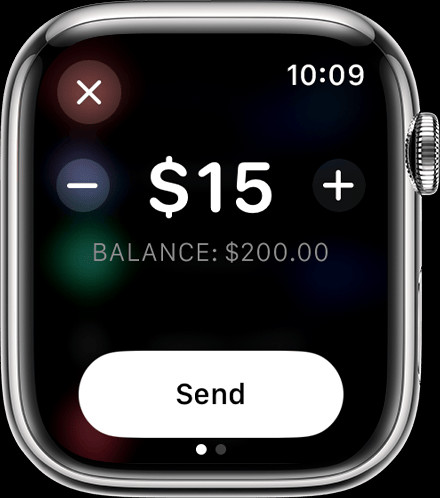 Image of Apple Watch sending money in the Messages app.
Here are the steps to send money via iMessage on your Apple Watch:
- Open the Messages App: Open the Messages app on your Apple Watch.
- Select a Conversation: Choose an existing conversation or start a new one.
- Access Apple Cash:
- Tap the plus icon (+) located next to the text input field.
- Tap the Apple Cash icon.
- Adjust the Amount:
- Use the minus (-) and plus (+) signs to adjust the amount you want to send.
- You can also use the Digital Crown to scroll and set the amount.
- Review Payment: Tap Send to review the payment details.
- Confirm Payment: Double-click the side button on your Apple Watch to send the payment.
6. What Do I Do If I Don’t Have Enough Money in My Apple Cash Account?
If your Apple Cash balance is insufficient, you can use a linked debit card to cover the remaining amount. The system will automatically deduct the necessary funds from your debit card to complete the transaction, ensuring seamless transfers.
Here’s how it works when your Apple Cash balance is insufficient:
- Automatic Debit Card Use: If you don’t have enough money in your Apple Cash balance to cover the full amount of the payment, Apple Cash will automatically use your linked debit card to cover the remaining balance.
- Review Payment Details: When you review the payment details before confirming, you will see a breakdown of how much will be deducted from your Apple Cash balance and how much will be charged to your debit card.
- Confirmation: Proceed with the payment as usual. You’ll need to confirm the payment using Face ID, Touch ID, or your passcode.
7. How Can I Add Money to My Apple Cash Account?
Adding money to your Apple Cash account involves going to the Wallet app, selecting your Apple Cash card, and choosing the option to add funds. You can then specify the amount and use a linked debit card to complete the transfer.
Here are the detailed steps:
- Open the Wallet App: Launch the Wallet app on your iPhone.
- Select Apple Cash Card: Tap on your Apple Cash card.
- Tap the More Button: Tap the More button (three dots) in the upper-right corner of the screen.
- Select Add Money: Tap on “Add Money.”
- Enter the Amount: Enter the amount you want to add to your Apple Cash balance.
- Choose Debit Card: Select the debit card you want to use for the transfer. If you haven’t added a debit card yet, you’ll need to add one.
- Confirm Payment: Double-click the side button to confirm the payment using Face ID, Touch ID, or your passcode.
- Funds Added: Once the transaction is confirmed, the funds will be added to your Apple Cash balance and available for use.
8. How Do I Accept a Payment Received Through iMessage?
To accept a payment, open the Messages app, find the message containing the payment, and tap “Accept.” If you haven’t set up Apple Cash, you’ll be prompted to do so. Once accepted, the money is securely stored in your Apple Cash account.
Here’s a detailed guide on how to accept payments:
- Open the Messages App: Launch the Messages app on your iPhone.
- Locate the Payment Message: Find the message from the sender that contains the Apple Cash payment.
- Tap Accept:
- If you have Apple Cash set up: Tap the “Accept” button in the message.
- If you don’t have Apple Cash set up: Tapping “Accept” will prompt you to set up Apple Cash. Follow the on-screen instructions to create your account.
- Review Payment Details: After tapping “Accept,” you may be prompted to review the payment details. Ensure the amount is correct and that you recognize the sender.
- Confirmation: Once you accept the payment, the funds will be securely deposited into your Apple Cash account. You will receive a notification confirming the transaction.
9. Can I Request Money From Someone Using iMessage?
Yes, you can request money from someone using iMessage. This feature is useful for reminders about shared expenses. Open a conversation, select the Apple Cash option, enter the amount, and tap “Request.” The recipient can then easily send the money.
Here’s how to request money via iMessage:
- Open the Messages App: Launch the Messages app on your iPhone.
- Select or Start a Conversation: Choose an existing conversation with the person you want to request money from, or start a new conversation.
- Access Apple Cash:
- Tap the plus icon (+) located to the left of the text input field.
- Tap the Apple Cash icon.
- Enter the Amount: Use the keypad to enter the amount of money you are requesting.
- Tap Request: Tap the “Request” button.
- Send the Request: The request will be sent as a message to the recipient.
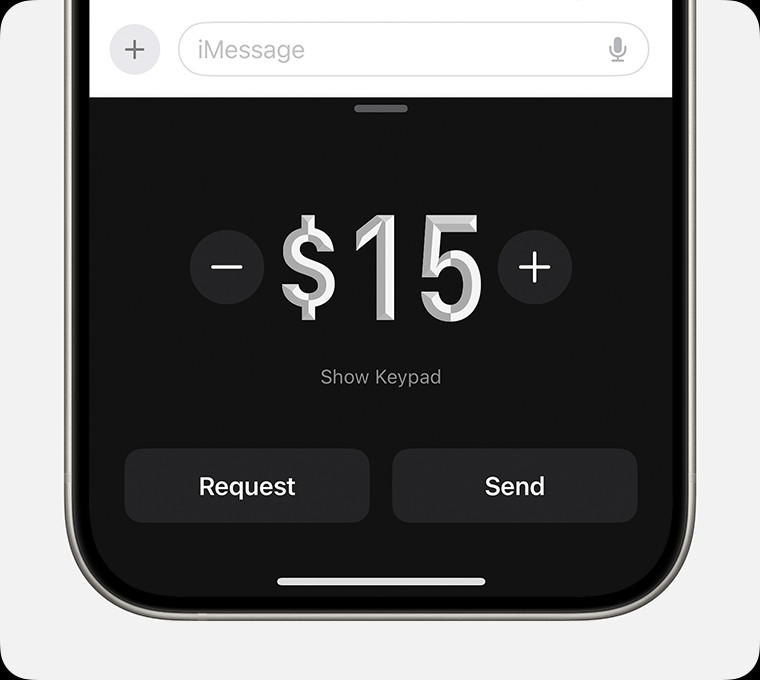 Image of iPhone requesting money in the Messages app
10. How Do I Cancel a Payment Sent Through iMessage?
You can cancel a payment through iMessage if the recipient hasn’t accepted it yet. Go to your Apple Cash transaction history, find the pending payment, and select the option to cancel. Once accepted, a payment cannot be canceled.
Here’s how to cancel a payment:
- Open the Wallet App: Launch the Wallet app on your iPhone.
- Select Apple Cash Card: Tap on your Apple Cash card.
- View Transaction History: Scroll down to view your transaction history.
- Find the Pending Payment: Look for the payment you want to cancel. It should have a status of “Pending.”
- Tap the Transaction: Tap on the pending transaction to view the details.
- Cancel Payment: If the payment is still pending, you will see an option to “Cancel Payment.” Tap this option.
- Confirm Cancellation: You may be asked to confirm the cancellation. Follow the on-screen instructions to complete the process.
11. How Do I Set Up Recurring Payments with Apple Cash?
Setting up recurring payments is useful for regular transfers like rent or allowances. Go to the Wallet app, select your Apple Cash card, tap the “More” button, choose “Recurring Payments,” and set up the details.
Here are the detailed steps:
-
Open the Wallet App: Launch the Wallet app on your iPhone.
-
Select Apple Cash Card: Tap on your Apple Cash card.
-
Tap the More Button: Tap the More button (three dots) in the upper-right corner of the screen.
-
Select Recurring Payments: Tap on “Recurring Payments.”
-
Tap New Recurring Payment: Tap on “New Recurring Payment” to set up a new recurring payment.
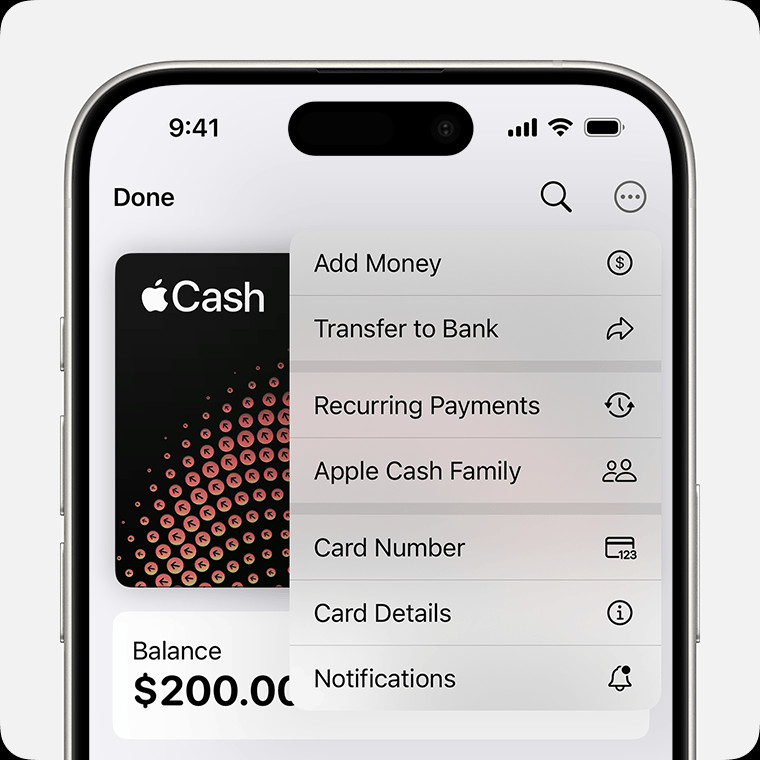 Image of iPhone showing the More menu with Recurring Payments selected
 -
Add the Recipient: Select the person you want to send recurring payments to from your contacts.
-
Set Up Payment Details:
- Dollar Amount: Choose the amount you want to send for each payment.
- Start Date: Select the date you want the payments to start.
- Frequency: Choose how often you want the payments to be sent (weekly, biweekly, or monthly).
- Memo (Optional): Add a memo to identify what the payments are for.
-
Review Payment: Tap Send, then tap the Send button to review the payment.
-
Confirm Payment: Double-click the side button to pay.
-
Confirm your payment with Face ID, Touch ID, or your passcode.
12. How Can I Edit, Cancel, or Pause a Recurring Payment?
You can easily manage your recurring payments by going to the Wallet app, selecting your Apple Cash card, tapping “More,” choosing “Recurring Payments,” and then selecting the payment to edit, cancel, or pause.
Here’s how to manage recurring payments:
- Open the Wallet App: Launch the Wallet app on your iPhone.
- Select Apple Cash Card: Tap on your Apple Cash card.
- Tap the More Button: Tap the More button (three dots) in the upper-right corner of the screen.
- Select Recurring Payments: Tap on “Recurring Payments.”
- Choose the Recurring Payment: Select the specific recurring payment you want to manage.
- Edit, Cancel, or Pause:
- Edit: Tap “Edit” to change the payment amount, frequency, start date, or memo.
- Cancel: Tap “Cancel” to stop the recurring payment altogether.
- Pause: Tap “Pause” to temporarily halt the payments. You can resume them later.
13. How Do I Transfer Money From Apple Cash to My Bank Account?
Transferring money from Apple Cash to your bank account involves going to the Wallet app, selecting your Apple Cash card, tapping “Transfer to Bank,” and following the instructions. You’ll need to have your bank account linked for this process.
Here are the steps to transfer money:
- Open the Wallet App: Launch the Wallet app on your iPhone.
- Select Apple Cash Card: Tap on your Apple Cash card.
- Tap the More Button: Tap the More button (three dots) in the upper-right corner of the screen.
- Select Transfer to Bank: Tap on “Transfer to Bank.”
- Enter the Amount: Enter the amount you want to transfer to your bank account.
- Choose Transfer Option:
- Instant Transfer: For a small fee, you can transfer the money instantly to your debit card.
- Standard Transfer: The standard transfer is free and typically takes 1-3 business days to arrive in your bank account.
- Confirm Transfer: Review the transfer details and confirm the transaction.
- Authentication: Use Face ID, Touch ID, or your passcode to authenticate the transfer.
14. What Are the Limits on Sending and Receiving Money Through Apple Cash?
Apple Cash has limits on sending, receiving, and transferring money to ensure security. These limits vary based on verification status. Typically, you can send and receive up to $10,000, but unverified accounts may have lower limits.
Here’s a breakdown of the limits:
- Sending Limits:
- Verified Users: Can send up to $10,000 in a single transaction and within a rolling seven-day period.
- Unverified Users: May have lower sending limits.
- Receiving Limits:
- Verified Users: Can receive unlimited amounts of money.
- Unverified Users: May have limits on the total amount they can hold in their Apple Cash account.
- Transfer Limits:
- You can transfer a minimum of $1 to your bank account.
- There may be daily or weekly limits on the total amount you can transfer to your bank account.
15. Is Sending Money Through iMessage Secure?
Yes, sending money through iMessage is secure. Apple uses encryption and security features like Face ID, Touch ID, and passcodes to protect your transactions. This ensures that your financial information is safe and that only authorized users can access your account.
Apple employs several security measures to protect your transactions:
- Encryption: All Apple Cash transactions are encrypted to protect your financial information during transmission.
- Authentication: Transactions require authentication using Face ID, Touch ID, or your passcode, ensuring that only you can authorize payments.
- Fraud Monitoring: Apple monitors transactions for suspicious activity and may require additional verification for certain payments.
- FDIC Insurance: After identity verification is complete, your Apple Cash account is FDIC-insured, providing an additional layer of security.
16. What Happens If I Send Money to the Wrong Person?
If you send money to the wrong person, contact Apple Support immediately. If the recipient hasn’t accepted the payment, you can cancel it. If the payment has been accepted, Apple may be able to assist in recovering the funds, but there’s no guarantee.
Here are the steps you should take:
- Check Transaction History: Open the Wallet app and check your Apple Cash transaction history to confirm that the payment was indeed sent to the wrong person.
- Contact the Recipient: If you know the person, contact them and explain the situation. They may be willing to return the money.
- Contact Apple Support:
- Go to Apple Support online or use the Apple Support app on your iPhone.
- Explain the situation and provide all relevant details, including the transaction date, amount, and the recipient’s information.
- Apple Support may be able to help you recover the funds, but this is not guaranteed.
- File a Claim: If you are unable to recover the funds, you may need to file a claim with your bank or financial institution.
17. What Should I Do If I Have Issues With Apple Cash?
If you experience issues with Apple Cash, such as transaction errors or account problems, contact Apple Support for assistance. They can provide troubleshooting steps or escalate the issue if necessary.
Here are some common issues and how to address them:
- Transaction Errors: If a transaction fails or is not processing correctly, check your internet connection and try again. If the issue persists, contact Apple Support.
- Account Problems: If you are having trouble accessing your Apple Cash account or have questions about your balance, contact Apple Support.
- Identity Verification Issues: If you are having trouble verifying your identity, make sure you are providing accurate information and follow the instructions provided by Apple.
- Fraudulent Activity: If you suspect fraudulent activity on your account, contact Apple Support immediately.
18. Can I Use Apple Cash to Send Money Internationally?
No, Apple Cash is currently only available for use within the United States. You cannot send or receive money internationally using Apple Cash. For international transfers, you’ll need to use alternative services like Wise (formerly TransferWise) or Remitly.
If you need to send money internationally, consider these alternatives:
- Wise (formerly TransferWise): Offers low-cost international money transfers with transparent fees.
- Remitly: Specializes in sending money to specific countries and offers competitive exchange rates.
- Xoom (a PayPal service): Allows you to send money to a wide range of countries with various delivery options.
- Western Union: A well-established service for sending money worldwide, with numerous locations and online options.
- MoneyGram: Another popular option for international money transfers, offering fast and reliable service.
19. What Are the Fees Associated With Using Apple Cash?
Generally, Apple Cash does not have fees for sending or receiving money. However, there may be a small fee for instant transfers to your bank account. Standard transfers are typically free and take 1-3 business days.
Here’s a detailed breakdown of the fees:
- Sending Money: There are no fees for sending money to other Apple Cash users.
- Receiving Money: There are no fees for receiving money into your Apple Cash account.
- Standard Transfers to Bank Account: Transfers to your bank account that take 1-3 business days are free.
- Instant Transfers to Debit Card: Instant transfers to your debit card incur a fee, typically 1.5% of the amount transferred, with a minimum fee of $0.25 and a maximum fee of $15.
20. What is Tap to Cash and How Does It Work?
Tap to Cash allows you to send and receive money with someone nearby without sharing your phone number or email. This feature uses near-field communication (NFC) technology for quick and secure transactions.
 Image of the top of two iPhones next to each other
Tap to Cash is a convenient way to send money to someone in person without exchanging contact information. Here’s how it works:
- Open Apple Cash: Both the sender and the recipient need to have Apple Cash set up on their iPhones.
- Initiate the Transfer: The sender opens the Wallet app, selects the Apple Cash card, and chooses the “Tap to Cash” option.
- Enter the Amount: The sender enters the amount they want to send.
- Tap iPhones Together: The sender and recipient hold their iPhones close together, back-to-back. NFC technology will detect the proximity.
- Confirm the Transaction: Both users will see a confirmation screen. The sender confirms the payment with Face ID, Touch ID, or their passcode.
- Complete the Transfer: Once confirmed, the money is instantly transferred from the sender’s Apple Cash account to the recipient’s account.
21. How Do I Enable or Disable Manually Accepting Payments?
You can choose to manually accept payments for security. To enable or disable this feature, go to the Wallet app, select your Apple Cash card, tap “Card Details,” and toggle the “Manually Accept Payments” option.
Here are the steps to manage this setting:
- Open the Wallet App: Launch the Wallet app on your iPhone.
- Select Apple Cash Card: Tap on your Apple Cash card.
- Tap the More Button: Tap the More button (three dots) in the upper-right corner of the screen.
- Tap Card Details: Select “Card Details.”
- Toggle Manually Accept Payments:
- Enable: Turn the “Manually Accept Payments” switch on. When enabled, you will need to manually accept each payment you receive.
- Disable: Turn the “Manually Accept Payments” switch off. When disabled, payments will be automatically accepted into your Apple Cash account.
22. What Are the Privacy Implications of Using Apple Cash?
Apple Cash transactions are private, but it’s essential to understand the privacy implications. Apple uses your data to prevent fraud and improve services, but they do not share your transaction history for marketing purposes. Be mindful of who you send money to and the comments you include in transactions.
Here’s what you should know about the privacy implications of using Apple Cash:
- Data Usage: Apple uses your transaction data to prevent fraud, comply with legal requirements, and improve their services.
- Privacy Settings: You can manage certain privacy settings related to Apple Cash in your iPhone settings.
- Transaction History: Your transaction history is stored securely and is accessible to you in the Wallet app.
- Third-Party Sharing: Apple does not share your transaction history with third parties for marketing purposes.
23. How Do I View My Apple Cash Transaction History?
Viewing your transaction history is essential for tracking your spending and ensuring accuracy. Go to the Wallet app, select your Apple Cash card, and scroll down to see your recent transactions.
Here’s a detailed guide:
- Open the Wallet App: Launch the Wallet app on your iPhone.
- Select Apple Cash Card: Tap on your Apple Cash card.
- View Transaction History: Scroll down to see a list of your recent transactions. Each transaction includes the date, amount, and recipient or sender.
- Tap for Details: Tap on a specific transaction to view more details, such as the payment method used and any comments included.
24. What Should I Do If I Suspect Fraudulent Activity on My Apple Cash Account?
If you suspect fraudulent activity, immediately contact Apple Support and your bank. Monitor your transaction history regularly and report any unauthorized transactions promptly.
Here are the steps to take if you suspect fraud:
- Contact Apple Support:
- Go to Apple Support online or use the Apple Support app on your iPhone.
- Report the suspicious activity and provide all relevant details.
- Contact Your Bank:
- Contact your bank or financial institution to report the fraudulent activity on your linked debit card.
- They may need to cancel your card and issue a new one.
- Monitor Your Accounts:
- Regularly monitor your Apple Cash transaction history and your bank account statements for any unauthorized transactions.
- Change Your Passcode:
- Change your iPhone passcode and your Apple ID password to prevent further unauthorized access.
25. How Does Apple Cash Integrate With Apple Pay?
Apple Cash seamlessly integrates with Apple Pay, allowing you to use your Apple Cash balance to make purchases at stores, online, and in apps. This integration provides a convenient way to spend your money.
Apple Cash enhances your Apple Pay experience by:
- Funding Source: Apple Cash can be used as a funding source for Apple Pay transactions. When you make a purchase using Apple Pay, your Apple Cash balance will be used first.
- Versatile Usage: You can use Apple Cash to make purchases in stores, online, and in apps that accept Apple Pay.
- Easy Management: You can easily manage your Apple Cash balance and transaction history in the Wallet app.
26. How Do I Update My Personal Information on Apple Cash?
Updating your personal information ensures your account is accurate and secure. Go to the Wallet app, select your Apple Cash card, tap “Card Details,” and edit your information as needed.
Here’s how to update your information:
- Open the Wallet App: Launch the Wallet app on your iPhone.
- Select Apple Cash Card: Tap on your Apple Cash card.
- Tap the More Button: Tap the More button (three dots) in the upper-right corner of the screen.
- Tap Card Details: Select “Card Details.”
- Edit Information: You may be able to edit certain information, such as your billing address or phone number. Follow the on-screen instructions to update your information.
- Verify Changes: You may be asked to verify the changes using Face ID, Touch ID, or your passcode.
27. What Happens to My Apple Cash Account If I Change My Apple ID?
Changing your Apple ID can affect your Apple Cash account. Ensure you update your Apple Cash settings with the new Apple ID to maintain access to your funds and transaction history.
Here’s what you need to do:
- Update Apple ID on iPhone:
- Go to Settings > [Your Name] > Sign Out.
- Sign in with your new Apple ID.
- Update Apple Cash Settings:
- Open the Wallet app and select your Apple Cash card.
- Check the settings to ensure that your Apple ID is correctly associated with your Apple Cash account.
- You may need to re-verify your identity or re-enter your payment information.
- Contact Apple Support: If you experience any issues with your Apple Cash account after changing your Apple ID, contact Apple Support for assistance.
28. Are Apple Cash Transactions Taxable?
Generally, Apple Cash transactions are not taxable if they are personal gifts or reimbursements. However, if you are using Apple Cash for business purposes, you may need to report the income to the IRS.
Here’s what you need to know about the tax implications of using Apple Cash:
- Personal Transactions: Personal gifts and reimbursements are generally not taxable.
- Business Transactions: If you are using Apple Cash for business purposes, you may need to report the income to the IRS. Consult with a tax professional for guidance.
- Record Keeping: Keep accurate records of all Apple Cash transactions for tax purposes.
29. How Do I Close My Apple Cash Account?
Closing your Apple Cash account involves contacting Apple Support and transferring any remaining balance to your bank account. Once the account is closed, you will no longer be able to send or receive money through Apple Cash.
Here are the steps to close your Apple Cash account:
- Transfer Remaining Balance: Transfer any remaining balance in your Apple Cash account to your bank account.
- Contact Apple Support:
- Go to Apple Support online or use the Apple Support app on your iPhone.
- Request to close your Apple Cash account.
- Follow Instructions: Follow the instructions provided by Apple Support to close your account.
- Confirmation: You will receive a confirmation once your account has been closed.
30. How Can Money-Central.Com Help Me With My Financial Management?
Money-central.com offers a wealth of resources to help you manage your finances effectively. Our articles, tools, and expert advice cover a wide range of topics, including budgeting, saving, investing, and debt management.
Here’s how money-central.com can assist you:
- Informative Articles: Access comprehensive articles on various financial topics.
- Financial Tools: Utilize budgeting calculators, investment trackers, and other tools.
- Expert Advice: Get insights from financial experts to make informed decisions.
At money-central.com, we understand the challenges of managing personal finances, and we’re here to provide you with the knowledge and tools you need to achieve your financial goals. Visit our website today to explore our resources and take control of your financial future. You can also reach us at Address: 44 West Fourth Street, New York, NY 10012, United States or Phone: +1 (212) 998-0000.
Remember, effective financial management is about more than just sending money; it’s about understanding your financial situation and making informed decisions.
FAQ About Sending Money Through iMessage
1. Is There a Fee for Sending Money Through iMessage?
Generally, sending money through iMessage using Apple Cash is free. However, there might be a small fee for instant transfers to your bank account.
2. What Happens If I Send Money to the Wrong Person on iMessage?
If you send money to the wrong person, immediately contact Apple Support. If the recipient hasn’t accepted the payment, you can cancel it.
3. How Do I Accept a Payment on iMessage?
To accept a payment, open the Messages app, find the message containing the payment, and tap “Accept.” If you haven’t set up Apple Cash, you’ll be prompted to do so.
4. Can I Request Money From Someone on iMessage?
Yes, open a conversation, select the Apple Cash option, enter the amount, and tap “Request.” The recipient can then easily send the money.
5. Is It Safe to Send Money Via iMessage?
Yes, sending money through iMessage is secure. Apple uses encryption and security features like Face ID, Touch ID, and passcodes to protect your transactions.
6. How Do I Set Up Apple Cash?
Open the Wallet app, agree to the terms and conditions, and verify your identity if prompted. You might need to add a debit card as well.
7. How Do I Add Money to My Apple Cash Account?
Go to the Wallet app, select your Apple Cash card, and choose the option to add funds. You can then specify the amount and use a linked debit card to complete the transfer.
8. What Is the Maximum Amount I Can Send Through Apple Cash?
Verified users can send up to $10,000 in a single transaction and within a rolling seven-day period. Unverified users may have lower sending limits.
9. How Do I Transfer Money From Apple Cash to My Bank Account?
Go to the Wallet app, select your Apple Cash card, tap “Transfer to Bank,” and follow the instructions. You’ll need to have your bank account linked for this process.
10. Can I Send Money Internationally Using Apple Cash?
No, Apple Cash is currently only available for use within the United States.