Money Cakes are a creative and exciting way to gift cash, especially for graduations, birthdays, or any special occasion. At money-central.com, we will guide you through the process of crafting these unique financial gifts. This article provides a step-by-step guide, ensuring you create a memorable and visually stunning presentation. Learn how to combine financial generosity with creative flair, turning ordinary cash into an extraordinary gift.
1. What Is A Money Cake?
A money cake is a decorative gift made by arranging real currency, typically dollar bills, into the shape of a cake. It is a creative and fun way to give cash as a gift for various occasions such as birthdays, graduations, weddings, or holidays. Money cakes add a personal touch to a monetary gift, making it more memorable and exciting than simply handing over cash or a check.
What Are The Key Components Of A Money Cake?
The key components of a money cake include:
- Base: This provides the structure for the cake, often made from foam boards, cake boards, or cardboard.
- Money: Real currency, typically bills of various denominations, is the main component. The amount of money used depends on your budget and the desired size of the cake.
- Rubber Bands: Small, clear rubber bands are used to roll or fold the bills into shapes and keep them secure.
- Adhesive: Double-sided tape, glue dots, or a hot glue gun (used carefully to avoid damaging the bills) are used to attach the money to the base and keep the layers together.
- Decorations: Ribbons, toppers, artificial flowers, graduation caps, and personalized signs can be added to enhance the cake’s appearance and match the occasion.
What Occasions Are Suitable For Gifting A Money Cake?
Money cakes are suitable for a wide range of occasions, including:
- Graduations: A money cake makes an excellent graduation gift, helping the graduate with expenses as they start a new chapter.
- Birthdays: For milestone birthdays, a money cake can be a fun and practical gift.
- Weddings: Couples can use the cash to start their life together.
- Holidays: Especially during Christmas or Hanukkah, a money cake can be a festive and appreciated gift.
- Baby Showers: Parents-to-be can use the money for baby essentials.
- Retirements: A money cake can help retirees enjoy their newfound freedom.
- Achievements: Celebrating significant achievements like passing an exam, getting a new job, or reaching a personal goal.
- Just Because: Sometimes, a money cake can be a delightful surprise for no specific reason at all.
How Do You Personalize A Money Cake To Make It More Special?
Personalizing a money cake involves adding elements that reflect the recipient’s interests, personality, or the specific occasion. Here are some ideas:
- Theme Colors: Use colors that match the recipient’s favorite colors, school colors, or the theme of the event (e.g., gold and silver for a 50th birthday).
- Custom Toppers: Add a topper that reflects the recipient’s interests or achievements. This could be a miniature figure related to their hobby, a graduation cap, or a personalized message.
- Personalized Signage: Include a small sign with a heartfelt message or the recipient’s name.
- Ribbons and Decorations: Use ribbons, artificial flowers, or other decorations that complement the theme and add visual appeal.
- Photos: Incorporate small photos of the recipient or memorable moments.
- Denominations: Use a mix of denominations (e.g., $1, $5, $10, $20 bills) to add variety and interest.
- Hidden Messages: Write small, encouraging messages on some of the bills before rolling them up.
- Interactive Elements: Include elements that make the cake interactive, such as pull-out ribbons with additional cash or small gifts attached.
By incorporating these personal touches, you can transform a simple money cake into a cherished and unforgettable gift. Visit money-central.com for more creative ideas and resources to help you personalize your money cake and make it truly special.
2. What Supplies Are Needed To Make A Money Cake?
Creating a money cake is a fun and creative project that can turn a simple cash gift into a memorable present. To get started, you’ll need to gather a few essential supplies.
What Kind Of Base Should I Use For A Money Cake?
The base of your money cake provides the structure and support for the entire creation. Here are some options:
- Foam Boards: Lightweight and easy to cut, foam boards are a popular choice. They come in various colors, allowing you to match your cake’s theme.
- Cake Boards: These sturdy boards are designed for supporting cakes and come in different sizes and shapes. They provide a solid foundation, especially for multi-tiered money cakes.
- Cardboard: You can repurpose cardboard boxes to create a base. Cut out circular or square shapes and layer them for added strength.
- Green Foam Circles: These are often used for floral arrangements and can add height and dimension between layers.
How Much Money Do I Need And What Denominations Should I Use?
The amount of money you need depends on your budget and the desired size of the cake. You can use any denomination, but here are some considerations:
- Dollars: Using only dollar bills can make the cake look fuller and more impressive, especially if you’re aiming for a larger presentation.
- Mixed Denominations: Combining $1, $5, $10, and $20 bills adds visual variety and allows you to reach a specific total amount.
- Budget: Decide on a total amount you’re comfortable gifting and then plan your denominations accordingly.
- Rolling Technique: The larger you roll the bills, the fewer you will need to fill the cake.
What Kind Of Adhesives And Fasteners Are Safe To Use On Money?
When working with money, it’s crucial to use adhesives and fasteners that won’t damage the bills. Here are some safe options:
- Small Clear Rubber Bands: These are ideal for rolling or folding the bills and keeping them secure without causing damage.
- Double-Sided Tape: Use small pieces of double-sided tape to attach the rolled bills to the base. Ensure the tape is acid-free to prevent discoloration.
- Glue Dots: These small, adhesive dots are a great alternative to liquid glue and won’t leave residue on the bills.
- Hot Glue Gun (Use Sparingly): If you use a hot glue gun, apply the glue to the base material and then attach the bills. Avoid direct contact between the hot glue and the money to prevent damage.
Caution: Avoid using super glue or any strong adhesive that can permanently damage the bills.
What Decorative Items Can Enhance The Look Of A Money Cake?
Decorative items can add personality and flair to your money cake, making it even more special. Consider these options:
- Ribbons: Choose ribbons in colors that match the theme or the recipient’s preferences. Wrap them around the layers of the cake for a polished look.
- Toppers: Add a topper that reflects the occasion or the recipient’s interests, such as a graduation cap, a birthday candle, or a small figure.
- Artificial Flowers: Use artificial flowers to add a touch of elegance and color.
- Graduation Hat: A small graduation hat can be placed on top of the cake for a graduation-themed gift.
- Construction Paper for Signage: Create a small sign with a personalized message or the recipient’s name.
By gathering these supplies, you’ll be well-prepared to create a stunning and memorable money cake. money-central.com offers additional tips and resources to help you craft the perfect financial gift.
3. How To Build The Base Of A Money Cake?
Building a solid base is the first step in creating a stunning money cake. The base provides the necessary structure and stability for the layers of money and decorations. Here’s a step-by-step guide to help you construct a reliable foundation for your money cake.
How Do You Cut And Prepare The Base Layers?
- Select Your Material: Choose from foam boards, cake boards, or cardboard, depending on your preference and the desired sturdiness.
- Measure and Cut:
- Use a ruler and pencil to draw circles of varying sizes on your chosen material. Each circle will represent a different layer of the cake.
- The bottom layer should be the largest, with each subsequent layer slightly smaller to create a tiered effect.
- Use scissors or a box cutter to carefully cut out the circles. If using a box cutter, ensure you have a cutting mat underneath to protect your work surface.
- Reinforce (If Using Cardboard):
- If using cardboard, cut out multiple circles for each layer and glue them together to add strength and prevent bending.
How Do You Assemble The Base Layers For Stability?
- Attach the Bottom Layer:
- If you’re using a cake board as the bottom layer, you can proceed directly to the next step.
- If using foam board or cardboard, ensure it is sturdy enough to support the weight of the money and decorations.
- Create Height Between Layers:
- To create height between the layers, use rolls of ribbon, green foam circles, or small cardboard tubes.
- Hot glue these supports to the bottom layer, spacing them evenly around the perimeter.
- Attach the Next Layer:
- Carefully place the next smaller circle on top of the supports.
- Use hot glue to secure the circle to the supports, ensuring it is stable.
- Repeat for Additional Layers:
- Repeat the process of adding supports and attaching circles for each subsequent layer, making sure each layer is securely attached to the one below it.
How Do You Decorate The Base To Match The Theme?
- Cover the Sides:
- Use poster board or ribbon to cover the sides of the base layers.
- Cut strips of poster board or ribbon that are wide enough to cover the height of each layer.
- Attach the strips to the sides of the base using hot glue, ensuring a clean and seamless look.
- Choose Colors Wisely:
- Select colors that match the theme of the occasion or the recipient’s favorite colors.
- For example, use school colors for a graduation cake or festive colors for a birthday cake.
- Add Decorative Touches:
- Enhance the base with additional decorative elements such as:
- Ribbons wrapped around each layer
- Artificial flowers or greenery
- Decorative paper or fabric
- Glitter or paint for added sparkle
- Enhance the base with additional decorative elements such as:
By following these steps, you can create a sturdy and visually appealing base for your money cake. Remember to take your time and ensure each layer is securely attached for a professional finish. Visit money-central.com for more creative ideas and resources to help you build the perfect money cake base.
 Supplies for creating a money cake, including foam board, poster board, rubber bands, and a hot glue gun
4. How To Prepare And Attach The Money To The Cake?
Preparing and attaching the money to the cake is a crucial step in creating a visually appealing and exciting gift. The way you handle the money and secure it to the base can significantly impact the overall look and feel of the money cake.
What Is The Best Way To Roll Or Fold The Money?
- Rolling:
- Tools: Use a pencil or a small dowel to help roll the bills tightly and evenly.
- Technique: Place the bill flat and roll it around the pencil, starting from one end. Once rolled, secure it with a small, clear rubber band.
- Size: The size of the roll depends on the desired look and the amount of money you want to use. Larger rolls require fewer bills.
- Folding:
- Technique: Fold the bills into various shapes such as fans, triangles, or origami figures. There are many online tutorials that can guide you through different folding techniques.
- Creases: Ensure the folds are crisp and neat for a professional look.
- Securing: Use small pieces of double-sided tape or glue dots to hold the folds in place.
How Do You Attach The Money Securely Without Damaging It?
- Safe Adhesives:
- Double-Sided Tape: Use small pieces of double-sided tape on the back of each rolled or folded bill to attach it to the base. Make sure the tape is acid-free to prevent discoloration of the money.
- Glue Dots: Glue dots are a great alternative to liquid glue and won’t leave residue on the bills.
- Hot Glue (Use Sparingly): If using a hot glue gun, apply the glue to the base material and then attach the bills. Avoid direct contact between the hot glue and the money to prevent damage.
- Placement:
- Orientation: Ensure the numbers on the bills are facing forward for a consistent and appealing look.
- Spacing: Arrange the bills close enough to create a full and layered effect, but not so close that they are cramped or overlapping excessively.
- Rubber Bands:
- Use large rubber bands around each layer of money to keep them secure and in place.
- Hide the rubber bands by covering them with ribbon or other decorative elements.
How Do You Arrange The Money For The Best Visual Effect?
- Layering:
- Start at the bottom layer and work your way up, attaching the rolled or folded bills in a circular pattern around the base.
- Overlap each layer slightly to create a tiered effect.
- Color and Denomination:
- Mix different denominations to add visual interest. For example, alternate between $1, $5, $10, and $20 bills.
- Arrange the colors strategically to create patterns or highlights.
- Direction:
- Ensure all the bills are facing the same direction for a uniform look.
- Slight variations in the angle of the bills can add texture and dimension.
- Coverage:
- Fill any gaps with additional bills or decorative elements to ensure the base is fully covered and the money cake looks complete.
By following these steps, you can prepare and attach the money to your cake in a way that is both secure and visually stunning. money-central.com offers additional tips and resources to help you craft the perfect financial gift.
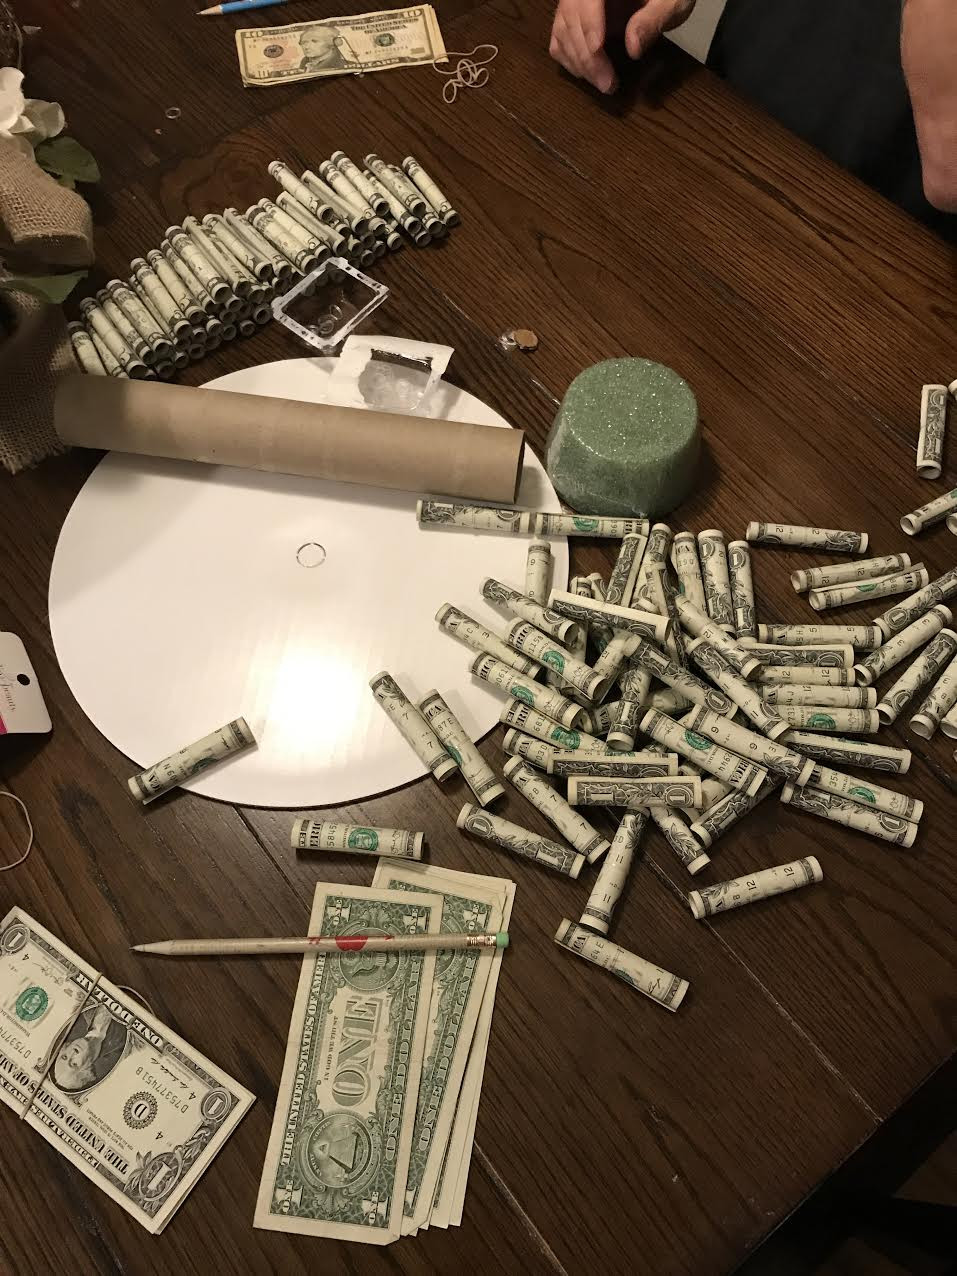 Rolling money with a pencil and securing it with a rubber band for a money cake
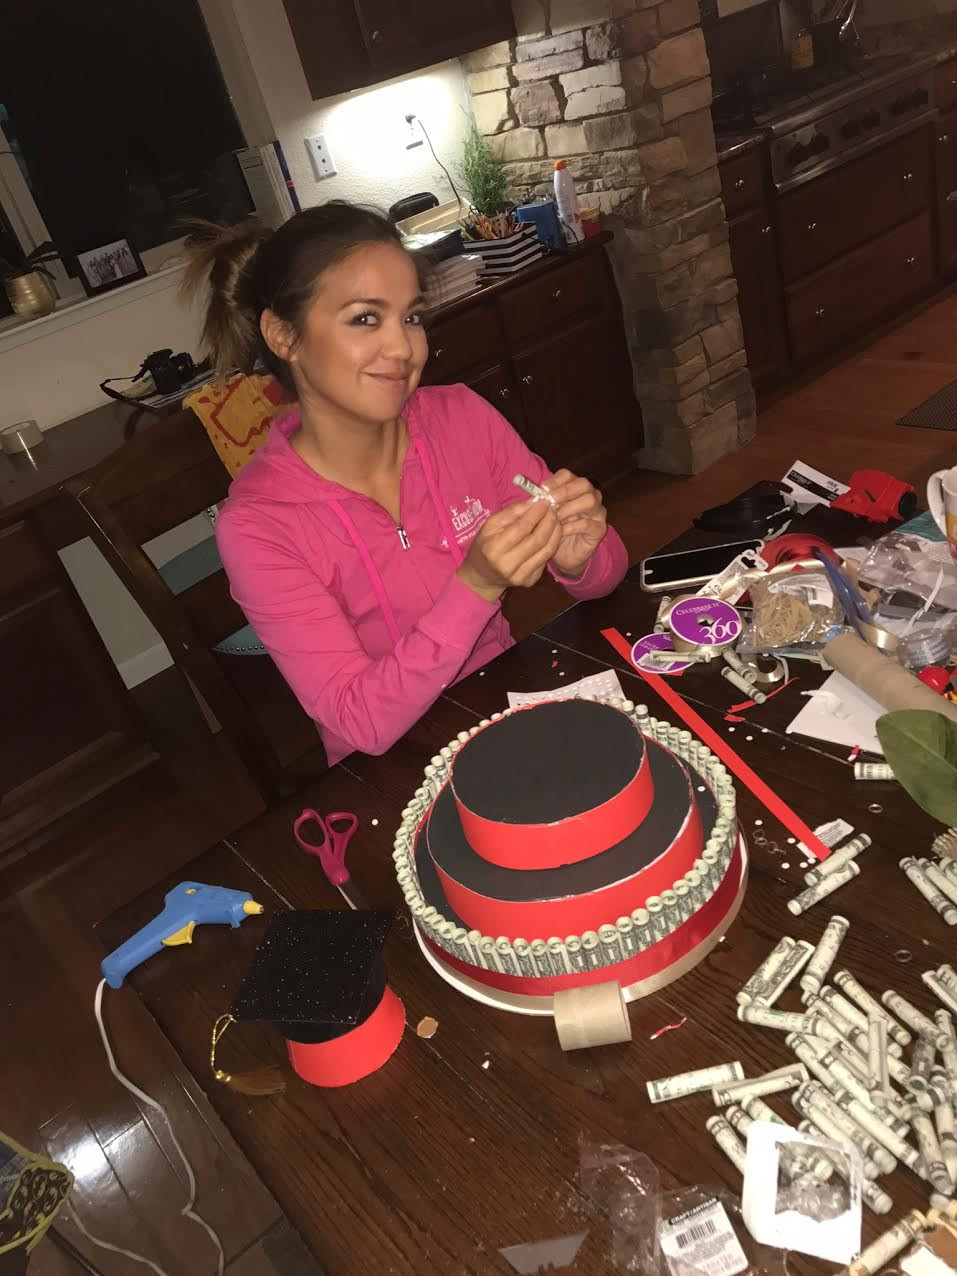
5. How To Add Decorative Elements And Finishing Touches?
Adding decorative elements and finishing touches is what transforms a basic money cake into a personalized and eye-catching masterpiece. These final steps allow you to tailor the cake to the specific occasion and the recipient’s preferences, making it a truly special and memorable gift.
What Kind Of Ribbons And Toppers Can Be Used?
- Ribbons:
- Types: Choose from satin, grosgrain, velvet, or sheer ribbons, depending on the desired look and feel.
- Colors: Select colors that match the theme of the occasion or the recipient’s favorite colors.
- Width: Use a combination of wide and narrow ribbons to add depth and dimension.
- Application: Wrap the ribbons around each layer of the cake, securing them with hot glue or double-sided tape.
- Toppers:
- Occasion-Specific: Choose toppers that reflect the occasion, such as a graduation cap for a graduation, a birthday candle for a birthday, or a wedding figurine for a wedding.
- Personalized: Create a custom topper with the recipient’s name, initials, or a special message.
- DIY: Make your own topper using materials like cardstock, glitter, and small figurines.
How Do You Create Personalized Signage For The Cake?
- Design:
- Software: Use a computer and design software (such as Microsoft Word, Adobe Photoshop, or Canva) to create a personalized sign.
- Message: Include a heartfelt message, the recipient’s name, or a quote that is meaningful to them.
- Font and Style: Choose a font and style that matches the theme of the cake and is easy to read.
- Printing:
- Paper: Print the sign on high-quality paper or cardstock for a professional look.
- Size: Adjust the size of the sign to fit the top layer of the cake without overwhelming it.
- Attachment:
- Support: Attach the sign to a small wooden skewer or a piece of sturdy wire for support.
- Placement: Insert the skewer or wire into the top layer of the cake, ensuring the sign is securely in place.
How Do You Add Other Decorative Elements Such As Flowers Or Photos?
- Flowers:
- Artificial Flowers: Use artificial flowers to add a touch of elegance and color. Choose flowers that match the theme of the cake and are easy to attach.
- Placement: Arrange the flowers around the top layer of the cake or between the layers for a layered effect.
- Attachment: Use hot glue or floral wire to secure the flowers in place.
- Photos:
- Selection: Choose small photos of the recipient or memorable moments to add a personal touch.
- Preparation: Print the photos in a small size and laminate them to protect them from damage.
- Attachment: Attach the photos to small wooden skewers or clips and insert them into the cake.
- Additional Decorations:
- Glitter: Add glitter to the ribbons, flowers, or signage for a sparkling effect.
- Confetti: Sprinkle confetti around the base of the cake for a festive touch.
- Bows: Create small bows using ribbon and attach them to the layers of the cake for added decoration.
By adding these decorative elements and finishing touches, you can create a money cake that is not only a generous gift but also a beautiful and personalized work of art. money-central.com offers additional tips and resources to help you craft the perfect financial gift.
 Assembling a money cake layer by layer
6. What Are Some Creative Variations Of A Money Cake?
While the traditional money cake is a popular choice, there are numerous creative variations you can explore to make your gift even more unique and personalized. These variations can incorporate different themes, materials, and presentation styles to suit any occasion and recipient.
How Can You Make A Themed Money Cake For Different Occasions?
- Graduation Money Cake:
- Theme: Use school colors and incorporate graduation-themed elements such as a miniature graduation cap, diploma, and tassels.
- Signage: Include a sign with the graduate’s name, graduation year, and a congratulatory message.
- Topper: Add a custom topper featuring the graduate’s photo or a motivational quote.
- Birthday Money Cake:
- Theme: Use the recipient’s favorite colors and incorporate birthday-themed elements such as candles, balloons, and confetti.
- Signage: Include a sign with the recipient’s name and age, along with a birthday message.
- Topper: Add a custom topper featuring the recipient’s photo or a fun birthday-themed figurine.
- Wedding Money Cake:
- Theme: Use elegant colors such as white, gold, and silver, and incorporate wedding-themed elements such as miniature wedding figurines, flowers, and ribbons.
- Signage: Include a sign with the couple’s names and wedding date, along with a congratulatory message.
- Topper: Add a custom topper featuring the couple’s photo or a romantic wedding-themed figurine.
- Holiday Money Cake:
- Theme: Use holiday-themed colors and incorporate holiday-themed elements such as ornaments, snowflakes, and miniature figurines.
- Signage: Include a sign with a holiday greeting, such as “Merry Christmas” or “Happy Holidays.”
- Topper: Add a custom topper featuring a holiday-themed figurine or ornament.
What Are Some Alternative Ways To Present The Money Besides Rolling It?
- Money Origami:
- Technique: Fold the bills into various origami shapes such as butterflies, flowers, or animals.
- Presentation: Arrange the origami figures on the cake base, securing them with small pieces of double-sided tape or glue dots.
- Tutorials: Find online tutorials to guide you through different money origami techniques.
- Money Flowers:
- Technique: Fold the bills into flower shapes and attach them to floral wire stems.
- Presentation: Arrange the money flowers on the cake base, creating a bouquet-like effect.
- Materials: Use floral tape and wire to secure the flowers and create a professional look.
- Money Pockets:
- Technique: Create small pockets using decorative paper or fabric and insert the bills into the pockets.
- Presentation: Attach the pockets to the cake base, creating a layered effect.
- Customization: Personalize the pockets with the recipient’s name or a special message.
How Can You Incorporate Other Small Gifts Or Treats Into The Money Cake?
- Gift Cards:
- Selection: Choose gift cards that match the recipient’s interests, such as a restaurant gift card, a movie theater gift card, or a retail store gift card.
- Presentation: Attach the gift cards to the cake base, along with the rolled or folded bills.
- Arrangement: Arrange the gift cards strategically to create a balanced and visually appealing look.
- Candies and Treats:
- Selection: Choose the recipient’s favorite candies or treats, such as chocolates, gummies, or cookies.
- Presentation: Arrange the candies and treats around the cake base, filling any gaps and adding a festive touch.
- Attachment: Secure the candies and treats with small pieces of double-sided tape or glue dots.
- Small Trinkets:
- Selection: Choose small trinkets that match the recipient’s interests, such as keychains, jewelry, or miniature figurines.
- Presentation: Attach the trinkets to the cake base, along with the rolled or folded bills.
- Arrangement: Arrange the trinkets strategically to create a personalized and meaningful gift.
By exploring these creative variations, you can make your money cake a truly unique and memorable gift. money-central.com offers additional tips and resources to help you craft the perfect financial gift.
 A money cake decorated with graduation-themed elements
7. What Are The Financial Considerations When Making A Money Cake?
While a money cake is a creative and fun way to gift cash, it’s important to consider the financial aspects to ensure you stay within your budget and make the most of your gift. Planning ahead and being mindful of your spending can help you create a stunning money cake without breaking the bank.
How Do You Determine A Budget For The Money Cake?
- Assess Your Finances:
- Income and Expenses: Start by evaluating your current income and expenses to determine how much you can comfortably spend on the gift.
- Savings: Consider dipping into your savings if you have a specific amount allocated for gifts or special occasions.
- Set a Limit:
- Affordable Amount: Determine an affordable amount that won’t strain your budget. This will be the total amount you’re willing to spend on the money cake, including the cash and all the supplies.
- Flexibility: Allow for some flexibility in your budget to accommodate unexpected costs or additional decorative elements you may want to add.
- Prioritize:
- Cash vs. Supplies: Decide how much of your budget will be allocated to the cash component of the cake and how much will be used for the base, decorations, and other supplies.
- Value: Prioritize the cash amount if you want the gift to be primarily monetary, or allocate more to the supplies if you want to create a visually elaborate cake.
What Are Some Ways To Reduce The Cost Of Making A Money Cake?
- DIY Supplies:
- Repurpose Materials: Use items you already have at home, such as cardboard boxes, ribbons, and wrapping paper, to create the base and decorations.
- Homemade Toppers: Make your own toppers using cardstock, glitter, and small figurines instead of buying expensive store-bought toppers.
- Couponing and Discounts:
- Craft Stores: Take advantage of coupons and discounts offered by craft stores like Michaels, Hobby Lobby, and Joann Fabrics.
- Online Deals: Look for online deals and promo codes for craft supplies and decorative elements.
- Dollar Store Finds:
- Budget-Friendly Options: Shop at dollar stores for budget-friendly options for ribbons, artificial flowers, and other decorative elements.
- Creative Alternatives: Find creative alternatives to expensive supplies, such as using colorful paper instead of ribbon or making your own confetti.
- Minimize Cash:
- Smaller Denominations: Use smaller denominations, such as $1 and $5 bills, to fill the cake without spending a lot of money.
- Partial Coverage: Cover only the visible parts of the cake with money and use other decorative elements to fill in the gaps.
How Can You Ensure The Money Used Is In Good Condition And Authentic?
- Bank Visit:
- Fresh Bills: Visit your local bank and request crisp, new bills for your money cake. Banks often have uncirculated bills available.
- Variety: Ask for a mix of denominations to add visual interest to the cake.
- Check for Authenticity:
- Security Features: Examine the bills for security features such as watermarks, security threads, and color-shifting ink.
- Official Website: Refer to the U.S. Bureau of Engraving and Printing’s website for information on how to identify genuine U.S. currency.
- Handle with Care:
- Clean Hands: Wash your hands before handling the bills to prevent dirt and oils from transferring to the money.
- Storage: Store the bills in a clean, dry place until you’re ready to use them for the money cake.
By considering these financial aspects, you can create a beautiful and memorable money cake that fits your budget and ensures the money is in good condition. money-central.com offers additional tips and resources to help you craft the perfect financial gift.
 Money cake adorned with ribbons and decorations
8. What Are The Legal And Ethical Considerations When Using Real Money In Gifts?
When using real money in gifts like money cakes, it’s important to be aware of the legal and ethical considerations to ensure you’re handling currency responsibly and respectfully. Understanding these aspects can help you avoid potential issues and create a gift that is both thoughtful and compliant with regulations.
Are There Any Laws Against Defacing Or Damaging Currency?
- Federal Law:
- 18 U.S. Code § 333: According to this law, it is illegal to mutilate, cut, disfigure, perforate, unite, or cement together any bank bill, draft, note, or other evidence of debt issued by any national banking association, Federal Reserve Bank, or Federal Reserve System, with the intent to render such item unfit to be reissued.
- Intent Matters:
- Intent to Defraud: The key element is the intent to render the currency unfit for circulation. Minor alterations that don’t significantly damage the bill are generally not prosecuted.
- Practical Application:
- Money Cakes: When making a money cake, avoid actions that would permanently damage the bills, such as cutting, tearing, or using strong adhesives that leave residue.
- Safe Practices: Use methods like rolling, folding, and securing with rubber bands or removable tape to minimize any potential damage.
How Do You Ensure The Money Is Still Usable After Being Part Of A Gift?
- Gentle Handling:
- Avoid Damage: Handle the bills with care to prevent tearing, crumpling, or other forms of damage.
- Cleanliness: Ensure your hands are clean when handling the money to avoid transferring dirt or oils.
- Removable Adhesives:
- Double-Sided Tape: Use small pieces of double-sided tape that can be easily removed without leaving residue or damaging the bill.
- Glue Dots: Opt for glue dots that provide a secure hold but can be peeled off without causing harm.
- Rubber Bands:
- Secure Rolling: Use small, clear rubber bands to secure rolled bills. Ensure the rubber bands are not too tight to avoid creasing the money.
- Avoid Staples and Permanent Glues:
- No Staples: Never use staples to attach money to the cake, as they can cause permanent damage.
- No Permanent Glues: Avoid using super glue or other strong adhesives that can’t be removed without damaging the bill.
What Are Some Ethical Considerations When Gifting Money?
- Respectful Presentation:
- Dignity: Present the money in a way that respects its value and the recipient’s dignity. Avoid making the gift seem trivial or disrespectful.
- Appropriate Occasions: Ensure the money cake is appropriate for the occasion and the relationship you have with the recipient.
- Privacy:
- Discretion: Be mindful of the recipient’s privacy when gifting money. Avoid making a public spectacle of the gift, especially if the recipient is private about financial matters.
- Personal Touch: Add a personal touch to the gift to show that you put thought and effort into it, rather than just giving money as an easy option.
- Cultural Sensitivity:
- Awareness: Be aware of any cultural norms or traditions that may affect how money gifts are perceived.
- Appropriate Amounts: Consider gifting an amount that is culturally appropriate and respectful.
- Transparency:
- Honesty: Be honest about the value of the gift and avoid any misleading or deceptive practices.
- No Strings Attached: Ensure the money is given without any hidden expectations or conditions.
By keeping these legal and ethical considerations in mind, you can create a money cake that is both a thoughtful and responsible gift. money-central.com offers additional tips and resources to help you craft the perfect financial gift.
 A finished money cake ready for gifting
9. How To Store And Transport A Money Cake Safely?
Proper storage and transportation are crucial for ensuring your carefully crafted money cake arrives in perfect condition. Whether you’re storing it overnight or transporting it to a special event, these tips will help you protect your creation.
What Is The Best Way To Protect The Cake From Damage During Storage?
- Covering the Cake:
- Plastic Wrap: Use clear plastic wrap to gently cover the money cake. This will protect it from dust, moisture, and potential damage.
- Avoid Tight Wrapping: Be careful not to wrap the plastic too tightly, as this could crush the decorations or dislodge the money.
- Appropriate Container:
- Cake Box: If possible, use a sturdy cake box that is large enough to accommodate the money cake without squeezing it.
- DIY Box: If you don’t have a cake box, create a makeshift container using a cardboard box. Reinforce the bottom and sides with tape for added stability.
- Cool, Dry Place:
- Temperature: Store the money cake in a cool, dry place away from direct sunlight and heat sources.
- Humidity: Avoid storing the cake in humid environments, as moisture can damage the money and decorations.
- Flat Surface:
- Level Ground: Ensure the cake is placed on a flat, level surface to prevent it from tipping over or sliding.
- Secure Placement: If necessary, use a non-slip mat or a small amount of double-sided tape to secure the cake to the surface.
How Do You Transport The Cake Without It Falling Apart?
- Sturdy Base:
- Reinforced Base: Make sure the base of the money cake is sturdy and well-supported. If necessary, add extra layers of cardboard or foam board for added stability.
- Secure Attachment: Ensure all the layers of the cake are securely attached to each other using hot glue or double-sided tape.
- Appropriate Container:
- Secure Fit: Use a cake box or container that fits the money cake snugly, preventing it from shifting during transport.
- Padding: Add padding around the cake using bubble wrap, packing peanuts, or crumpled paper to cushion it from bumps and vibrations.
- Careful Handling:
- Two Hands: Always carry the money cake with two hands, supporting it from the bottom.
- Slow and Steady: Walk slowly and steadily, avoiding sudden movements or jerky motions.
- Vehicle Transport:
- Flat Surface: Place the cake on a flat surface in your vehicle, such as the floor or a seat.
- Secure Placement: Use seatbelts or other restraints to secure the cake and prevent it from sliding or tipping over.
- Temperature Control: Keep the vehicle cool to prevent the decorations from melting or becoming damaged.
What Precautions Should You Take During Outdoor Transport?
- Weather Protection:
- Umbrella or Cover: If transporting the money cake in inclement weather, use an umbrella or cover to protect it from rain, snow, or excessive sunlight.
- Temperature Control: Avoid transporting the cake in extreme temperatures, as heat can melt the decorations and cold can damage the money.
- Wind Protection:
- Secure Covering: Use a secure covering, such as a lid or plastic wrap, to protect the money cake from wind.
- Weight: Add weight to the base of the cake to prevent it from being blown over by strong gusts of wind.
- Short Distance:
- Minimize Exposure: Transport the money cake over the shortest distance possible to minimize its exposure to the elements.
- Direct Route: Take a direct route to your destination, avoiding bumpy roads or areas with heavy traffic.
By following these storage and transportation tips, you can ensure your money cake arrives safely and looks its best when presented to the recipient. money-central.com offers additional tips and resources to help you craft the perfect financial gift.
10. Money Cakes: Frequently Asked Questions (FAQs)
Here are some frequently asked questions about money cakes to help you understand more about this creative and fun way to gift cash.
What exactly is a money cake?
A money cake is a decorative gift made by arranging real currency, typically dollar bills, into the shape of a cake; it’s a creative alternative to simply giving cash or a check.
What occasions are money cakes suitable for?
Money cakes are versatile gifts suitable for graduations, birthdays, weddings, holidays, baby showers, retirements, and celebrating achievements.