Putting money into your Apple Account is simple, and money-central.com is here to guide you. You can effortlessly add funds to your Apple Account balance for purchases like apps, games, music, and iCloud+ storage. We’ll explore the multiple ways to add value to your account, including using Wallet on your iPhone, the App Store, or your Mac or PC, providing the perfect solution for your needs.
1. What Is an Apple Account and Why Put Money Into It?
An Apple Account is essentially your digital wallet for all things Apple. Putting money into it allows you to make purchases within the Apple ecosystem without directly using a credit or debit card each time.
1.1. Understanding Your Apple Account
Your Apple Account is the key to accessing Apple’s services. It’s used for everything from downloading apps to streaming music and storing your data in the cloud. It’s like a digital wallet that holds funds specifically for Apple-related transactions.
1.2. Benefits of Adding Funds
Adding funds to your Apple Account balance offers several advantages:
- Convenience: Make purchases quickly without entering payment details repeatedly.
- Security: Reduce the risk of exposing your credit card information.
- Budgeting: Control spending by setting a specific amount to spend on Apple services.
- Gift Giving: Perfect for gifting Apple services or apps to friends and family.
- Auto-Reload: Set up automatic top-ups to ensure you always have funds available.
1.3. What Can You Purchase with Your Apple Account Balance?
Once you’ve added money to your Apple Account, you can use it to purchase a variety of Apple products and services, including:
- Apps and Games: Download apps and games from the App Store.
- Music, Movies, and TV Shows: Buy or rent content from the iTunes Store or Apple TV app.
- iCloud+ Storage: Upgrade your iCloud storage plan for more space.
- Apple Music Subscription: Pay for your Apple Music subscription.
- In-App Purchases: Make purchases within apps and games.
2. How Do I Add Money to My Apple Account Balance on iPhone?
There are two primary methods for adding money to your Apple Account balance directly from your iPhone: through the Wallet app and through the App Store.
2.1. Adding Money Via Wallet App
If you have added your Apple Account card to the Wallet app, this is a quick and convenient method.
2.1.1. Step-by-Step Guide
- Open the Wallet app on your iPhone.
- Tap on your Apple Account card.
- Tap Add Money.
- If using Apple Pay, ensure your iPhone runs iOS 18.1 or later.
- Follow the on-screen instructions to complete the purchase, verifying if prompted.
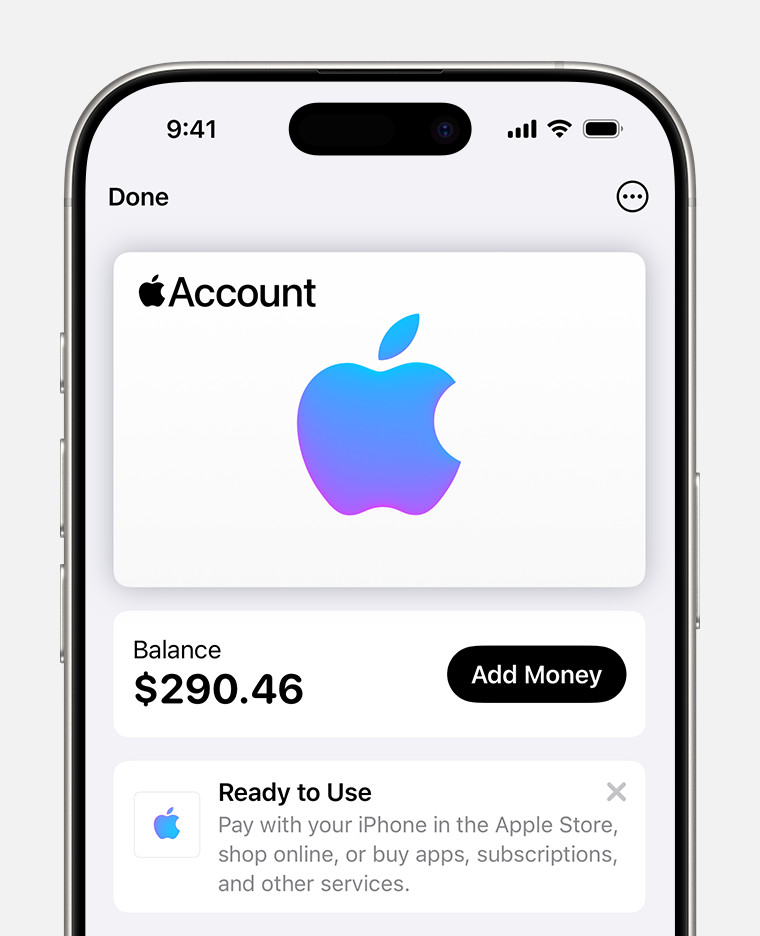 Apple Account card displayed in the Wallet app, showing the 'Add Money' option
2.1.2. Requirements
- Your Apple Account card must be added to the Wallet app.
- A payment method accepted in Wallet is required.
- For Apple Pay, ensure your iPhone is updated to iOS 18.1 or later.
2.1.3. Troubleshooting
If you encounter issues, make sure your Apple Account card is correctly added to Wallet and that your payment method is valid.
2.2. Adding Money Via App Store
This method is accessible to all iPhone users, regardless of whether they use Apple Wallet.
2.2.1. Step-by-Step Guide
- Open the App Store app.
- Tap your photo, initials, or the sign-in button at the top of the screen.
- Tap Add Money to Account.
- Select the amount you want to add, or set up Auto Reload.
- Follow the on-screen instructions to complete the purchase, verifying if prompted.
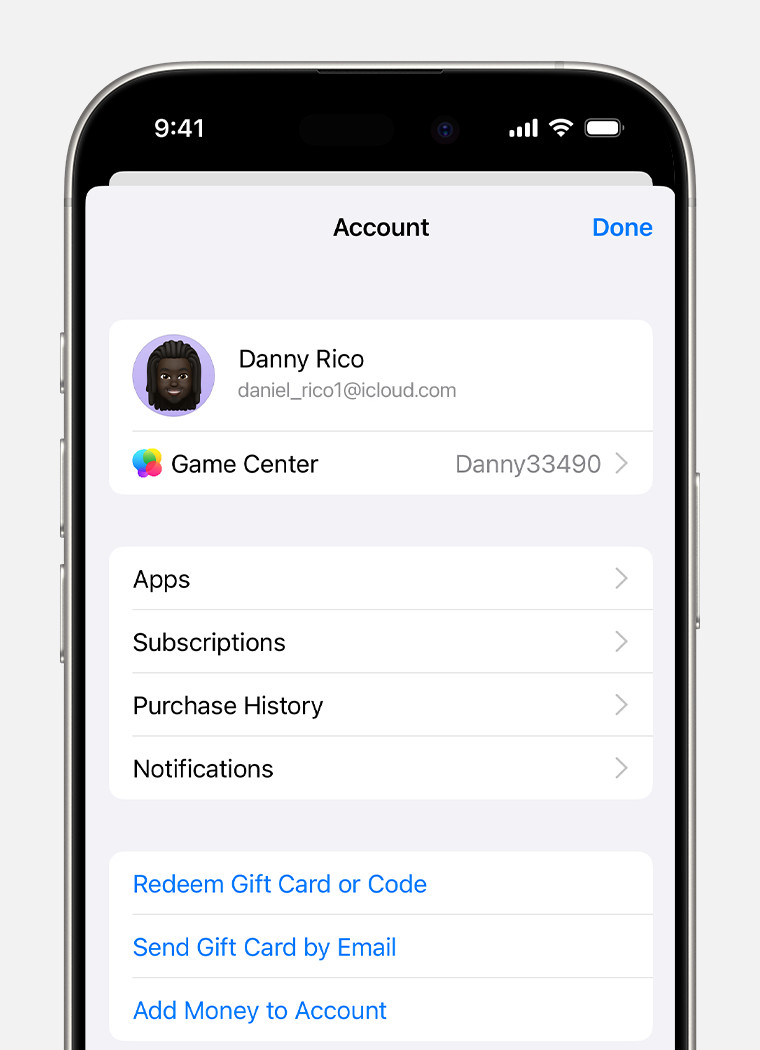 Apple Account options in the App Store, highlighting the 'Add Money to Account' feature
2.2.2. Setting Up Auto Reload
Auto Reload ensures your Apple Account balance is automatically replenished when it runs low, or on a recurring basis. To set it up:
- Follow steps 1-3 above.
- Tap Set Up Auto Reload.
- Choose the frequency (weekly, biweekly, or monthly) or set a trigger when your balance is low.
- Confirm your settings.
2.2.3. Why Use Auto Reload?
- Convenience: Never run out of funds for purchases.
- Budgeting: Control spending with regular, automated top-ups.
- Peace of Mind: Ensure subscriptions are always paid on time.
3. How Do I Add Money to My Apple Account Balance on Mac or PC?
You can also add money to your Apple Account balance from your Mac or PC using the App Store, Apple Music app, or Apple TV app.
3.1. Step-by-Step Guide for Mac
- Open the App Store on your Mac.
- Click your name or the account button in the sidebar.
- Click Account Settings at the top of the screen.
- On the Account Information page, click Add Money.
- Choose the amount you want to add, or set up Auto Reload.
- Click Next, then confirm your selection.
3.2. Step-by-Step Guide for PC
- Open the Apple Music app or Apple TV app on your PC.
- Click your name or the account button in the sidebar.
- Click View My Account.
- On the Account Information page, click Add Money.
- Choose the amount you want to add, or set up Auto Reload.
- Click Next, then confirm your selection.
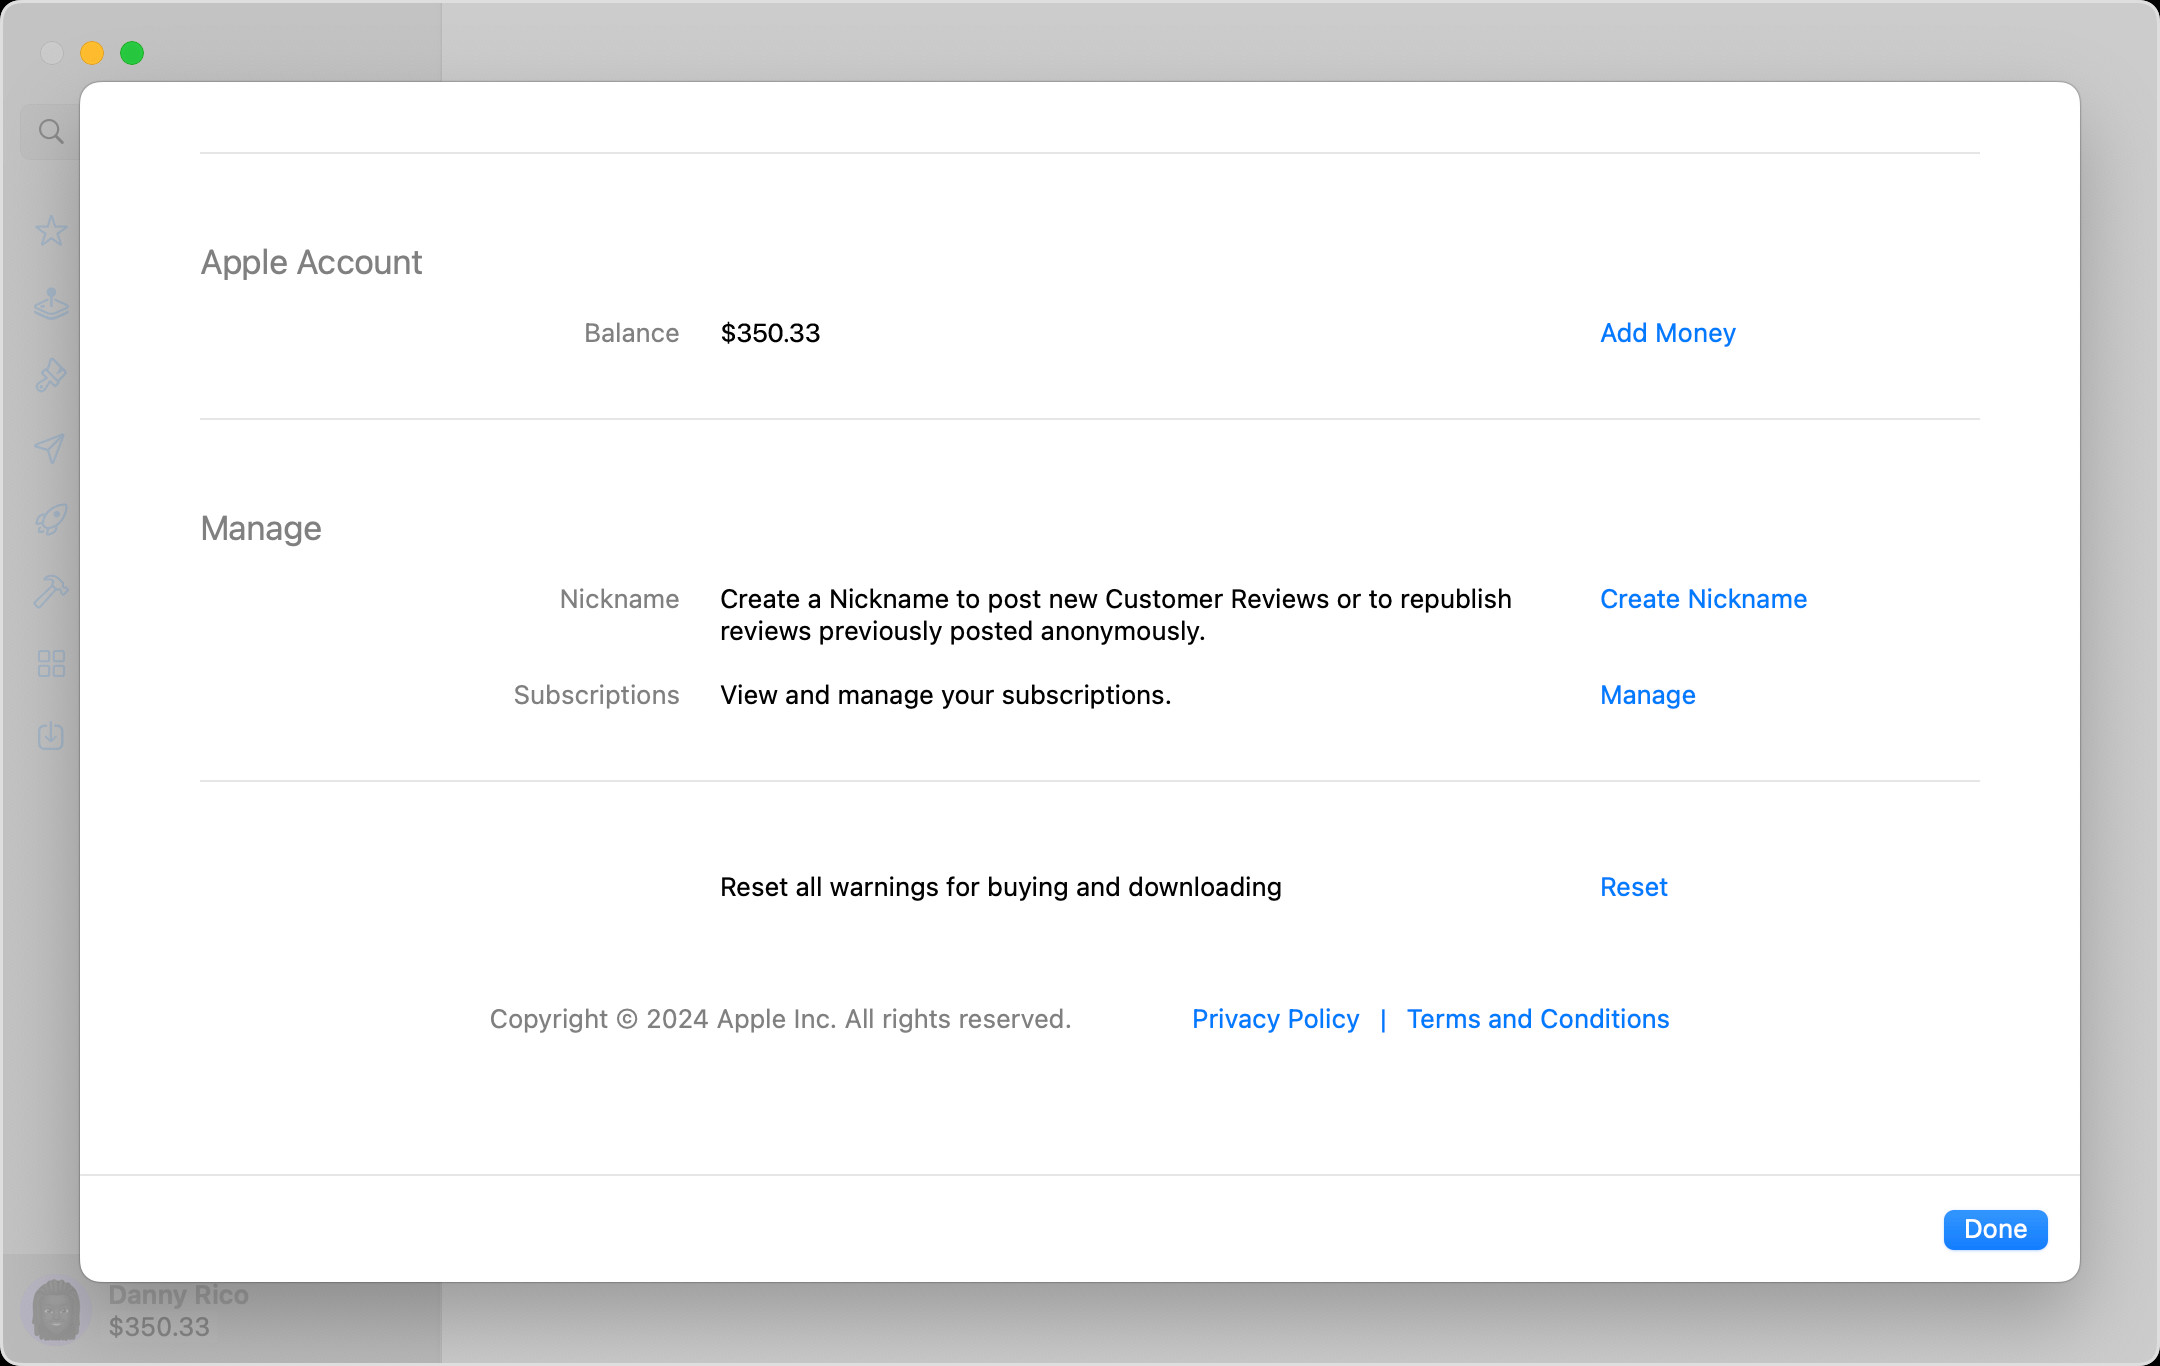 A macOS screen showing the Account Information page with options to add money to the Apple Account balance
3.3. Managing Auto Reload on Computer
To turn off Auto Reload on your computer:
- Follow the steps above to access the Add Money page.
- Click Turn Off Auto Reload.
4. Understanding Auto Reload for Your Apple Account Balance
Auto Reload is a convenient feature that automatically adds funds to your Apple Account balance, ensuring you always have enough money for your Apple-related purchases. This section will detail how Auto Reload works and its various benefits.
4.1. How Auto Reload Works
Auto Reload can be set up to add funds to your Apple Account balance either on a recurring schedule or when your balance drops below a certain threshold. Here’s a breakdown of the two main Auto Reload options:
- Recurring Schedule:
- Funds are added to your Apple Account balance weekly, biweekly, or monthly.
- This is ideal for users who have consistent spending habits within the Apple ecosystem.
- Low Balance Trigger:
- Automatically adds funds when your Apple Account balance falls below a specified amount.
- Perfect for users who want to ensure they always have enough funds for unexpected purchases or ongoing subscriptions.
4.2. Benefits of Using Auto Reload
- Convenience:
- Eliminates the need to manually add funds to your Apple Account balance.
- Ensures you always have sufficient funds for your Apple Music subscription, iCloud storage, or other recurring expenses.
- Continuous Access to Services:
- Prevents interruptions in your Apple services due to insufficient funds.
- Maintains uninterrupted access to streaming, storage, and app usage.
- Budgeting:
- Helps manage and control spending by setting up regular, automated top-ups.
- Reduces the likelihood of overspending by pre-setting the amount to be added.
- Time-Saving:
- Reduces the time spent managing your Apple Account balance.
- Automates the process, allowing you to focus on other tasks.
4.3. Setting Up Auto Reload on Different Devices
Auto Reload can be easily set up on your iPhone, Mac, or PC. The process varies slightly depending on the device you are using.
4.3.1. On iPhone
- Open the App Store app.
- Tap your photo, initials, or the sign-in button at the top of the screen.
- Tap Add Money to Account.
- Tap Set Up Auto Reload.
- Follow the on-screen instructions to choose your preferred frequency (weekly, biweekly, or monthly) or set a trigger when your balance is low.
- Confirm your settings.
4.3.2. On Mac or PC
- On your Mac, open the App Store. On a PC, open the Apple Music app or Apple TV app.
- Click your name or the account button in the sidebar.
- Click Account Settings (Mac) or View My Account (PC).
- On the Account Information page, click Add Money.
- Choose the amount you want to add, or click Set Up Auto Reload.
- Follow the on-screen instructions to set your Auto Reload preferences.
- Click Next, then confirm your selection.
4.4. Managing and Canceling Auto Reload
You can easily manage or cancel Auto Reload at any time through your Apple Account settings.
4.4.1. On iPhone
- Open the App Store app.
- Tap your photo, initials, or the sign-in button at the top of the screen.
- Tap Add Money to Account.
- If Auto Reload is active, you will see an option to Turn Off Auto Reload. Tap it to cancel.
4.4.2. On Mac or PC
- On your Mac, open the App Store. On a PC, open the Apple Music app or Apple TV app.
- Click your name or the account button in the sidebar.
- Click Account Settings (Mac) or View My Account (PC).
- On the Account Information page, click Add Money.
- If Auto Reload is active, click Turn Off Auto Reload to cancel.
4.5. Regional Availability
It’s important to note that Auto Reload options may not be available in all countries and regions. Apple periodically updates the availability of its services based on local regulations and market conditions.
5. Troubleshooting Common Issues with Your Apple Account Balance
While adding money to your Apple Account balance is generally straightforward, you may encounter some common issues. This section provides troubleshooting steps to help resolve these problems.
5.1. Payment Method Issues
One of the most common issues is related to the payment method used to add funds to your Apple Account balance.
5.1.1. Invalid or Expired Payment Method
- Problem: Your credit or debit card is invalid, expired, or has insufficient funds.
- Solution:
- Verify Card Details: Ensure that the card number, expiration date, and CVV code are entered correctly.
- Update Card Information: If your card has expired, update the expiration date and CVV code in your Apple Account settings.
- Check Account Balance: Ensure that your card has sufficient funds to cover the amount you are trying to add.
- Contact Your Bank: Contact your bank to ensure that there are no restrictions or blocks on your card that may be preventing the transaction.
5.1.2. Payment Method Not Accepted
- Problem: The payment method you are trying to use is not accepted by Apple.
- Solution:
- Check Accepted Payment Methods: Refer to Apple’s support documentation to ensure that your payment method is accepted in your region.
- Use an Alternative Payment Method: Try using a different credit or debit card, or consider using Apple Pay or an Apple Gift Card.
5.1.3. Verification Issues
- Problem: You are prompted to verify your purchase with a text message or other method, but you are not receiving the verification code.
- Solution:
- Check Your Phone Number: Ensure that the phone number associated with your Apple Account is correct.
- Resend Verification Code: Request a new verification code.
- Contact Apple Support: If you are still not receiving the verification code, contact Apple Support for assistance.
5.2. Apple Account Balance Issues
Another set of common issues involves problems with your Apple Account balance itself.
5.2.1. Balance Not Updating
- Problem: You have added funds to your Apple Account, but the balance is not updating.
- Solution:
- Restart Your Device: Restart your iPhone, Mac, or PC to refresh your Apple Account balance.
- Sign Out and Sign Back In: Sign out of your Apple Account and then sign back in to refresh your balance.
- Check Your Purchase History: Review your purchase history to ensure that the transaction was successful.
- Contact Apple Support: If the balance still does not update, contact Apple Support for assistance.
5.2.2. Incorrect Balance
- Problem: Your Apple Account balance is incorrect or does not reflect recent purchases or additions.
- Solution:
- Review Your Purchase History: Check your purchase history to identify any discrepancies.
- Contact Apple Support: If you find any errors in your purchase history or if your balance is still incorrect, contact Apple Support.
5.2.3. Unable to Use Apple Account Balance
- Problem: You are unable to use your Apple Account balance to make purchases.
- Solution:
- Check for Restrictions: Ensure that there are no restrictions on your Apple Account that may be preventing you from using your balance.
- Verify Sufficient Funds: Ensure that you have sufficient funds in your Apple Account balance to cover the purchase.
- Contact Apple Support: If you are still unable to use your balance, contact Apple Support for assistance.
5.3. Auto Reload Issues
Issues with Auto Reload can also occur, requiring specific troubleshooting steps.
5.3.1. Auto Reload Not Working
- Problem: Auto Reload is not automatically adding funds to your Apple Account balance as expected.
- Solution:
- Verify Auto Reload Settings: Ensure that Auto Reload is enabled and that the settings are configured correctly.
- Check Payment Method: Verify that the payment method associated with Auto Reload is valid and up to date.
- Contact Your Bank: Contact your bank to ensure that there are no restrictions or blocks on your card that may be preventing the transaction.
- Contact Apple Support: If Auto Reload still does not work, contact Apple Support for assistance.
5.3.2. Auto Reload Adding Incorrect Amount
- Problem: Auto Reload is adding an incorrect amount to your Apple Account balance.
- Solution:
- Review Auto Reload Settings: Check your Auto Reload settings to ensure that the correct amount is specified.
- Adjust Auto Reload Settings: If the amount is incorrect, adjust the settings to the desired amount.
6. Alternative Methods to Add Money to Your Apple Account
While adding money to your Apple Account using a credit or debit card is common, alternative methods provide flexibility and convenience. This section explores these options, including using Apple Gift Cards and Apple Pay.
6.1. Using Apple Gift Cards
Apple Gift Cards are a popular alternative for adding funds to your Apple Account. They can be purchased at various retailers and online.
6.1.1. Where to Buy Apple Gift Cards
- Apple Store: Physical and digital gift cards are available at Apple Stores.
- Online Retailers: Major online retailers like Amazon, Best Buy, and Target offer digital and physical Apple Gift Cards.
- Grocery Stores and Pharmacies: Many grocery stores and pharmacies also sell Apple Gift Cards.
6.1.2. How to Redeem Apple Gift Cards
- On iPhone or iPad:
- Open the App Store app.
- Tap your photo, initials, or the sign-in button at the top of the screen.
- Tap Redeem Gift Card or Code.
- You can either use the camera to scan the gift card or enter the code manually.
- On Mac:
- Open the App Store app.
- Click your name or the sign-in button in the sidebar.
- Click Redeem Gift Card.
- Enter the gift card code.
- On PC:
- Open the Apple Music app or Apple TV app.
- Click your name or the sign-in button in the sidebar.
- Click Redeem.
- Enter the gift card code.
6.1.3. Benefits of Using Apple Gift Cards
- Gift Option: They make an excellent gift for friends and family who use Apple products.
- Budget Control: Helps control spending by using a pre-set amount.
- Security: Reduces the need to use credit or debit cards directly.
6.2. Using Apple Pay
Apple Pay is a convenient and secure way to add funds to your Apple Account, especially if you already use it for other transactions.
6.2.1. Setting Up Apple Pay
- Open the Wallet app:
- On your iPhone, open the Wallet app.
- Add a Card:
- Tap the + button to add a new card.
- Follow the on-screen instructions to add your credit or debit card.
- Verify Your Card:
- Your bank may require additional verification.
6.2.2. Adding Money to Your Apple Account with Apple Pay
- Open the App Store:
- On your iPhone, open the App Store app.
- Go to Your Account:
- Tap your photo, initials, or the sign-in button at the top of the screen.
- Add Money to Account:
- Tap Add Money to Account.
- Select Amount:
- Choose the amount you want to add.
- Use Apple Pay:
- Confirm the purchase using Apple Pay.
6.2.3. Benefits of Using Apple Pay
- Convenience: Quick and easy transactions.
- Security: Transactions are secure and use tokenization to protect your card information.
- Integration: Seamless integration with other Apple services.
6.3. Other Payment Methods
Depending on your region, Apple may offer other payment methods for adding funds to your Apple Account.
6.3.1. Direct Carrier Billing
In some countries, you can add funds to your Apple Account using direct carrier billing, where the charge is added to your mobile phone bill.
6.3.2. Local Payment Methods
Apple may support local payment methods specific to your region, such as:
- Bank Transfers: Direct bank transfers may be available.
- E-Wallets: Support for popular e-wallets in your region.
7. Managing Your Apple Account and Spending
Effectively managing your Apple Account and monitoring your spending helps you stay in control of your finances. This section provides insights into how to manage your account and track your expenses.
7.1. Viewing Your Purchase History
Regularly reviewing your purchase history is crucial for tracking your spending and identifying any unauthorized transactions.
7.1.1. How to Access Your Purchase History
- On iPhone or iPad:
- Open the Settings app.
- Tap your name at the top.
- Tap Media & Purchases.
- Tap View Account. You may be asked to sign in.
- Tap Purchase History.
- On Mac:
- Open the App Store app.
- Click your name or the sign-in button in the sidebar.
- Click Account Information.
- Scroll down to Purchase History.
- On PC:
- Open the Apple Music app or Apple TV app.
- Click your name or the sign-in button in the sidebar.
- Click View My Account.
- Scroll down to Purchase History.
7.1.2. What Information Can You Find?
- Date of Purchase: The exact date and time of each transaction.
- Items Purchased: A detailed list of all apps, music, movies, and other items purchased.
- Amount Charged: The amount charged for each item.
- Payment Method Used: The payment method used for each transaction.
7.2. Setting Spending Limits and Restrictions
To better manage your spending, you can set spending limits and restrictions on your Apple Account, particularly useful for families with children.
7.2.1. Using Family Sharing
Family Sharing allows you to share purchases, subscriptions, and storage with up to five family members.
- Set Up Family Sharing:
- Open the Settings app on your iPhone or iPad.
- Tap your name at the top.
- Tap Family Sharing.
- Follow the on-screen instructions to set up Family Sharing.
- Enable Ask to Buy:
- For children in your family, enable the Ask to Buy feature. This requires them to get your approval before making any purchases.
7.2.2. Screen Time Restrictions
Screen Time allows you to set restrictions on app usage, purchases, and content.
- Open the Settings app:
- On your iPhone or iPad, open the Settings app.
- Go to Screen Time:
- Tap Screen Time.
- Set Restrictions:
- Tap Content & Privacy Restrictions.
- Enable the restrictions and set limits for purchases and content.
7.3. Managing Subscriptions
Managing your subscriptions is essential to avoid unwanted charges.
7.3.1. How to View and Cancel Subscriptions
- On iPhone or iPad:
- Open the Settings app.
- Tap your name at the top.
- Tap Subscriptions.
- On Mac:
- Open the App Store app.
- Click your name or the sign-in button in the sidebar.
- Click Account Information.
- Scroll down to Manage Subscriptions.
- On PC:
- Open the Apple Music app or Apple TV app.
- Click your name or the sign-in button in the sidebar.
- Click View My Account.
- Scroll down to Manage Subscriptions.
7.3.2. Tips for Managing Subscriptions
- Review Regularly: Regularly review your subscriptions to identify any you no longer need.
- Cancel Unused Subscriptions: Cancel any subscriptions that you are not using to save money.
- Set Reminders: Set reminders for subscription renewal dates to decide whether to continue or cancel.
8. Security Tips for Your Apple Account Balance
Ensuring the security of your Apple Account balance is crucial to protect your funds and personal information. This section provides essential security tips to help you keep your account safe.
8.1. Using a Strong Password
A strong, unique password is the first line of defense against unauthorized access to your Apple Account.
8.1.1. Creating a Strong Password
- Length: Use at least 12 characters.
- Complexity: Include a combination of uppercase and lowercase letters, numbers, and symbols.
- Uniqueness: Do not reuse passwords from other accounts.
- Avoid Personal Information: Do not use personal information such as your name, birthday, or address.
8.1.2. Changing Your Password
- On iPhone or iPad:
- Open the Settings app.
- Tap your name at the top.
- Tap Password & Security.
- Tap Change Password.
- On Mac:
- Open System Preferences.
- Click Apple ID.
- Click Password & Security.
- Click Change Password.
- Online:
- Go to the Apple ID website and sign in.
- Click Security in the sidebar.
- Click Change Password.
8.2. Enabling Two-Factor Authentication
Two-Factor Authentication (2FA) adds an extra layer of security by requiring a verification code from a trusted device or phone number when you sign in.
8.2.1. How to Enable Two-Factor Authentication
- On iPhone or iPad:
- Open the Settings app.
- Tap your name at the top.
- Tap Password & Security.
- Tap Turn On Two-Factor Authentication.
- On Mac:
- Open System Preferences.
- Click Apple ID.
- Click Password & Security.
- Click Turn On Two-Factor Authentication.
- Online:
- Go to the Apple ID website and sign in.
- Click Security in the sidebar.
- Click Turn On Two-Factor Authentication.
8.2.2. Benefits of Two-Factor Authentication
- Increased Security: Makes it much harder for unauthorized users to access your account, even if they have your password.
- Peace of Mind: Provides added security for your personal information and financial data.
8.3. Recognizing and Avoiding Phishing Scams
Phishing scams are attempts to trick you into revealing your personal information by disguising as legitimate emails or messages.
8.3.1. What to Look For
- Suspicious Emails: Be wary of emails that ask for your Apple ID, password, or other personal information.
- Poor Grammar: Phishing emails often contain grammatical errors and typos.
- Generic Greetings: Be cautious of emails that use generic greetings like “Dear Customer.”
- Urgent Requests: Phishing emails often create a sense of urgency to pressure you into taking immediate action.
8.3.2. How to Protect Yourself
- Verify the Sender: Always verify the sender of the email before clicking on any links or providing any information.
- Go Directly to the Source: Instead of clicking on links in emails, go directly to the Apple website or app.
- Never Share Your Password: Never share your Apple ID password or other personal information with anyone.
- Report Suspicious Emails: Report any suspicious emails to Apple.
9. Understanding Apple’s Terms and Conditions
Familiarizing yourself with Apple’s terms and conditions is crucial for understanding your rights and responsibilities when using their services, including your Apple Account balance.
9.1. Key Points in Apple’s Terms of Service
9.1.1. Acceptable Use
- Compliance with Laws: You must comply with all applicable laws and regulations when using Apple services.
- Prohibited Activities: You are prohibited from engaging in activities that are illegal, harmful, or disruptive to Apple services.
9.1.2. Account Security
- Responsibility: You are responsible for maintaining the security of your Apple Account, including your password and two-factor authentication.
- Unauthorized Use: You must notify Apple immediately if you become aware of any unauthorized use of your account.
9.1.3. Payments and Refunds
- Payment Methods: Apple specifies the accepted payment methods for adding funds to your Apple Account.
- Refund Policy: Apple’s refund policy outlines the conditions under which you may be eligible for a refund.
9.1.4. Termination
- Termination by Apple: Apple reserves the right to terminate your account if you violate the terms of service.
- Termination by You: You can terminate your account at any time by contacting Apple Support.
9.2. Apple Account Balance Specifics
9.2.1. Restrictions on Use
- Geographic Restrictions: Your Apple Account balance may be subject to geographic restrictions, limiting its use to specific countries or regions.
- Types of Purchases: Some types of purchases may not be eligible for payment using your Apple Account balance.
9.2.2. Expiration
- Expiration Dates: Apple Gift Cards and Apple Account balances may be subject to expiration dates in certain jurisdictions. Check the terms and conditions for your region.
9.2.3. Non-Transferability
- Non-Transferable: Your Apple Account balance is non-transferable and cannot be redeemed for cash, except where required by law.
10. Getting Help and Support
If you encounter issues or have questions about your Apple Account balance, numerous resources are available to provide assistance.
10.1. Apple Support Website
The Apple Support website is a comprehensive resource for troubleshooting issues and finding answers to common questions.
10.1.1. How to Use the Apple Support Website
- Go to the Apple Support Website:
- Visit support.apple.com.
- Search for Your Issue:
- Use the search bar to enter your issue or question.
- Browse Topics:
- Browse the available topics to find relevant articles and guides.
10.1.2. Available Resources
- Troubleshooting Guides: Step-by-step guides for resolving common issues.
- Frequently Asked Questions (FAQs): Answers to common questions about Apple products and services.
- User Manuals: Detailed user manuals for Apple devices and software.
10.2. Contacting Apple Support
If you cannot find the information you need on the Apple Support website, you can contact Apple Support directly.
10.2.1. How to Contact Apple Support
- Online:
- Visit the Apple Support website and select your product or service.
- Choose the topic that best describes your issue.
- Select the option to chat with an Apple Support advisor or schedule a call.
- Phone:
- Find the phone number for your region on the Apple Support website.
- Call Apple Support and follow the prompts to speak with an advisor.
- In Person:
- Visit an Apple Store and speak with a Genius Bar representative.
10.2.2. Preparing for Your Support Interaction
- Gather Information: Gather as much information as possible about your issue, including the device you are using, the software version, and any error messages you have received.
- Write Down Your Questions: Write down your questions in advance to ensure that you cover all the important points.
- Be Prepared to Provide Details: Be prepared to provide details about your Apple Account and any recent transactions.
10.3. Apple Community Forums
The Apple Community Forums are a great place to connect with other Apple users and get help from experienced community members.
10.3.1. How to Use the Apple Community Forums
- Visit the Apple Community Forums:
- Go to discussions.apple.com.
- Search for Your Issue:
- Use the search bar to find discussions related to your issue.
- Post Your Question:
- If you cannot find an existing discussion that addresses your issue, post your question in the appropriate forum.
FAQ: Putting Money Into Your Apple Account
-
Q1: Can I use an Apple Gift Card to add money to my Apple Account?
Yes, you can redeem Apple Gift Cards to add funds to your Apple Account balance.
-
Q2: Is there a limit to how much money I can add to my Apple Account?
Apple may impose limits on the amount of money you can add to your account. Check the terms and conditions for details.
-
Q3: Can I transfer my Apple Account balance to someone else?
No, Apple Account balances are non-transferable.
-
Q4: What happens to my Apple Account balance if I close my account?
You may be able to request a refund for any remaining balance, subject to Apple’s policies and legal requirements.
-
Q5: Can I use my Apple Account balance for all Apple services?
While most Apple services accept Apple Account balances, there may be exceptions.
-
Q6: How do I check my Apple Account balance?
You can view your Apple Account balance in the App Store, Settings app, or on the Apple ID website.
-
Q7: What should I do if I suspect unauthorized activity on my Apple Account?
Change your password immediately and contact Apple Support.
-
Q8: Can I set up automatic payments for subscriptions using my Apple Account balance?
Yes, you can use your Apple Account balance to pay for subscriptions.
-
Q9: Are there any fees associated with adding money to my Apple Account?
Apple does not typically charge fees for adding money to your Apple Account, but check with your payment provider for any potential fees.
-
Q10: How can I turn off Auto Reload?
You can turn off Auto Reload in the App Store settings on your iPhone or Mac.
Adding money to your Apple Account provides a seamless way to manage your Apple-related expenses. Whether you choose to use your Wallet app, the App Store, or your computer, the process is straightforward and secure. For more detailed information and to explore additional financial tools, visit money-central.com. Address: 44 West Fourth Street, New York, NY 10012, United States. Phone: +1 (212) 998-0000. Don’t wait; start controlling your finances today.