Adding money to your Apple Account balance is simple, allowing you to seamlessly purchase apps, games, music, iCloud+, and more from the Apple ecosystem. At money-central.com, we’ll guide you through the easy steps to add funds to your account, whether you’re using your iPhone, Mac, or PC. By understanding these methods, you can efficiently manage your Apple-related expenses and enjoy uninterrupted access to your favorite digital content.
1. What is an Apple Account Balance, and Why Add Money?
An Apple Account balance is essentially a digital wallet you can use within the Apple ecosystem. Adding funds to this balance provides a convenient and secure way to pay for various Apple services and products.
- Convenience: Instead of entering your credit card information every time you make a purchase, you can simply use your Apple Account balance.
- Control: Adding a specific amount to your balance helps you budget your spending on Apple services.
- Gift Option: You can gift Apple Account balances to friends and family, allowing them to enjoy Apple’s offerings.
- Security: Using your Apple Account balance reduces the risk of exposing your credit card details to multiple transactions.
2. How to Add Money to Your Apple Account Balance on iPhone
There are two primary methods for adding funds to your Apple Account balance directly from your iPhone: through the Wallet app and via the App Store.
2.1. Adding Money via the Wallet App
This method is available in certain countries and regions. Ensure you have added your Apple Account card to your Wallet to proceed.
-
Open the Wallet App: Locate and tap the Wallet app icon on your iPhone.
-
Select Your Apple Account Card: Find your Apple Account card within the Wallet and tap on it.
-
Tap Add Money: You will see an “Add Money” option; tap it.
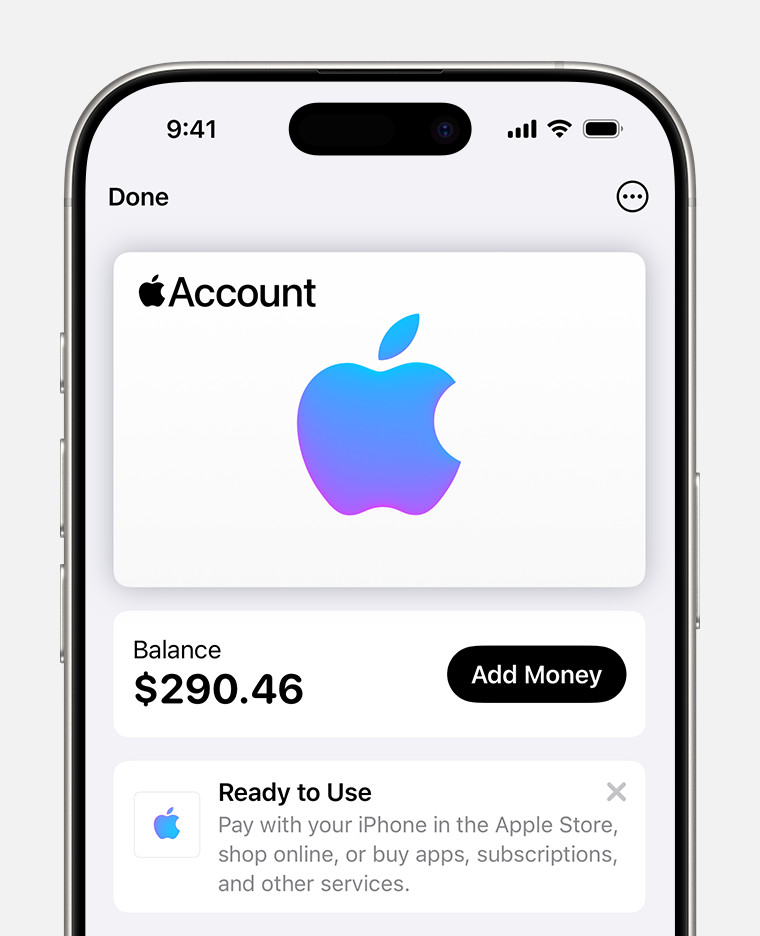 Apple Account Card in Wallet
Adding funds to your Apple Account balance through the Wallet app for a convenient payment method.
-
Choose Amount and Payment Method: Select the amount you wish to add and confirm your payment method. Ensure your iPhone is running iOS 18.1 or later to use your selected Apple Pay payment method in Wallet.
-
Follow On-Screen Instructions: Complete the purchase by following the prompts, which may include verifying the transaction via text message or another method.
2.2. Adding Money via the App Store
This method is universally accessible on iPhones and offers a straightforward way to top up your Apple Account balance.
-
Open the App Store: Find and open the App Store app on your iPhone.
-
Tap Your Profile Icon: Tap your photo, initials, or the sign-in button located at the top of the screen.
-
Tap Add Money to Account: Select the “Add Money to Account” option.
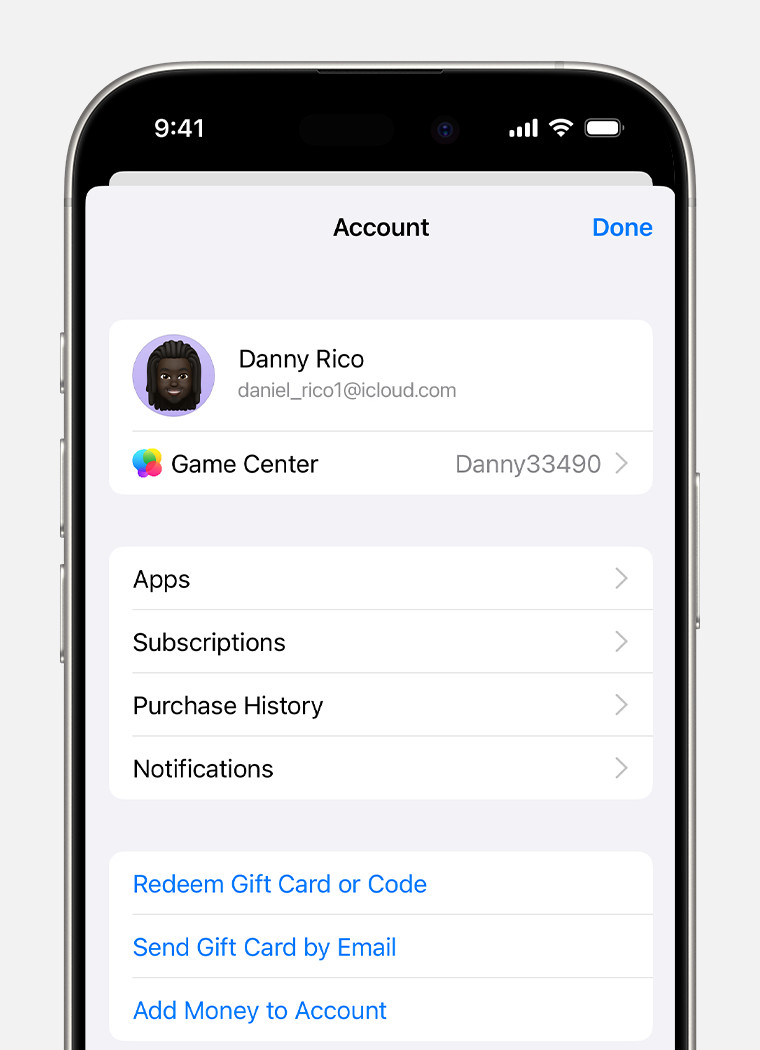 Adding Funds via App Store Account
Adding money to your Apple Account balance through the App Store for buying apps and subscriptions.
-
Choose Amount or Set Up Auto Reload: Select the amount you want to add, or set up Auto Reload for future automatic top-ups.
-
Follow On-Screen Instructions: Complete the purchase by following the prompts, which may include verifying the transaction via text message or another method.
3. How to Add Money to Your Apple Account Balance on Mac or PC
You can also add money to your Apple Account balance from your Mac or PC. The process is slightly different depending on whether you are using a Mac or a PC.
3.1. Adding Money on a Mac
-
Open the App Store: On your Mac, open the App Store application.
-
Access Account Information:
- Click your name or the account button in the sidebar.
- Click “Account Settings” at the top of the screen.
-
Click Add Money: On the Account Information page, click the “Add Money” option.
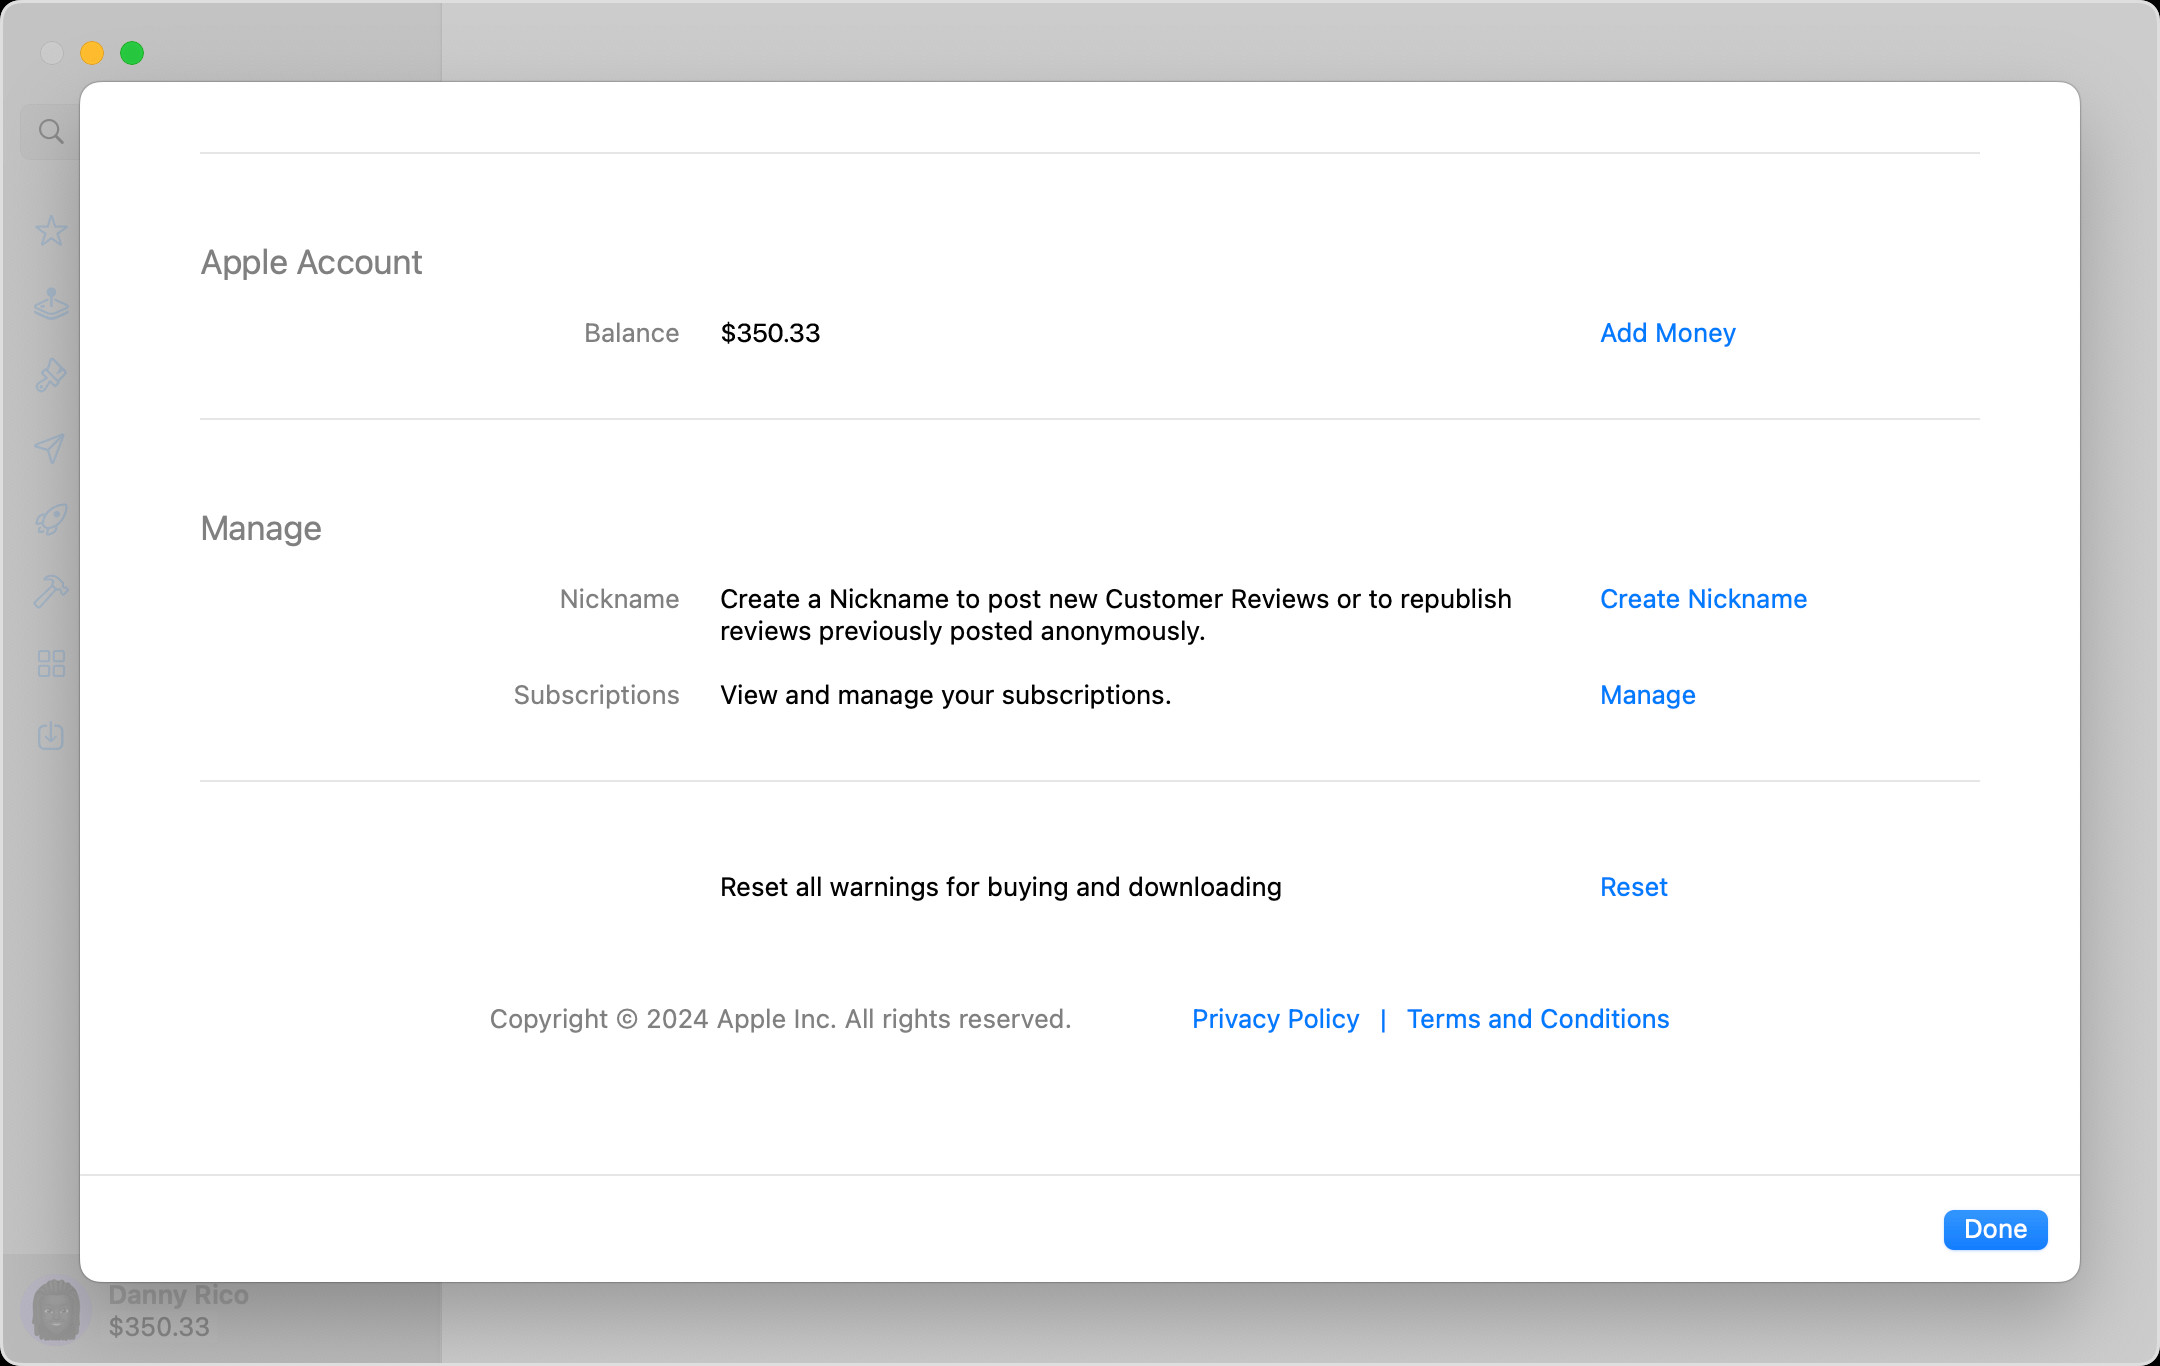 Account Information Page on macOS
Accessing the “Add Money” option on a Mac to manage your Apple Account balance.
-
Choose Amount or Set Up Auto Reload: Select the amount you want to add, or set up Auto Reload for future automatic top-ups.
-
Click Next and Confirm: Click “Next” and confirm your selection. You might need to verify your purchase through a text message or another method.
3.2. Adding Money on a PC
- Open Apple Music App or Apple TV App: On your PC, open either the Apple Music app or the Apple TV app.
- Access Account Information:
- Click your name or the account button in the sidebar.
- Click “View My Account.”
- Click Add Money: On the Account Information page, click the “Add Money” option.
- Choose Amount or Set Up Auto Reload: Select the amount you want to add, or set up Auto Reload for future automatic top-ups.
- Click Next and Confirm: Click “Next” and confirm your selection. You might need to verify your purchase through a text message or another method.
4. Setting Up Auto Reload for Your Apple Account Balance
Auto Reload is a convenient feature that automatically adds funds to your Apple Account balance. This ensures you always have enough funds for your Apple-related purchases. You can set it up to reload weekly, biweekly, monthly, or when your balance is low.
4.1. How to Set Up Auto Reload
- On iPhone: Go to the “Add Money to Account” page in the App Store and tap “Set Up Auto Reload.”
- On Mac or PC: Go to the “Add Money” page in the App Store, Apple Music app, or Apple TV app, and click “Set Up Auto Reload.”
- Configure Settings: Choose your preferred reload frequency (weekly, biweekly, or monthly) or set it to top up when your balance is low.
4.2. How to Turn Off Auto Reload
- On iPhone: Go to the “Add Money to Account” page in the App Store and tap “Turn Off Auto Reload.”
- On Mac or PC: Go to the “Add Money” page in the App Store, Apple Music app, or Apple TV app, and click “Turn Off Auto Reload.”
5. What Payment Methods Can You Use to Add Money?
Apple accepts a variety of payment methods for adding money to your Apple Account balance. The availability of specific payment methods can vary by region.
5.1. Accepted Payment Methods
- Credit Cards: Visa, MasterCard, American Express, and Discover are generally accepted.
- Debit Cards: Most debit cards associated with major banks are accepted.
- Apple Pay: You can use Apple Pay if you have it set up with a valid payment method.
- Apple Gift Cards: These can be redeemed to add funds to your Apple Account balance.
5.2. Troubleshooting Payment Issues
If you encounter issues while adding money, consider the following:
- Verify Payment Information: Ensure your card details are accurate and up-to-date.
- Check Card Limits: Make sure your credit or debit card has sufficient available credit or funds.
- Contact Your Bank: If the issue persists, contact your bank to ensure there are no restrictions on your card.
- Try a Different Payment Method: If possible, try using a different payment method to see if the issue is specific to one card.
6. How to Use Your Apple Account Balance
Once you have funds in your Apple Account balance, you can use them to purchase various Apple services and products.
6.1. Purchasing Apps and Games
You can use your Apple Account balance to buy apps and games from the App Store.
- Open the App Store: Launch the App Store on your device.
- Find the App or Game: Search for the app or game you want to purchase.
- Tap the Price: Tap the price button to initiate the purchase.
- Confirm Purchase: If your Apple Account balance has sufficient funds, the purchase will be deducted from your balance.
6.2. Subscribing to Apple Services
You can use your Apple Account balance to pay for Apple services like iCloud+, Apple Music, Apple TV+, and more.
- Go to Settings: Open the Settings app on your device.
- Tap Your Name: Tap your name at the top of the screen.
- Tap Subscriptions: Select the “Subscriptions” option.
- Choose a Subscription: Choose the Apple service you want to subscribe to.
- Confirm Purchase: If your Apple Account balance has sufficient funds, the subscription will be charged to your balance.
6.3. Making In-App Purchases
Many apps offer in-app purchases that can be paid for using your Apple Account balance.
- Open the App: Launch the app that offers in-app purchases.
- Navigate to In-App Purchases: Find the section within the app where you can make purchases.
- Select Purchase: Choose the item or feature you want to buy.
- Confirm Purchase: If your Apple Account balance has sufficient funds, the purchase will be deducted from your balance.
7. Managing Your Apple Account Balance
It’s essential to keep track of your Apple Account balance and manage it effectively to avoid any surprises.
7.1. Checking Your Balance
You can check your Apple Account balance on your iPhone, Mac, or PC.
- On iPhone:
- Open the App Store app.
- Tap your photo, initials, or the sign-in button at the top of the screen.
- Your Apple Account balance will be displayed below your name.
- On Mac:
- Open the App Store app.
- Click your name or the account button in the sidebar.
- Your Apple Account balance will be displayed.
- On PC:
- Open the Apple Music app or Apple TV app.
- Click your name or the account button in the sidebar.
- Your Apple Account balance will be displayed.
7.2. Viewing Your Purchase History
You can view your purchase history to see how you have spent your Apple Account balance.
- Go to Settings: Open the Settings app on your device.
- Tap Your Name: Tap your name at the top of the screen.
- Tap Media & Purchases: Select “Media & Purchases.”
- Tap View Account: Choose “View Account.” You may need to sign in.
- Tap Purchase History: Select “Purchase History” to view your transactions.
7.3. Setting Spending Limits
While Apple doesn’t offer a direct feature to set spending limits on your Apple Account balance, you can manage your spending by only adding a specific amount to your balance and monitoring your purchases regularly.
8. Apple Account Balance vs. Apple Pay: What’s the Difference?
It’s important to differentiate between your Apple Account balance and Apple Pay, as they serve different purposes.
8.1. Key Differences
- Apple Account Balance: A stored value that you can use specifically for Apple’s digital goods and services.
- Apple Pay: A mobile payment service that allows you to make purchases in stores, online, and in apps using your credit and debit cards stored in the Wallet app.
8.2. How They Work Together
You can use Apple Pay to add money to your Apple Account balance. Once the funds are in your balance, you can use them for Apple-related purchases.
9. Common Issues and Troubleshooting
Encountering issues while managing your Apple Account balance is not uncommon. Here are some common problems and how to troubleshoot them.
9.1. Issues Adding Money
- Problem: Unable to add money to your Apple Account balance.
- Solution:
- Verify your payment information.
- Check your card limits.
- Contact your bank to ensure there are no restrictions.
- Try a different payment method.
9.2. Issues with Auto Reload
- Problem: Auto Reload not working as expected.
- Solution:
- Ensure your payment method is valid and up-to-date.
- Check your Auto Reload settings to confirm they are configured correctly.
- Contact Apple Support if the issue persists.
9.3. Unauthorized Purchases
- Problem: Seeing unauthorized purchases in your purchase history.
- Solution:
- Change your Apple ID password immediately.
- Enable two-factor authentication for added security.
- Contact Apple Support to report the unauthorized purchases.
10. Tips for Maximizing Your Apple Account Balance
To make the most of your Apple Account balance, consider these tips:
10.1. Budgeting
Set a budget for your Apple-related expenses and only add that amount to your Apple Account balance. This will help you control your spending and avoid overspending.
10.2. Utilizing Apple Gift Cards
Purchase Apple Gift Cards when they are on sale or offered with promotions. This can help you save money on future Apple purchases.
10.3. Monitoring Your Spending
Regularly check your purchase history to track your spending and identify any unnecessary expenses.
11. Security Measures to Protect Your Apple Account
Protecting your Apple Account is crucial to prevent unauthorized access and financial loss.
11.1. Strong Passwords
Use a strong, unique password for your Apple ID. Avoid using easily guessable information like your birthday or name.
11.2. Two-Factor Authentication
Enable two-factor authentication to add an extra layer of security to your account. This requires a verification code from your trusted device when you sign in on a new device.
11.3. Avoiding Phishing Scams
Be cautious of phishing emails and messages that attempt to steal your Apple ID and password. Always verify the sender’s authenticity before clicking on any links or providing any information.
12. Apple’s Terms and Conditions for Account Balances
It’s important to be aware of Apple’s terms and conditions regarding Apple Account balances to avoid any misunderstandings or issues.
12.1. Key Points
- Apple Account balances are valid only for U.S. transactions in Apple properties.
- They are not redeemable at Apple resellers or for cash.
- No resale, refunds, or exchanges are allowed, except as required by law.
- Apple is not responsible for unauthorized use.
13. How to Contact Apple Support for Balance Issues
If you encounter any issues with your Apple Account balance that you cannot resolve on your own, contact Apple Support for assistance.
13.1. Contact Methods
- Online: Visit support.apple.com and search for “Apple Account balance” for relevant articles and contact options.
- Phone: Call 800-275-2273 for assistance.
14. Future Trends in Apple Account Management
As technology evolves, expect to see advancements in how Apple Account balances are managed and utilized.
14.1. Potential Developments
- Integration with More Services: Expect Apple Account balances to be integrated with more Apple services and products in the future.
- Enhanced Security Features: Apple may introduce new security features to protect Apple Account balances from fraud and unauthorized access.
- More Flexible Payment Options: Apple could offer more flexible payment options for adding money to your Apple Account balance.
15. Real-Life Examples of Using Apple Account Balance
To illustrate the practicality of using an Apple Account balance, here are a few real-life examples:
15.1. Example 1: College Student
A college student uses their Apple Account balance to pay for their Apple Music subscription, iCloud storage, and educational apps. They set up Auto Reload to ensure they always have enough funds for their essential services.
15.2. Example 2: Family
A family uses Apple Family Sharing and funds their children’s Apple Accounts with a monthly allowance. The children can then use this balance to purchase age-appropriate apps and games, while the parents can monitor their spending.
15.3. Example 3: Professional
A professional uses their Apple Account balance to pay for productivity apps, cloud storage for work documents, and subscriptions to professional development resources.
16. The Impact of Digital Wallets on Financial Management
Digital wallets like the Apple Account balance are transforming how people manage their finances.
16.1. Benefits of Digital Wallets
- Convenience: Digital wallets make it easy to make purchases without needing to carry physical cards or cash.
- Security: Many digital wallets offer enhanced security features like encryption and two-factor authentication.
- Tracking: Digital wallets make it easy to track your spending and manage your budget.
16.2. Challenges of Digital Wallets
- Security Risks: Digital wallets are vulnerable to hacking and fraud.
- Dependence on Technology: You need a smartphone or other device to use a digital wallet.
- Limited Acceptance: Not all merchants accept digital wallets.
17. Expert Opinions on Managing Digital Finances
Financial experts recommend several strategies for managing digital finances effectively.
17.1. Key Recommendations
- Budgeting: Create a budget and track your spending to ensure you are not overspending.
- Security: Use strong passwords and enable two-factor authentication for all your financial accounts.
- Monitoring: Regularly monitor your accounts for any unauthorized transactions.
- Education: Stay informed about the latest financial scams and how to protect yourself.
18. Resources for Further Learning About Financial Management
To deepen your knowledge of financial management, consider these resources:
18.1. Online Courses
- Coursera: Offers courses on personal finance and financial planning.
- edX: Provides courses on financial literacy and investment strategies.
- Khan Academy: Offers free resources on personal finance and economics.
18.2. Books
- “The Total Money Makeover” by Dave Ramsey
- “Rich Dad Poor Dad” by Robert Kiyosaki
- “The Intelligent Investor” by Benjamin Graham
18.3. Websites
- money-central.com: Provides articles, tools, and resources on personal finance.
- Investopedia: Offers definitions, articles, and tutorials on investing and finance.
- NerdWallet: Provides reviews and comparisons of financial products.
19. Case Studies on Successful Financial Planning
Examining case studies of successful financial planning can provide valuable insights and inspiration.
19.1. Case Study 1: Early Retirement
A couple in their late 30s successfully retired early by diligently saving and investing a significant portion of their income. They lived frugally, avoided debt, and invested in a diversified portfolio of stocks and bonds.
19.2. Case Study 2: Debt Freedom
A family eliminated their debt by creating a budget, cutting expenses, and using the debt snowball method. They focused on paying off their smallest debts first, which gave them momentum and motivation to tackle larger debts.
19.3. Case Study 3: Homeownership
A young professional successfully purchased their first home by saving for a down payment, improving their credit score, and securing a favorable mortgage rate. They researched different neighborhoods, compared loan options, and negotiated a fair price for the property.
20. The Role of Financial Advisors in Managing Your Money
Consider consulting a financial advisor for personalized guidance and support in managing your money.
20.1. Benefits of a Financial Advisor
- Expertise: Financial advisors have the knowledge and experience to help you make informed financial decisions.
- Personalization: They can create a customized financial plan that meets your specific needs and goals.
- Accountability: They can provide ongoing support and accountability to help you stay on track with your financial plan.
20.2. How to Choose a Financial Advisor
- Qualifications: Look for advisors who are certified and have a proven track record.
- Experience: Choose an advisor who has experience working with clients in similar situations to yours.
- Fees: Understand how the advisor is compensated and what fees they charge.
- Chemistry: Choose an advisor you feel comfortable working with and who understands your goals and values.
21. Frequently Asked Questions (FAQs) About Adding Money to Your Apple Account
21.1. Can I use a gift card to add money to my Apple Account balance?
Yes, you can redeem Apple Gift Cards to add funds to your Apple Account balance.
21.2. Is there a limit to how much money I can add to my Apple Account balance?
Yes, there are limits. Apple typically sets a maximum amount that can be stored in your Apple Account balance and a daily limit on how much you can add. Check Apple’s support pages for the most current limits.
21.3. Can I transfer money from my Apple Account balance to someone else?
No, you cannot directly transfer money from your Apple Account balance to another person’s account. However, you can use Family Sharing to allow family members to use your balance.
21.4. What happens to my Apple Account balance if I close my Apple ID?
If you close your Apple ID, you may forfeit any remaining balance. It’s best to use up your balance before closing your account.
21.5. Can I use my Apple Account balance to pay for physical products at an Apple Store?
No, your Apple Account balance is primarily for digital goods and services. For physical products, you would typically use Apple Pay or another payment method.
21.6. How do I cancel a purchase made with my Apple Account balance?
You can request a refund for certain purchases made with your Apple Account balance by contacting Apple Support. Refund eligibility depends on the specific item and Apple’s policies.
21.7. What if I see an unrecognized charge on my Apple Account balance?
Contact Apple Support immediately to report the unauthorized charge. They will investigate the issue and take appropriate action.
21.8. Can I use my Apple Account balance in a different country?
Apple Account balances are typically region-specific and can only be used in the country where they were purchased.
21.9. How does Auto Reload work if my payment method fails?
If your payment method fails when Auto Reload is triggered, Apple will notify you, and you’ll need to update your payment information to continue using the service.
21.10. Is it safe to store a large amount of money in my Apple Account balance?
While Apple implements security measures, it’s generally advisable to only keep the amount you need in your Apple Account balance to minimize potential risks.
Adding money to your Apple Account balance is a straightforward process that enhances your ability to enjoy Apple’s ecosystem. Whether you’re using an iPhone, Mac, or PC, the steps are simple and convenient. Understanding how to manage your balance, set up Auto Reload, and troubleshoot common issues ensures a seamless experience. Visit money-central.com for more insights and tools to optimize your financial habits and make the most of your digital spending. Are you ready to take control of your Apple-related expenses? Explore our comprehensive guides and resources at money-central.com and start managing your Apple Account balance like a pro!