Folding a money star is a fun and creative way to give a cash gift or add a unique touch to your personal finances, and money-central.com provides comprehensive instructions. This guide provides clear, step-by-step instructions on how to create a stunning origami star from dollar bills, enhancing your financial creativity and money management skills. Learn paper folding to impress your friends and family, transform ordinary bills into eye-catching origami, and master the art of modular origami.
1. What is a Money Star and Why Should You Fold One?
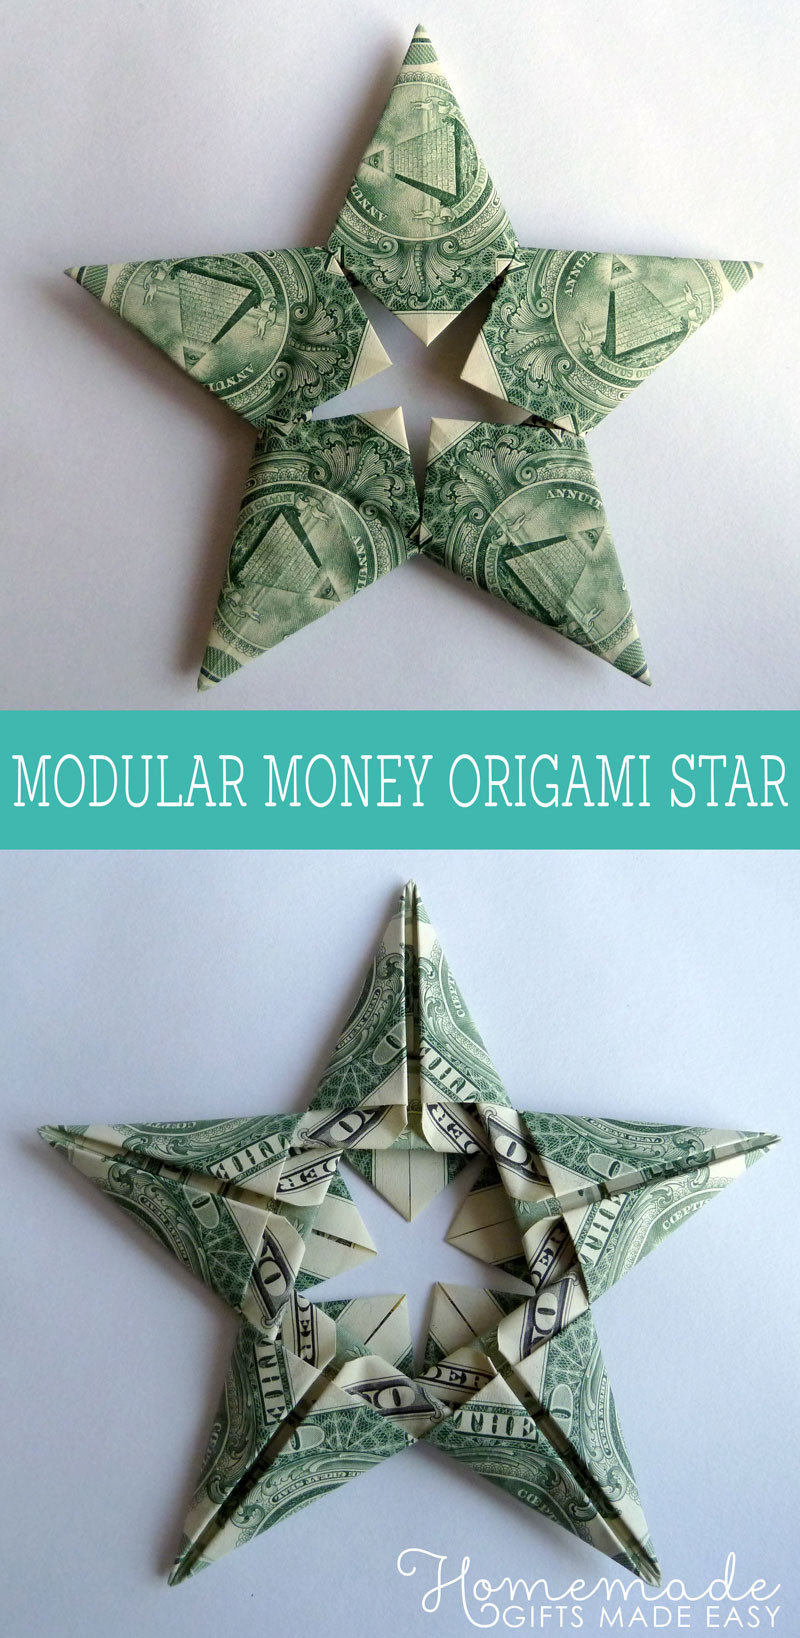
A money star, also known as a modular money origami star, is a decorative origami piece crafted by folding multiple currency bills into individual components or modules. These modules are then interlocked to form a star shape. Folding a money star is a creative way to give a cash gift and a fun way to engage with your money, promote financial literacy, and foster creative thinking.
- Unique Gift Presentation: Cash gifts can sometimes feel impersonal, but folding them into a money star adds a personal and creative touch.
- Creative Expression: Origami, in general, is an art form. Using money as the medium adds an interesting dimension, blending finance with creativity.
- Financial Education: Folding money stars can be a fun way to teach kids (and adults) about money, value, and the importance of handling it with care.
- Stress Relief: Engaging in origami can be therapeutic. The repetitive folding motions can be calming and can help reduce stress.
- Conversation Starter: A money star is an interesting object that can spark conversations, whether used as a decoration or given as a gift.
2. What Materials Do You Need to Fold a Money Star?
To embark on your money star folding journey, gather these essential materials:
- Five Dollar Bills: Fresh, crisp bills are best for folding. While any denomination will work, $1 bills are commonly used for practice.
- Flat Surface: A clean and uncluttered workspace makes folding easier.
- Patience: Origami takes practice. Don’t get discouraged if your first attempt isn’t perfect.
- Optional: Paper Clips: These can be helpful, especially when first learning, to hold folds in place.
3. How Do You Prepare Your Dollar Bills for Origami?
Preparing your dollar bills properly ensures a crisp and professional-looking origami star. Here’s how to do it:
- Choose Crisp Bills: Select bills that are as new and unwrinkled as possible. New bills hold creases better and give a cleaner final product.
- Ironing (Optional): If your bills are slightly wrinkled, you can iron them on a low setting. Place a thin cloth between the bill and the iron to protect the ink.
- Avoid Heavily Soiled Bills: Heavily soiled or damaged bills can be difficult to fold and may tear during the process.
- Handle with Clean Hands: Ensure your hands are clean and dry to prevent transferring dirt or oils onto the bills.
- Pre-Crease (Optional): For more complex folds, making a light pre-crease can help guide your folds later on.
- Practice with Paper: If you’re new to origami, practice the folding sequence with paper of the same size as a dollar bill to get the hang of the steps before using real money.
4. Step-by-Step Guide: Folding the Money Star Modules
Each point of the star requires folding a single bill into a specific shape. Here are the step-by-step instructions:
4.1. Step 1: Creating the Initial Crease
Fold the bill in half lengthwise and unfold it to create a center crease. This will serve as the central reference line for subsequent folds.
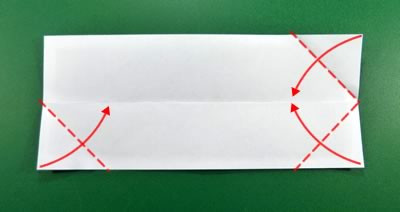
4.2. Step 2: Making the First Set of Folds
Fold the top-right and bottom-right corners toward the center crease, creating a kite-like shape on the right side. Similarly, fold the bottom-left corner to meet the center crease.
 modular money origami star step 2
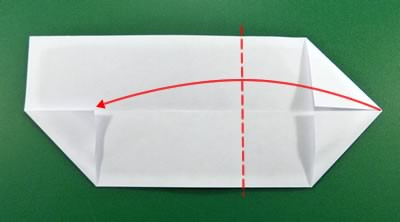
4.3. Step 3: Folding the Right Point
Fold the right point of the bill to meet the folded-up bottom-left corner. This creates a triangle shape that aligns with the left side.
 modular-money origami star step 3
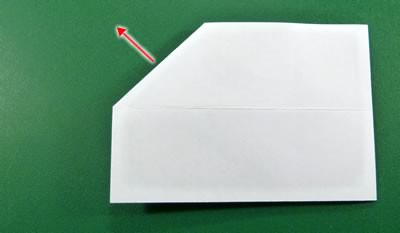
4.4. Step 4: Reversing and Folding the Corners
Turn the bill over so that the folded-in corner is at the top left. Unfold this corner, then fold both corners on the right-hand side toward the center crease, similar to making paper airplanes.
 modular money origami star step 4
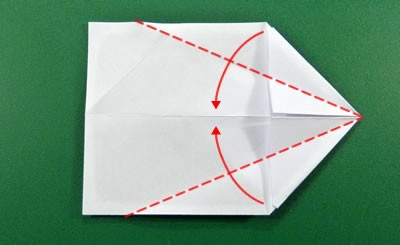
4.5. Step 5: Folding Corners Again
Fold the corners toward the center one more time to create a tighter, more defined shape.
 modular money origami star step 5
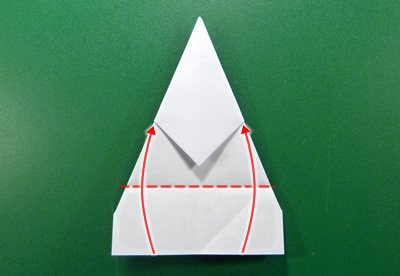
4.6. Step 6: Creating the Final Tuck
Turn the bill over again, positioning it with the pointy bit facing upward. Fold the bottom edge up and tuck it as far as possible under the triangle-shaped flap. Repeat this folding and tucking process two more times to secure the bottom edge.
 modular money origami star step 6
4.7. Step 7: Repeat the Process
Repeat steps 1-6 with the remaining four bills. Each folded bill will form one point of the modular money origami star.
5. How Do You Assemble the Modular Money Star?
Assembling the money star involves interlocking the folded bill modules. Each bill has two types of slots – a big slot and a small slot – used to connect the modules. Follow these steps:
-
Step 1: Identify the Slots: Locate the big and small slots on each folded bill. The big slot is generally more open, while the small slot is tighter.
-
Step 2: Initial Connection: Take two folded bills and arrange them so that the tab from the right bill can be inserted into the big slot on the left bill.
-
Step 3: Securing the Connection: Turn the bills over. Insert the tab from the right bill into the small slot on the left bill to secure the connection.
-
Step 4: Adding More Modules: Continue adding more bills, interlocking them in the same way. Ensure that each tab is securely inserted into the appropriate slot of the adjacent bill.
-
Step 5: Finalizing the Star: Once all five bills are connected, adjust the modules to ensure the star is symmetrical and visually appealing.
6. What are Some Tips for Making Perfect Folds?
Achieving clean, crisp folds is crucial for creating a professional-looking money star. Here are some valuable tips:
- Use Fresh Bills: Crisp, new bills hold creases better and make the folding process smoother.
- Practice First: If you’re new to origami, practice with paper cut to the same size as a dollar bill before using real money.
- Crease Sharply: Ensure each fold is sharply creased for a defined shape. Use a fingernail or a ruler’s edge to reinforce the creases.
- Be Precise: Accuracy is key in origami. Take your time to align edges and corners correctly.
- Use Tools: A bone folder or a similar tool can help create sharp, clean creases without damaging the bill.
- Watch Tutorials: Video tutorials can be extremely helpful for visualizing the folding process. Pause and rewind as needed to follow each step.
- Secure Folds: Use small paper clips to hold folds in place, especially when working with plastic money or slippery materials.
- Iron Bills (Optional): If your bills are wrinkled, iron them on a low setting with a cloth in between to protect the ink.
- Avoid Distractions: Focus on the task at hand to avoid errors. Origami requires concentration and attention to detail.
- Stay Patient: Origami can be challenging, especially for beginners. Be patient and persistent, and don’t get discouraged by mistakes.
7. What Variations Can You Try with Your Money Star?
Once you’ve mastered the basic money star, consider exploring these creative variations:
- Using Different Denominations: Use different denominations ($1, $5, $10, etc.) to create a colorful and varied money star.
- Combining Currencies: If you have access to different currencies, try mixing them to create a unique, international money star.
- Adding Embellishments: Decorate your money star with glitter, stickers, or small ribbons to add a festive touch.
- Varying the Number of Points: While the standard money star has five points, you can experiment with adding or subtracting modules to create stars with different numbers of points.
- Creating a Money Wreath: Fold multiple money stars and connect them in a circular pattern to create a festive money wreath.
- Using Colored Paper: Use colored origami paper instead of money for a more artistic and less financially valuable version.
- Incorporating into Cards: Attach a money star to the front of a greeting card for a personalized and memorable gift.
- Creating Mobiles: Hang multiple money stars from a mobile for a unique and eye-catching decoration.
- Gifting for Special Occasions: Tailor the money star for specific occasions like birthdays, graduations, or holidays, using appropriate embellishments and colors.
- Teaching Others: Share your knowledge by teaching friends and family how to fold money stars, spreading the fun and creativity.
8. How Can You Use the Money Star as a Gift?
A money star makes an excellent gift presentation. Here are some ideas:
- Birthdays: Present the money star as a unique and personalized birthday gift.
- Graduations: Offer a money star to graduates as a creative way to celebrate their achievement.
- Holidays: Use money stars as festive decorations and gifts during holidays like Christmas or Hanukkah.
- Weddings: Gift a money star to newlyweds as a memorable and practical wedding gift.
- Special Occasions: Customize the money star for any special occasion, adding personal touches and embellishments.
- Thank You Gifts: Show appreciation by gifting a money star as a thank you to friends, family, or colleagues.
- Incentives: Use money stars as rewards or incentives for children or employees, adding an element of fun and motivation.
- Charitable Donations: Create money stars for charitable auctions or fundraisers, attracting attention and support.
- DIY Projects: Incorporate money stars into DIY projects, such as scrapbooks or home décor, for a unique and personalized touch.
- Educational Purposes: Use money stars as teaching tools in classrooms, demonstrating financial literacy and creative expression.
9. What are the Financial Benefits of Learning Origami?
While primarily a creative activity, learning origami can indirectly benefit your financial literacy and mindfulness in several ways:
- Promotes Mindfulness: Origami requires focus and concentration, promoting mindfulness and reducing stress, which can lead to better financial decisions.
- Enhances Fine Motor Skills: The intricate folding involved in origami enhances fine motor skills and hand-eye coordination, which can be valuable in various tasks, including handling money.
- Teaches Patience: Origami teaches patience and perseverance, which are essential qualities for achieving long-term financial goals.
- Encourages Creativity: Origami encourages creative thinking and problem-solving, skills that can be applied to financial planning and investment strategies.
- Provides a Frugal Hobby: Origami is an inexpensive hobby, requiring only paper or money, making it an accessible and budget-friendly pastime.
- Reduces Impulsive Spending: Engaging in a focused activity like origami can reduce impulsive spending by occupying your mind and hands.
- Increases Appreciation for Money: Folding money into origami can increase your appreciation for the value and artistry of currency.
- Offers a Unique Gifting Option: Origami provides a unique and personalized gifting option, potentially saving money on store-bought gifts.
- Fosters Financial Education: Teaching origami to children can be a fun way to introduce them to basic financial concepts and the importance of handling money responsibly.
- Supports Cognitive Function: Origami has been shown to support cognitive function and memory, which can aid in making informed financial decisions.
10. Where Can You Learn More About Money Management in the US?
For comprehensive resources on money management in the US, consider exploring these options:
- money-central.com: Offers a wide range of articles, tools, and resources on personal finance topics, including budgeting, saving, investing, and debt management.
- Financial Planning Association (FPA): Provides access to certified financial planners and educational resources to help you make informed financial decisions.
- National Foundation for Credit Counseling (NFCC): Offers credit counseling services and financial education programs to help individuals manage debt and improve their financial well-being.
- U.S. Securities and Exchange Commission (SEC): Provides investor education resources and information on investment products and regulations.
- Consumer Financial Protection Bureau (CFPB): Offers resources and tools to help consumers make informed financial decisions and protect themselves from fraud and scams.
- Federal Deposit Insurance Corporation (FDIC): Provides information on banking services, deposit insurance, and financial literacy.
- Internal Revenue Service (IRS): Offers tax information and resources to help individuals understand and comply with tax laws.
- Local Libraries: Libraries often host free workshops and seminars on personal finance topics, providing access to valuable information and resources.
- Community Centers: Community centers may offer financial literacy programs and counseling services to help individuals manage their finances effectively.
- Online Courses: Numerous online platforms offer courses on personal finance, investing, and money management, providing flexible learning options.
 modular money origami star front
Ready to take control of your finances and explore more creative ways to manage your money? Visit money-central.com for comprehensive articles, financial tools, and expert advice tailored to your needs. Whether you’re looking to improve your budgeting skills, find the best investment opportunities, or seek personalized financial guidance, money-central.com is your go-to resource. Start your journey towards financial empowerment today and unlock a world of possibilities for your financial future.
Address: 44 West Fourth Street, New York, NY 10012, United States.
Phone: +1 (212) 998-0000.
Website: money-central.com.
FAQ Section
1. Can I use any type of bill to fold a money star?
Yes, you can use any type of bill, but crisp, new bills are recommended for the best results.
2. How many bills do I need to make a money star?
You need five bills to make a standard five-pointed money star.
3. Is it difficult to fold a money star?
Origami can be challenging, especially for beginners, but with patience and practice, anyone can learn to fold a money star.
4. Can I use paper instead of money?
Yes, you can use colored origami paper instead of money for a more artistic version.
5. What if my bills are wrinkled?
You can iron your bills on a low setting with a cloth in between to protect the ink.
6. Can I decorate my money star?
Yes, you can decorate your money star with glitter, stickers, or small ribbons to add a festive touch.
7. Where can I find more origami instructions?
You can find more origami instructions on money-central.com, as well as various online resources and video tutorials.
8. How do I keep the folds in place?
You can use small paper clips to hold the folds in place, especially when working with plastic money.
9. Is folding money illegal?
No, it is not illegal to fold money, as long as you are not defacing or damaging the currency with the intent to render it unfit for circulation.
10. Can I give a money star as a gift?
Yes, a money star makes a unique and personalized gift for birthdays, graduations, holidays, and other special occasions.