Imagine attending an outdoor event, surrounded by thousands of people, yet completely disconnected from the digital world. No social media updates, no quick email checks, no way to share your experience online. This was the reality last summer at a music festival I attended, and it highlighted a significant opportunity. While a vendor was charging exorbitant rates for brief internet access, it sparked an idea: what if providing affordable, portable internet was not only a valuable service but also a lucrative venture?
This experience led me to explore how to create a portable Wi-Fi network that could be deployed anywhere internet access is scarce, offering a way to make money online, and even provide free connectivity when needed. This article will guide you through setting up your own portable hotspot business, focusing on cost-effective strategies and the potential for generating income by providing internet access in underserved locations. We’ll delve into the essential components, from choosing the right internet connection to configuring your network and managing your services. Whether you’re looking to generate extra income or simply provide a valuable service to your community, this guide will provide a comprehensive roadmap to launching your own portable Wi-Fi hotspot.
Choosing Your Internet Connection: Balancing Cost and Coverage
The foundation of any portable Wi-Fi business is a reliable internet connection. While the allure of free internet is strong, in reality, providing a robust and consistent service requires a paid connection. However, choosing the right type of connection is crucial for maximizing profitability and minimizing costs. Let’s explore some options, starting with the convenience of satellite internet and then moving to more terrestrial solutions.
Satellite Internet: The Starlink Advantage and its Limitations
Starlink, with its ability to provide high-speed, low-latency internet virtually anywhere, seems like the perfect solution for a portable hotspot business. Its ease of setup and impressive performance in remote areas make it incredibly appealing.
 Starlink Terms and Conditions prohibit resale.
Image of text stating “Starlink Terms and Conditions prohibit resale.”, emphasizing the legal restriction on reselling Starlink service.
However, there’s a significant catch: Starlink’s terms and conditions explicitly prohibit reselling their service. Using Starlink for commercial resale would violate these terms and could lead to service termination. Therefore, while we will use Starlink as a conceptual example due to its ideal portability and performance, it’s crucial to understand that this guide is presented as a proof of concept and not a recommendation for violating Starlink’s terms of service.
Furthermore, Starlink has introduced data caps on some of their plans. Understanding these limitations is important, especially if your hotspot users are data-intensive. Here’s a comparison of two relevant Starlink service plans:
| Fixed Residential | Starlink for RVs |
|---|---|
| Monthly cost | $110/mo. |
| Portable? | YES – $25/mo. additional |
| Standard service / Priority access | 20-100 Mbps Download / 5-15 Mbps Upload |
| RV service /Best Effort service | 5-50 Mbps Download /2-10 Mbps Upload |
| Data Cap? | 1TB Standard service then switches to Best Effort |
| Pause service plan? | NO |
Table comparing Starlink Residential and RV service plans, highlighting portability, data caps, and service pausing features.
For portable hotspot businesses, the Starlink for RVs plan offers compelling advantages. While it operates at a lower priority on the network, it allows service pausing, saving costs during periods of inactivity. Its inherent portability also simplifies moving your hotspot setup between locations.
Exploring Alternatives to Starlink: LTE and Creative Solutions
Given the restrictions on reselling Starlink, exploring alternative internet connections is essential. LTE (Long-Term Evolution) networks offer a viable option, leveraging cellular technology for internet access.
LTE: Leveraging Cellular Networks for Connectivity
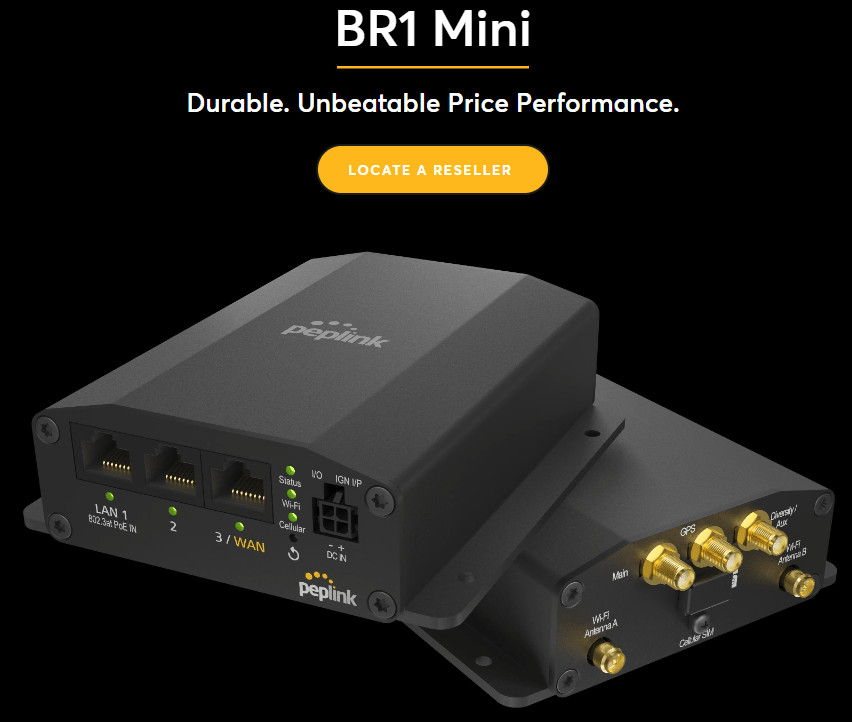
LTE modem/routers, such as the Pepwave MAX BR1 Mini or MAX BR1 ENT, can provide robust and reliable internet access using cellular SIM cards. These devices are designed for demanding environments and offer features like redundant SIM slots for failover or bandwidth bonding.
 Peplink / Pepwave MAX BR1 Mini
Image of a Peplink / Pepwave MAX BR1 Mini LTE modem/router, showcasing its compact and rugged design suitable for portable applications.
However, LTE’s primary limitation is coverage. You need to be within range of a cellular tower for service. Signal strength can be improved with external antennas, such as those offered by Insty Connect, which are specifically designed for RV and mobile use. Insty Connect systems often include both omnidirectional and directional antenna options to maximize signal reception in various locations.
Crosstalk Solutions also offers unlimited AT&T SIM cards, providing a potential data source for LTE routers. However, similar to Starlink, it’s critical to review AT&T’s terms and conditions regarding resale, as they also typically prohibit bandwidth resale, and enforcement can be stricter, potentially leading to service termination.
Creative Internet Sourcing: Thinking Outside the Box
For truly free or low-cost internet, you need to think creatively and assess your surroundings. Consider these possibilities:
- Point-to-Point (PTP) Wireless Bridges: If you are near a location with existing internet access that you are authorized to use, a PTP wireless bridge can extend that connection to your desired hotspot location. This involves setting up directional antennas to create a wireless link between two points.
 Look at that happy family using the Internet.
Image of a family happily using the internet on their devices outdoors, illustrating the positive impact of internet access in unexpected locations.
- Utilizing Existing Wi-Fi Networks (with Permission): In some cases, you might be able to negotiate access to an existing Wi-Fi network, such as at a campground or marina, and rebroadcast that signal. This requires explicit permission from the network owner and may involve sharing revenue or providing other benefits in exchange.
- Free Community Wi-Fi: Explore if there are any free community Wi-Fi networks in the areas you plan to operate. While these may be less common, they could offer a truly free backbone for your hotspot, though bandwidth and reliability might be concerns.
Remember, the key to making money online for free in this context is minimizing your operational costs, and sourcing a low-cost or free internet connection is a major step in that direction. However, always prioritize legal and ethical considerations, ensuring you have the necessary permissions to use and potentially resell any internet connection.
Building Your Portable Hotspot: Equipment and Configurations
Once you have secured an internet connection strategy, the next step is assembling the hardware to create your portable Wi-Fi hotspot. The goal is to create a compact, power-efficient, and user-friendly system. We will explore two configurations, starting with a more modular approach (Configuration A) and then a more integrated, simplified option (Configuration B).
Configuration A: Modular and Flexible Network Setup
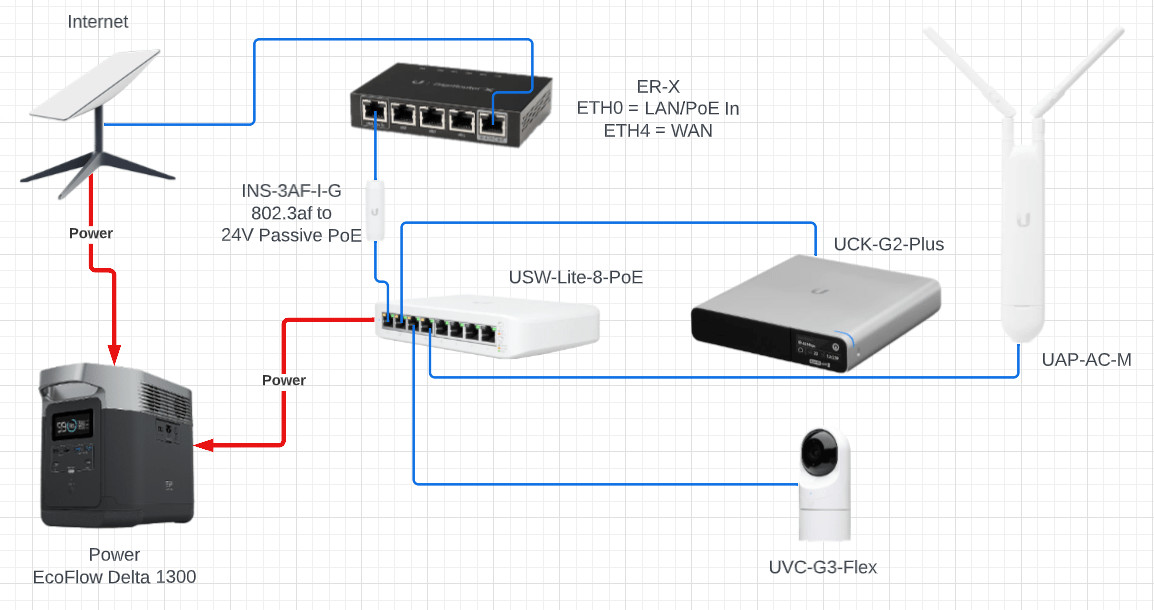
Configuration A utilizes separate components, offering greater flexibility and potentially more robust performance. It focuses on using cost-effective yet reliable hardware.
Core Components:
-
Router: UISP EdgeRouter X (ER-X) – This router is chosen for its affordability, PoE (Power over Ethernet) capability, and sufficient processing power for a portable hotspot. Its ability to be powered by 24V passive PoE is a key advantage for simplifying power management.
 UISP EdgeRouter X – ER-X
Image of a UISP EdgeRouter X (ER-X), highlighting its compact form factor and multiple Ethernet ports.
-
PoE Converter: Instant PoE Converter (INS-3AF-I-G) – This converter is necessary because the ER-X uses 24V passive PoE, while many standard PoE switches output 802.3af PoE. The converter bridges this gap, allowing the ER-X to be powered by a standard PoE switch.
 Instant PoE Converter – INS-3AF-I-G
Image of an Instant PoE Converter (INS-3AF-I-G), illustrating its role in converting PoE standards for device compatibility.
-
PoE Switch: Switch Lite 8 PoE (USW-Lite-8-PoE) – This 8-port switch provides both data connectivity and PoE power. With 4 802.3af PoE ports, it can power the ER-X, the Cloud Key Gen2 Plus, and an access point, simplifying wiring and power requirements.
-
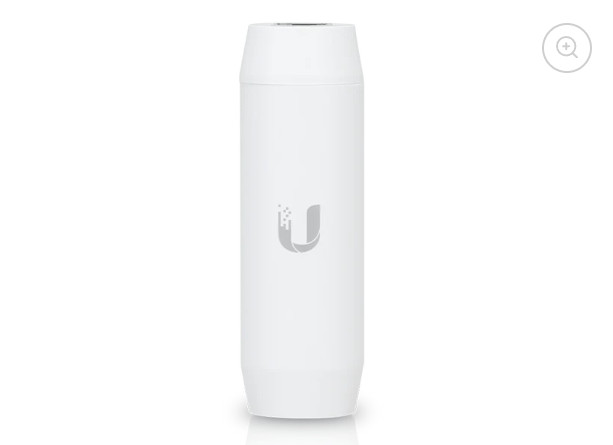
UniFi Controller & Captive Portal: Cloud Key Gen2 Plus (UCK-G2-PLUS) – The Cloud Key Gen2 Plus serves as the central management point for UniFi network devices and, crucially, provides the captive portal functionality. This portal is essential for managing user access, displaying payment options, and collecting payments for internet access. The “Plus” version also includes a hard drive for optional camera recording.
 Cloud Key Gen2 Plus – UCK-G2-PLUS
Image of a Cloud Key Gen2 Plus (UCK-G2-PLUS), emphasizing its compact design and status display for network management.
-
Access Point: Access Point AC Mesh (UAP-AC-M) – The UAP-AC-M is a versatile and cost-effective outdoor-rated access point. Its mesh capabilities allow for extending Wi-Fi coverage, and its form factor is suitable for various mounting options. While it is Wi-Fi 5, it provides sufficient performance for most hotspot applications, especially when focusing on cost-effectiveness.
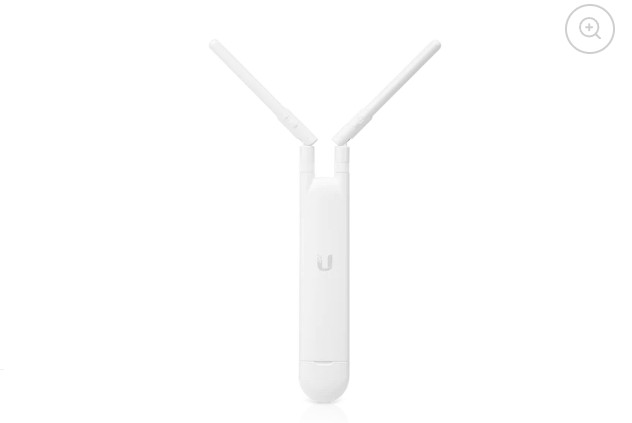 Access Point AC Mesh – UAP-AC-M
Image of an Access Point AC Mesh (UAP-AC-M), showcasing its weatherproof design and flexible mounting options for outdoor deployment.
-
Optional Camera: Camera G3 Flex (UVC-G3-Flex) – Adding a G3 Flex camera provides a security and monitoring element to your portable hotspot setup. It can act as a theft deterrent and provide surveillance of the equipment, especially in unattended locations. It integrates directly with the Cloud Key Gen2 Plus for recording and management.
 Camera G3 Flex – UVC-G3-Flex
Image of a Camera G3 Flex (UVC-G3-Flex), highlighting its small size and versatile mounting options for discreet surveillance.
Network Layout and Enclosure:
All these components can be interconnected and housed in a portable enclosure, such as a storage bin. Velcro and 3D-printed brackets can secure the equipment. Longer Ethernet cables (e.g., 25ft for the camera and access point) provide flexibility in placement.
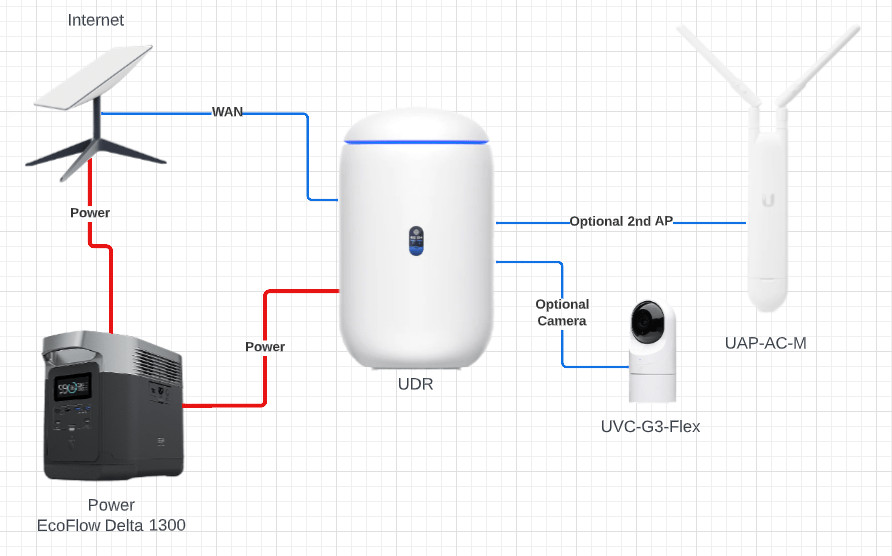 Single Power Plug Network Layout
Diagram illustrating the network layout of Configuration A, showing the interconnection of the router, switch, Cloud Key, access point, and camera.
Image of Configuration A equipment neatly packed within a storage bin, demonstrating the portability and compact nature of the setup.
Adding a fan and ventilation holes to the enclosure is crucial for heat management, especially for the Cloud Key Gen2 Plus and the PoE switch, which can generate significant heat, potentially leading to failures in hot environments.
Configuration A Setup: Router and UniFi Configuration
Setting up Configuration A involves configuring both the EdgeRouter X and the UniFi controller.
EdgeRouter X (ER-X) Configuration:
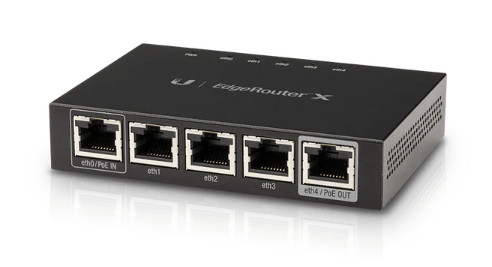
- Set ETH4 as the WAN port during the initial setup wizard.
- Configure ETH0 to be powered by 24V Passive PoE.
- Combine remaining ports into SWITCH0 interface.
- Enable DHCP server and DNS on SWITCH0 for the secure LAN segment.
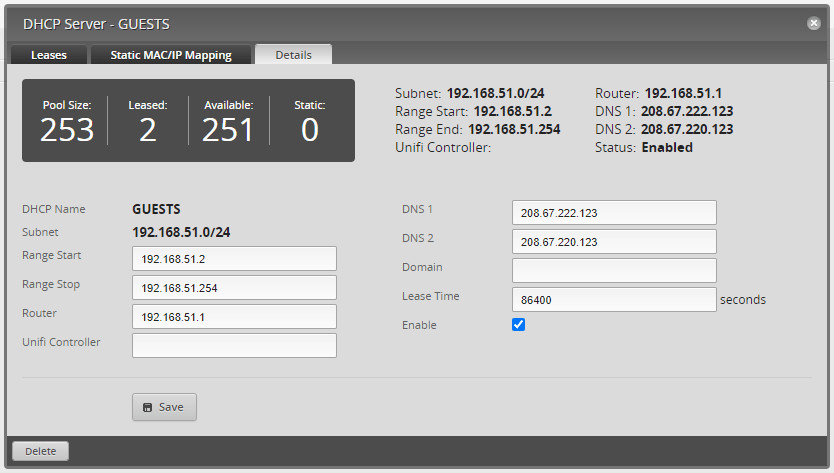
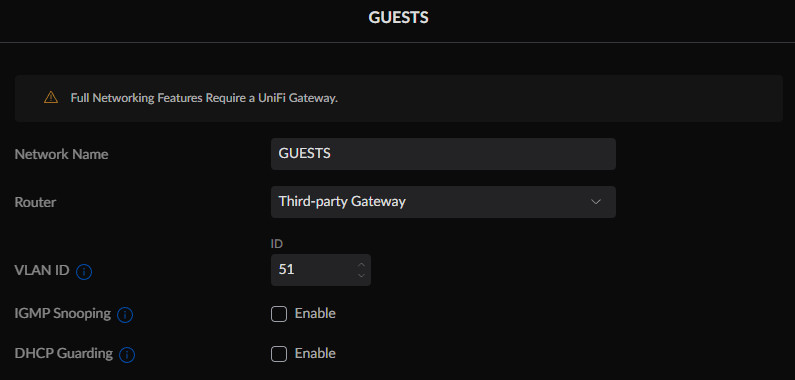
- Create VLAN 51 (SWITCH0.51) for guests, assigning it the name GUESTS.
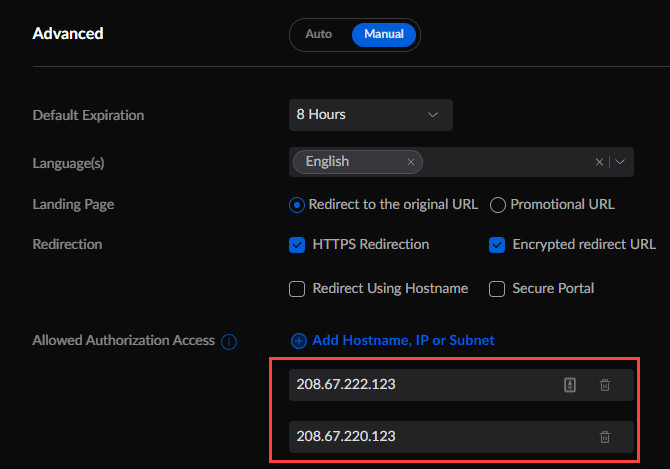
- Configure DHCP server on VLAN 51 (GUESTS) to use Cisco FamilyShield DNS servers (208.67.222.123 & 208.67.220.123) for malware and adult content filtering.
- Implement firewall rules to restrict DNS queries to only the Cisco FamilyShield servers for the GUESTS network (optional for basic setup but recommended for security).
UniFi Controller Configuration:
- Create two networks: “Secure” LAN (disabled DHCP and services as ER-X handles this) and “GUESTS” (VLAN-only network with VLAN ID 51).
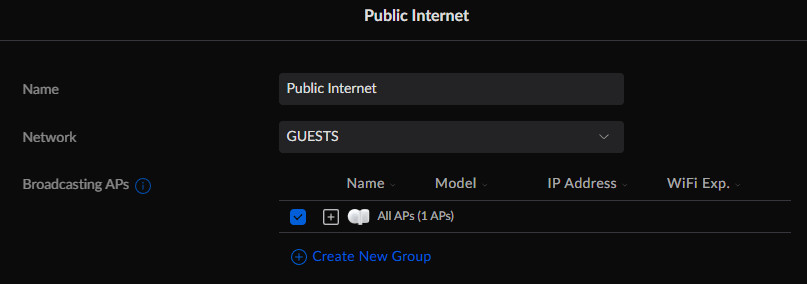
- Create two wireless networks: “Unthrottled” (WPA2 password protected for secure LAN) and “Public Internet” (Guest Wi-Fi for hotspot users).
- Configure “Public Internet” SSID to use the GUESTS VLAN (VLAN 51).
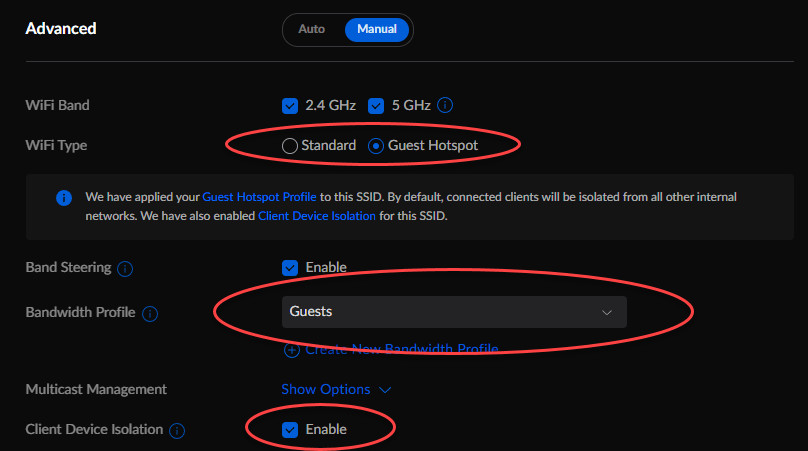
- Set Wi-Fi Type to “Guest Hotspot” under advanced settings.
- Enable Client Device Isolation to prevent users on the guest network from communicating with each other or the secure LAN.
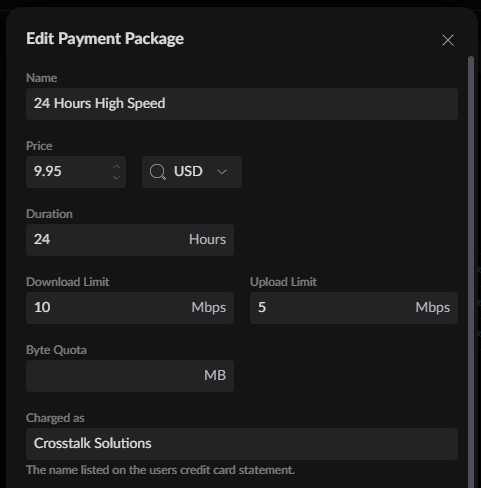
- Configure Guest Hotspot profiles (under Profiles -> Guest Hotspot -> Default).
- Set Authentication Type to “Payment.”
- Integrate with a payment processor (e.g., Stripe).
- Define internet packages (e.g., free 10-minute trial, paid hourly/daily plans) with bandwidth limits (e.g., 10Mbps download/5Mbps upload).
- Customize data collection fields (e.g., email address as mandatory).
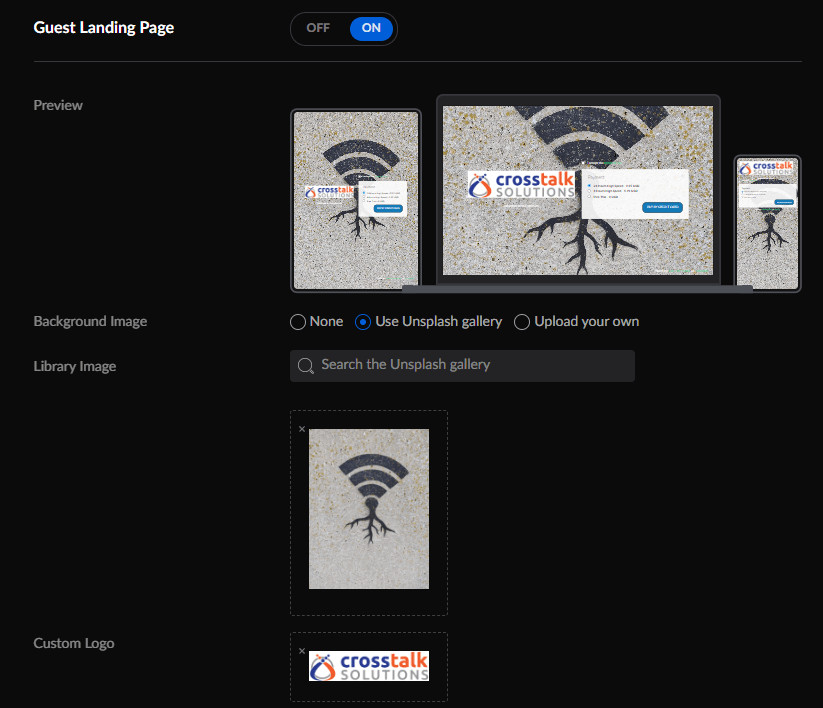
- Enable Guest Landing Page and customize its appearance with logos, terms and conditions, and background images.
- Under “Advanced” settings in the Guest Hotspot profile, manually authorize access to the Cisco FamilyShield DNS servers (208.67.222.123 and 208.67.220.123) to ensure DNS resolution works before payment.
 SWITCH0.51 DHCP configuration using Cisco’s FamilyShield malware and adult blocking DNS resolvers.
Screenshot of the EdgeRouter X configuration interface, specifically showing the DHCP settings for the GUESTS VLAN using Cisco FamilyShield DNS servers.
 Networks in UniFi
Screenshot of the UniFi Network Controller interface, displaying the configured networks, including the “Secure” LAN and “GUESTS” VLAN.
 VLAN-only setup for GUESTS network in UniFi
Screenshot of the UniFi Network Controller interface, showing the VLAN-only configuration details for the “GUESTS” network.
 Wireless networks in UniFi
Screenshot of the UniFi Network Controller interface, listing the configured wireless networks, including “Unthrottled” and “Public Internet” SSIDs.
 Guest Hotspot settings for "Public Internet" SSID in UniFi
Screenshot of the UniFi Network Controller interface, displaying the Guest Hotspot settings for the “Public Internet” SSID, including VLAN assignment and Guest Hotspot activation.
 Manual advanced settings for "Public Internet" SSID in UniFi
Screenshot of the UniFi Network Controller interface, showing the manual advanced settings for the “Public Internet” SSID, including the Guest Hotspot configuration.
 Payment package options in UniFi Guest Hotspot
Screenshot of the UniFi Network Controller interface, showcasing the configured payment package options within the Guest Hotspot settings, including free trial and paid plans.
 Payment field gathering options in UniFi Guest Hotspot
Screenshot of the UniFi Network Controller interface, displaying the data collection field settings for user registration within the Guest Hotspot portal.
 Simple captive portal example in UniFi
Screenshot of a sample captive portal landing page created within the UniFi Network Controller, showing a basic design with logo and terms of service.
 Allow access to the Cisco FamilyShield DNS servers in UniFi Guest Hotspot
Screenshot of the UniFi Network Controller interface, specifically showing the authorized access settings for Cisco FamilyShield DNS servers within the Guest Hotspot configuration.
After completing these configurations, users connecting to the “Public Internet” SSID will be redirected to the captive portal, where they can choose an internet package and complete payment via Stripe to gain access. Bandwidth will be limited according to the configured packages.
Configuration B: Simplified Setup with UniFi Dream Router (UDR)
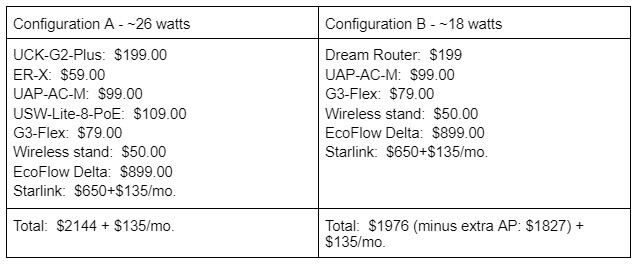
Configuration B offers a more streamlined approach using the UniFi Dream Router (UDR). The UDR integrates the router, switch, access point, and UniFi controller into a single device, simplifying the hardware setup and reducing power consumption.
Image of a UniFi Dream Router (UDR), emphasizing its compact, all-in-one design for simplified network deployments.
UDR Advantages:
- Integration: Combines router, switch (with 2 PoE ports), access point, and UniFi controller.
- Simplified Setup: Reduces the number of devices and connections, making setup and portability easier.
- Lower Power Consumption: The UDR consumes approximately 7-8 watts, extending battery life compared to Configuration A.
- Layer 7 Filtering: As a UniFi firewall, the UDR supports application-layer filtering, allowing you to control network traffic based on application type (e.g., blocking streaming services or peer-to-peer file sharing).
- Content Filtering: Built-in content filtering capabilities within UniFi can further restrict access to undesirable websites.
UDR Setup:
The setup process for Configuration B is similar to Configuration A in terms of network and wireless network creation. However, the key difference is that all these configurations are done directly within the UDR’s UniFi Network Controller interface, eliminating the need to configure a separate EdgeRouter X.
Key Configuration Steps for UDR:
- Configure networks and VLANs (similar to UniFi controller in Configuration A).
- Set up wireless networks, including the “Public Internet” Guest Wi-Fi SSID with captive portal enabled.
- Configure Guest Hotspot profiles with payment gateway integration and internet packages.
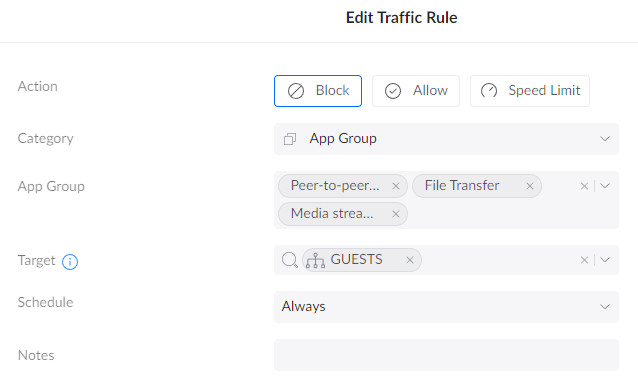
- Implement Layer 7 filtering rules under Traffic Management to block specific application categories on the GUESTS network (e.g., Peer-to-peer, File transfers, Media streaming).
Screenshot of the UniFi Network Controller interface on the UDR, demonstrating the application layer filtering rules configured for the GUESTS network to block specific traffic types.
- Optionally enable Content Filtering on the GUESTS network to restrict access to website categories.
Screenshot of the UniFi Network Controller interface on the UDR, showing the content filtering options available for the GUESTS network to restrict access to website categories.
UDR Considerations:
- Availability: The UDR can be challenging to purchase due to frequent stock shortages. Monitoring stock notification services like UINotify.net is recommended.
- Hardware Robustness: Some user reports suggest potential hardware reliability issues with the UDR compared to the separate components in Configuration A. Its long-term durability under constant portable use might be a consideration.
- Coverage: The UDR has a built-in access point, but for larger coverage areas, you can supplement it with an external access point like the UAP-AC-M, connected to one of the UDR’s PoE ports and placed remotely.
Configuration Comparison:
| Feature | Configuration A | Configuration B (UDR) |
|---|---|---|
| Complexity | More complex (separate components) | Simpler (all-in-one UDR) |
| Cost (Equipment) | Slightly higher | Slightly lower |
| Power Consumption | Higher | Lower |
| Layer 7 Filtering | Requires additional firewall (e.g., pfSense) | Built-in UDR firewall |
| Content Filtering | Requires external DNS (e.g., Cisco FamilyShield) | Built-in UDR content filtering |
| Scalability | More scalable (modular design) | Limited by UDR’s capabilities |
| Portability | Slightly less compact | More compact and portable |
| Hardware Robustness | Potentially more robust (separate components) | Potentially less robust (all-in-one) |
Table comparing the price and features of Configuration A and Configuration B, highlighting the cost savings and feature advantages of the UDR-based setup.
Choosing between Configuration A and B depends on your priorities. If you value modularity, potential robustness, and scalability, Configuration A is suitable. If simplicity, lower cost, integrated Layer 7 filtering, and portability are key, Configuration B with the UDR is a compelling option.
Powering Your Portable Hotspot: Battery and Alternative Solutions
Power is a critical consideration for a portable Wi-Fi hotspot. You need a reliable and sufficient power source to operate your equipment in locations without readily available mains power.
Battery Power: Ecoflow Delta and Capacity Considerations
Portable power stations like the Ecoflow Delta 1300 offer a convenient battery solution. The Ecoflow Delta 1300 has a large capacity and can power the hotspot equipment for extended periods.
Image of an Ecoflow Delta 1300 portable power station, showcasing its large battery capacity and multiple output ports for powering various devices.
In testing, Configuration A (without Starlink) consumed around 25 watts, while adding Starlink increased power consumption to 75 watts or more. A fully charged Ecoflow Delta 1300 could power the complete setup (including Starlink) for approximately 8 hours.
Power Management Strategies:
- Battery Capacity Planning: Calculate the power consumption of your chosen equipment configuration and estimate the battery capacity needed for your desired operating time.
- Battery Redundancy: Consider having two Ecoflow Delta units, one in use while the other is charging, for continuous operation.
- Solar Charging: Solar panels can be used to recharge the Ecoflow Delta, but the power demand of Starlink, in particular, requires significant solar capacity and may not be sufficient for continuous overnight operation or cloudy conditions.
- Generators: Generators offer a high-power solution but are noisy and require fuel. They might be suitable for certain scenarios but are less ideal for quiet environments like campgrounds.
Monetization and Free Access Options
While the focus is on “how to make money online for free,” providing free internet access can also be a valuable application of this portable hotspot setup.
Monetizing Your Hotspot: Pricing and Payment Gateways
To generate income, you need a clear pricing strategy and a payment processing system integrated with your captive portal.
Pricing Strategies:
- Tiered Packages: Offer various internet packages based on duration (e.g., hourly, daily, event-long passes) and potentially bandwidth or data limits.
- Free Trial: Provide a short free trial period (e.g., 10-15 minutes) to attract users and allow them to experience the service before paying.
- Competitive Pricing: Research existing internet access options in your target locations and price your service competitively.
Payment Gateway Integration:
- Stripe: UniFi’s captive portal integrates seamlessly with Stripe, a popular payment processing platform, allowing you to accept credit card payments securely.
- PayPal: Explore if your captive portal system supports PayPal or other payment gateways if Stripe is not your preferred option.
Free Internet for Community Benefit and Emergency Response
The same portable hotspot setup can be used to provide free internet access in various situations:
- Emergency Internet: In disaster-stricken areas where communication infrastructure is damaged, a portable hotspot can provide vital internet connectivity for emergency responders and affected communities. Organizations like the ITDRC (Information Technology Disaster Resource Center) utilize similar solutions for disaster relief.
- Community Service: Offer free Wi-Fi at community events, parks, or underserved areas as a public service. This can enhance community engagement and goodwill.
- Camping and Group Events: Provide free internet access for camping groups, tailgating parties, or other gatherings as a value-added amenity.
Layer 7 Filtering: Managing Bandwidth and Security
Implementing Layer 7 filtering is crucial for managing bandwidth usage and ensuring network security, especially when reselling internet access.
Benefits of Layer 7 Filtering:
- Bandwidth Control: Prevent users from consuming excessive bandwidth by blocking or throttling bandwidth-intensive applications like streaming services (Netflix, YouTube) or peer-to-peer file sharing (BitTorrent).
- Security: Mitigate risks associated with illegal activities like torrenting copyrighted content, which could lead to legal issues for the internet service subscriber (you).
- Fair Usage: Ensure fair bandwidth distribution among users by prioritizing essential traffic and limiting non-essential applications.
Layer 7 Filtering Options:
- UniFi Dream Router (UDR): Configuration B’s UDR offers built-in application layer filtering capabilities within its firewall settings. You can create traffic management rules to block or limit specific application categories on the guest network.
- pfSense Firewall: For Configuration A, you can integrate a pfSense firewall appliance like the Netgate pfSense 1100. pfSense provides advanced Layer 7 filtering capabilities through add-on packages, but it adds complexity and cost to the setup.
Financial Projections and Profit Potential
While the initial equipment investment is necessary, a portable Wi-Fi hotspot business has the potential for significant returns, especially in locations with limited internet access.
Hypothetical Financial Scenario:
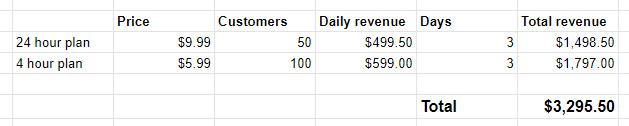
Consider a 3-day event with 10,000 attendees and no existing internet access. Assume the following hypothetical user adoption rates:
- 1% of attendees per day (100 users) purchase a 4-hour internet package at $5.99.
- 0.5% of attendees per day (50 users) purchase a 24-hour internet package at $9.99.
Over the 3-day event, this scenario could generate approximately $3,300 in revenue.
Table illustrating hypothetical financial projections for a 3-day event, showing potential revenue based on user adoption rates and pricing packages.
Profitability Factors:
- Event Size and Duration: Larger and longer events offer greater revenue potential.
- Internet Demand: Locations with poor or no existing internet access will have higher demand for your service.
- Pricing Strategy: Optimize pricing packages to maximize revenue while remaining competitive and attractive to users.
- Operational Costs: Minimize costs related to internet connection, power, equipment maintenance, and event fees to maximize profit margins.
Conclusion: Portable Wi-Fi Hotspot – A Versatile Opportunity
Setting up a portable Wi-Fi hotspot business presents a unique opportunity to make money online, leveraging readily available technology and addressing a growing need for connectivity in various locations. Whether you aim to generate income by providing paid internet access or offer free connectivity for community benefit, the technical foundation and setup process remain largely the same.
By carefully considering internet connection options, choosing the right equipment configuration, managing power efficiently, and implementing appropriate network management and security measures, you can create a valuable and potentially profitable portable Wi-Fi hotspot service. The key is to identify underserved locations, understand your target audience’s needs, and adapt your service offering to maximize its value and impact. Consider the ethical implications and always strive to provide a reliable and user-friendly experience, whether you are charging for access or offering it for free. The potential applications are vast, from music festivals and outdoor events to emergency response and community service – the possibilities are limited only by your creativity and entrepreneurial spirit.
What improvements or innovative applications do you envision for a portable Wi-Fi hotspot setup? Share your thoughts and ideas in the comments below!