Receiving money via Apple Pay is a straightforward and secure process, allowing you to manage your finances efficiently. At money-central.com, we provide you with the insights and resources you need to master digital transactions and improve your overall financial health. Explore our site for comprehensive guides, helpful tools, and expert advice that will empower you to take control of your financial future with confidence. Whether it’s understanding payment options, setting up recurring payments, or mastering digital finance.
1. What is Apple Cash and How Does it Work?
Apple Cash is a digital payment service integrated into Apple devices, enabling users to send and receive money. It works seamlessly within the Wallet app and Messages, offering a convenient way to manage funds digitally. According to a study by New York University’s Stern School of Business in July 2023, digital payment adoption increased by 30% due to user-friendliness and integration with existing devices.
1.1. Setting Up Apple Cash
To start using Apple Cash, ensure you have an eligible device with the latest version of iOS.
- Open the Wallet app: Find the Wallet app on your iPhone.
- Add Apple Cash: If you haven’t already set up Apple Cash, you’ll see an option to add it.
- Follow the Instructions: Complete the setup process by providing the necessary information.
1.2. Verifying Your Identity
For full functionality and FDIC insurance eligibility, verifying your identity is crucial.
- Why Verify: Verification enhances security and ensures compliance with financial regulations.
- How to Verify: Follow the prompts within the Wallet app to submit the required information.
1.3. Understanding FDIC Insurance
Once your identity is verified, your Apple Cash account becomes FDIC-insured.
- What is FDIC Insurance: The Federal Deposit Insurance Corporation (FDIC) insures deposits up to $250,000 per depositor, per insured bank.
- Benefits: This insurance protects your funds in the event of a bank failure, providing peace of mind.
2. How to Accept Money on Apple Pay
Accepting money via Apple Pay is simple and can be done automatically or manually.
2.1. Automatic Acceptance
To automatically accept payments, follow these steps:
- Open Wallet App: Go to the Wallet app on your iPhone.
- Tap Apple Cash Card: Select your Apple Cash card.
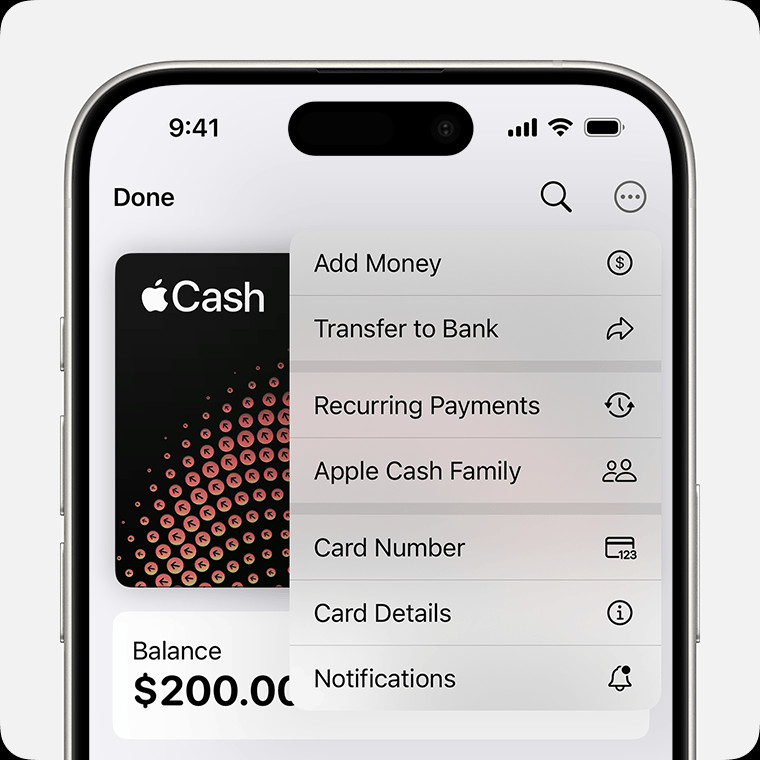
- Tap More Button: Look for and tap the “More” button.
- Card Details: Choose “Card Details.”
- Automatic Payments: Select “Automatically Accept Payments.”
By enabling automatic acceptance, any money sent to you will be immediately added to your Apple Cash balance.
2.2. Manual Acceptance
If you prefer to manually accept payments:
- Follow Steps 1-4 Above: Complete the same steps as for automatic acceptance to reach “Card Details.”
- Manual Payments: Select “Manually Accept Payments.”
- Accept in Messages: When someone sends you money, open the Messages conversation and tap “Accept.”
You have 7 days to accept a payment manually. If you don’t accept it within this period, the money will be returned to the sender.
2.3. What Happens if You Haven’t Set Up Apple Cash?
If someone sends you money and you haven’t set up Apple Cash:
- Accept in Messages: You’ll see an “Accept” option in the message.
- Setup Apple Cash: Tapping “Accept” will prompt you to set up Apple Cash.
- Follow On-Screen Instructions: Complete the setup process to claim the money.
3. Where Can You Receive Money via Apple Pay?
Apple Pay allows you to receive money through various channels, enhancing its versatility.
3.1. Receiving Money Through Messages
One of the most common ways to receive money is through the Messages app.
- Open Messages: Open the Messages app on your iPhone.
- View Payment: When someone sends you money, you’ll see a notification in the conversation.
- Accept Payment: Tap the notification and follow the instructions to accept the payment.
 iPhone showing Apple Cash payment in Messages
3.2. Receiving Money Through the Wallet App
You can also view and manage received payments directly in the Wallet app.
- Open Wallet App: Go to the Wallet app on your iPhone.
- View Transactions: Tap your Apple Cash card to see your transaction history.
- Manage Payments: Here, you can view details of received payments and manage your balance.
3.3. Receiving Money via Tap to Cash
Tap to Cash allows you to send and receive money with someone nearby without sharing phone numbers or email addresses.
- How it Works: Simply hold your iPhone near the other person’s iPhone to initiate the transfer.
- Benefits: This method is quick, secure, and ideal for in-person transactions.
 Two iPhones using Tap to Cash
4. Managing Your Apple Cash Balance
Effectively managing your Apple Cash balance is essential for financial control.
4.1. Checking Your Balance
Keeping track of your balance is straightforward:
- Open Wallet App: Open the Wallet app on your iPhone.
- View Balance: Your Apple Cash balance is displayed on your Apple Cash card.
4.2. Using Your Apple Cash Balance
You can use your Apple Cash balance in several ways:
- Spending with Apple Pay: Use it for purchases at stores and online where Apple Pay is accepted.
- Sending Money: Send money to friends and family.
- Transferring to Bank Account: Transfer the balance to your bank account or eligible debit card.
4.3. Transferring Money to Your Bank Account
Transferring your Apple Cash balance to your bank account is simple:
- Open Wallet App: Open the Wallet app on your iPhone.
- Tap Apple Cash Card: Select your Apple Cash card.
- Transfer to Bank: Choose the option to transfer to your bank account.
- Enter Amount: Enter the amount you wish to transfer and follow the instructions.
Typically, transfers are completed within 1-3 business days, though instant transfers to eligible debit cards are also available for a small fee.
5. Requesting Money with Apple Pay
Need to request money from someone? Apple Pay makes it easy.
5.1. Requesting Money Through Messages
You can send a payment request directly through the Messages app:
- Open Messages: Open the Messages app on your iPhone.
- Start Conversation: Start a new conversation or open an existing one.
- Tap Plus Icon: Tap the plus icon and select “Apple Cash.”
- Enter Amount: Enter the amount you want to request.
- Tap Request: Tap “Request” to send the request.
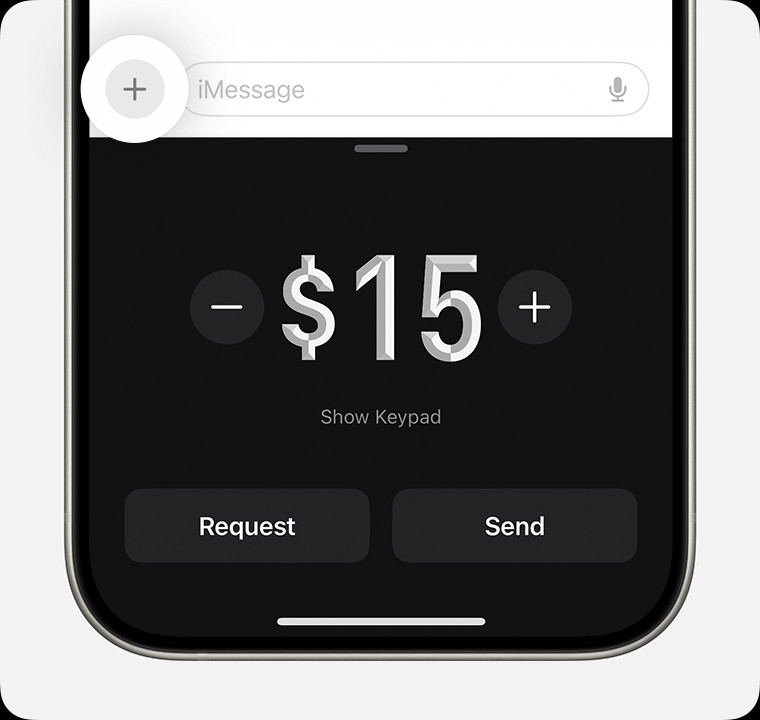
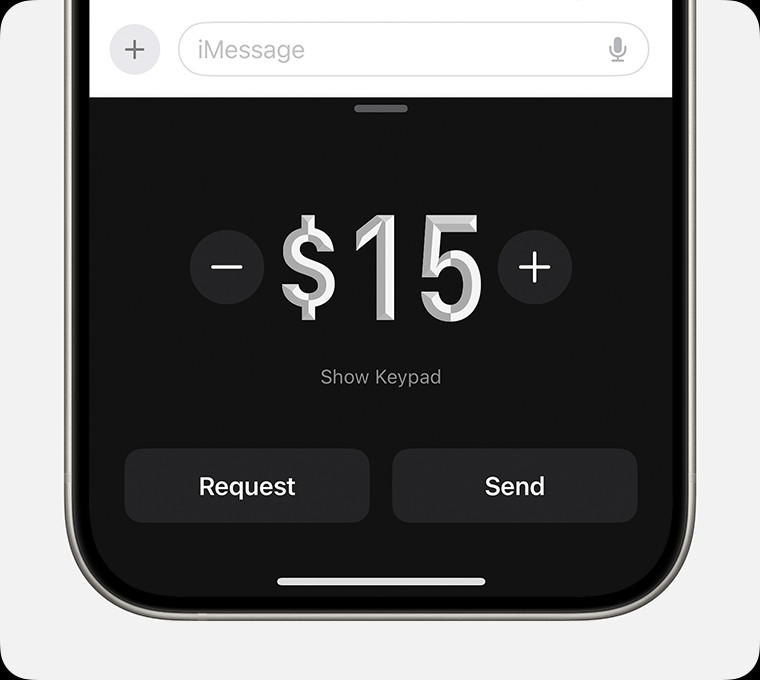 iPhone requesting money in Messages
5.2. Responding to a Request for Payment
When you receive a request for payment:
- Open Request: Open the request in the Messages app.
- Tap Pay: Tap “Pay” on the message.
- Review Amount: Review the amount and tap “Send” to continue.
- Confirm Payment: Confirm your payment with Face ID, Touch ID, or your passcode.
If you wish to decline the request, simply ignore the message.
5.3. Using Apple Watch to Request and Respond
You can also request and respond to payment requests on your Apple Watch:
- Open Messages: Open the Messages app on your Apple Watch.
- Select Conversation: Choose a conversation.
- Tap Plus Icon: Tap the plus icon and select “Apple Cash.”
- Enter Amount: Enter an amount and swipe left to show the “Request” button.
- Tap Request: Tap “Request” to send.
To respond, follow the same steps and tap “Pay” when you receive a request.
6. Setting Up Recurring Payments
For regular payments, setting up recurring payments can save time and ensure consistency.
6.1. How to Set Up Recurring Payments
- Open Wallet App: Open the Wallet app on your iPhone.
- Tap Apple Cash Card: Select your Apple Cash card.
- Tap More Button: Tap the “More” button.
- Recurring Payments: Tap “Recurring Payments” and then “New Recurring Payment.”
- Add Recipient: Add the recipient and follow the on-screen instructions to choose the payment amount, start date, and frequency.
 iPhone showing Recurring Payments in Wallet
6.2. Editing, Canceling, or Pausing Recurring Payments
Managing your recurring payments is simple:
- Open Wallet App: Open the Wallet app on your iPhone.
- Tap Apple Cash Card: Select your Apple Cash card.
- Tap More Button: Tap the “More” button.
- Recurring Payments: Tap “Recurring Payments” and select the payment you want to manage.
- Edit Options: Tap “Cancel,” “Pause,” or “Edit” to make changes.
7. Troubleshooting Common Issues
Even with its user-friendly design, you might encounter issues while using Apple Cash. Here are some solutions to common problems.
7.1. Payment Pending Issues
If a payment is pending, it means the recipient hasn’t accepted it yet.
- Check Transaction History: In your Apple Cash transaction history, look for the payment.
- Cancel Payment: If the status says “pending,” you can cancel the payment.
7.2. Identity Verification Problems
If you’re having trouble verifying your identity:
- Ensure Accurate Information: Make sure the information you provide matches your official documents.
- Contact Support: If the issue persists, contact Apple Support for assistance.
7.3. Device Compatibility
Apple Cash requires an eligible device with the latest version of iOS. Ensure your device meets these requirements.
8. Security and Privacy Considerations
Apple Pay prioritizes security and privacy, using advanced technologies to protect your financial information.
8.1. Encryption and Tokenization
Apple Pay uses encryption and tokenization to secure your transactions.
- Encryption: Your data is encrypted to protect it during transmission.
- Tokenization: Instead of using your actual card number, a unique token is used for each transaction, reducing the risk of fraud.
8.2. Face ID, Touch ID, and Passcode
Apple Pay uses Face ID, Touch ID, or your passcode to authenticate transactions, ensuring that only you can authorize payments.
8.3. Privacy Settings
You can manage your privacy settings within the Wallet app to control how your data is used.
9. Advantages of Using Apple Pay
Apple Pay offers numerous advantages over traditional payment methods.
9.1. Convenience
Apple Pay is incredibly convenient, allowing you to make payments with just a tap of your device.
9.2. Security
With advanced security features like encryption and biometric authentication, Apple Pay is one of the safest ways to pay.
9.3. Speed
Transactions are quick and seamless, saving you time at checkout.
9.4. Integration
Apple Pay is integrated into the Apple ecosystem, making it easy to use across all your devices.
10. Apple Cash for Families
Apple Cash Family allows family organizers to set up Apple Cash for children under 18.
10.1. Setting Up Apple Cash for a Child
- Family Sharing: Ensure Family Sharing is set up.
- Invite Child: Invite your child to join the family group.
- Set Up Apple Cash: Follow the on-screen instructions to set up Apple Cash for your child.
10.2. Parental Controls
Parents can set spending limits and monitor transactions to help children manage their money responsibly.
10.3. Limitations
Apple Cash Family accounts have certain limitations, such as a maximum sending and receiving limit of $2000 within a rolling seven-day period.
11. Apple Cash vs. Other Payment Platforms
Understanding how Apple Cash compares to other payment platforms can help you make informed decisions.
11.1. Apple Cash vs. PayPal
- Integration: Apple Cash is deeply integrated into the Apple ecosystem, while PayPal is a standalone app.
- Fees: Both platforms offer free transactions for personal use, but PayPal charges fees for business transactions.
- Security: Both platforms use encryption and other security measures to protect your data.
11.2. Apple Cash vs. Venmo
- Social Features: Venmo is known for its social features, allowing users to share transactions with friends. Apple Cash lacks these features.
- Ease of Use: Both platforms are easy to use, but Apple Cash may be more convenient for Apple users due to its integration with iOS.
- Transaction Limits: Both platforms have transaction limits, so review the terms and conditions for current details.
11.3. Apple Cash vs. Zelle
- Bank Integration: Zelle is integrated with many banks, allowing users to send and receive money directly from their bank accounts.
- Speed: Zelle transactions are typically faster than Apple Cash transfers to a bank account.
- Availability: Zelle is available to anyone with a U.S. bank account, while Apple Cash requires an Apple device.
| Feature | Apple Cash | PayPal | Venmo | Zelle |
|---|---|---|---|---|
| Integration | Apple ecosystem | Standalone app | Standalone app | Bank integrated |
| Fees | Free for personal use | Fees for business transactions | Free for personal use | Free |
| Social Features | No | No | Yes | No |
| Ease of Use | High | High | High | High |
| Transaction Speed | 1-3 days to bank, instant to debit card (fee) | 1-3 days to bank, instant to debit card (fee) | 1-3 days to bank, instant to debit card (fee) | Typically faster than Apple Cash to bank |
| Availability | Apple devices in the U.S. | Worldwide | U.S. | U.S. bank account |
12. Tips for Using Apple Pay Effectively
To maximize the benefits of Apple Pay, consider these tips.
12.1. Keep Your Device Secure
Protect your device with a strong passcode, Face ID, or Touch ID to prevent unauthorized access.
12.2. Monitor Your Transactions
Regularly check your transaction history in the Wallet app to identify and address any suspicious activity.
12.3. Stay Updated
Keep your device updated to ensure you have the latest security features and improvements.
12.4. Use Two-Factor Authentication
Enable two-factor authentication for your Apple ID to add an extra layer of security.
13. What To Do If You Sent a Payment to the Wrong Person
Accidents happen, but there are steps you can take if you send money to the wrong person.
13.1. Check Transaction History
In your Apple Cash transaction history, person-to-person payments appear with a name, phone number, or email address.
13.2. Cancel the Payment
If the transaction status says pending, the receiver hasn’t accepted your payment yet, and you can cancel it.
13.3. Contact Apple Support
If the payment has already been accepted, contact Apple Support for assistance. They may be able to help you recover the funds.
14. Rejecting a Payment in Wallet
Sometimes you may need to reject a payment that you’ve received. Here’s how to do it:
- Open Wallet App: Open the Wallet app on your iPhone, tap your Apple Cash card, then look for the payment in Latest Transactions.
- Tap the Payment: Tap the payment, tap the payment again, then tap Reject Payment.
If you don’t see an option to Reject Payment, then you may have already accepted the payment.
15. Limits and Restrictions
Apple Cash has certain limits and restrictions that you should be aware of.
15.1. Transaction Limits
There are limits on how much money you can send and receive. These limits may vary depending on your account status and verification level.
15.2. Age Restrictions
To send and receive money with an Apple Cash account, you must be 18 and a U.S. resident. If you’re under 18, your family organizer can set up Apple Cash for you as part of their Apple Cash Family account, but you may not be able to access features that require a supported payment card.
15.3. Geographic Restrictions
Apple Cash is only available in the U.S. on eligible devices.
16. Security Checks and Availability of Funds
Security checks may require more time to make funds available. This is to ensure the security of your transactions and protect against fraud.
16.1. What Triggers Security Checks?
Unusual transaction patterns or large amounts may trigger additional security checks.
16.2. How Long Do Security Checks Take?
The duration of security checks can vary, but Apple aims to complete them as quickly as possible.
17. Apple Cash and Green Dot Bank
Apple Cash services are provided by Green Dot Bank, Member FDIC. Apple Payments Services LLC, a subsidiary of Apple Inc., is a service provider of Green Dot Bank for Apple Cash accounts.
17.1. Role of Green Dot Bank
Green Dot Bank is responsible for holding and managing your Apple Cash funds.
17.2. Terms and Conditions
Review the Terms and Conditions for detailed information about Apple Cash services.
18. Staying Safe with Apple Cash
While Apple Cash is secure, it’s important to take precautions to protect yourself from fraud and scams.
18.1. Only Transact with People You Know
Apple Cash person-to-person payments are like any other private transaction between two people, so only send and receive money with people you know.
18.2. Be Wary of Scams
Be cautious of scams and never send money to strangers or in response to unsolicited requests.
18.3. Report Suspicious Activity
If you suspect fraud or unauthorized activity, report it to Apple Support immediately.
19. Latest Updates and Features
Stay informed about the latest updates and features of Apple Cash.
19.1. iOS Updates
Keep your device updated to access the latest features and security enhancements.
19.2. New Features
Apple regularly introduces new features to improve the user experience. Check the Wallet app for updates.
20. Conclusion
Receiving money on Apple Pay is a convenient, secure, and efficient way to manage your finances. By understanding how to set up, use, and troubleshoot Apple Cash, you can take full advantage of this powerful payment platform. Remember to visit money-central.com for more comprehensive guides, helpful tools, and expert advice to improve your overall financial health.
Ready to take control of your financial future? Explore money-central.com for in-depth articles, practical tools, and expert advice that will help you master digital finance and achieve your financial goals. From budgeting tips to investment strategies, we’ve got you covered. Visit our website today and start your journey towards financial success.