Apple Pay has revolutionized mobile payments, offering a seamless and secure way to send and receive money. If you’re looking to leverage Apple Pay to receive funds, whether it’s from friends, family, or for sales, understanding the process is key. This guide will walk you through everything you need to know about How To Receive Money On Apple Pay, ensuring you can effortlessly manage your finances within the Apple ecosystem.
Receiving money on Apple Pay primarily revolves around Apple Cash, a digital card within your Wallet app. This virtual card acts as the central hub for funds sent to you via Apple Pay. Let’s explore the various methods and settings to optimize your experience in receiving money through this convenient service.
Receiving Money in the Messages App
One of the most straightforward ways to receive money via Apple Pay is directly through the Messages app. When someone sends you money using Apple Cash, it appears as a message within your conversation. Here’s how you handle receiving money in Messages:
-
Open the Messages App: Navigate to the Messages app on your iPhone or iPad and open the conversation where someone has sent you money.
-
Locate the Payment Message: You’ll see a message indicating that you’ve received a payment via Apple Cash. It will typically show the sender’s name and the amount sent.
-
Tap “Accept”: Within the payment message, you will find an “Accept” button. Tap this button to initiate the process of receiving the money.
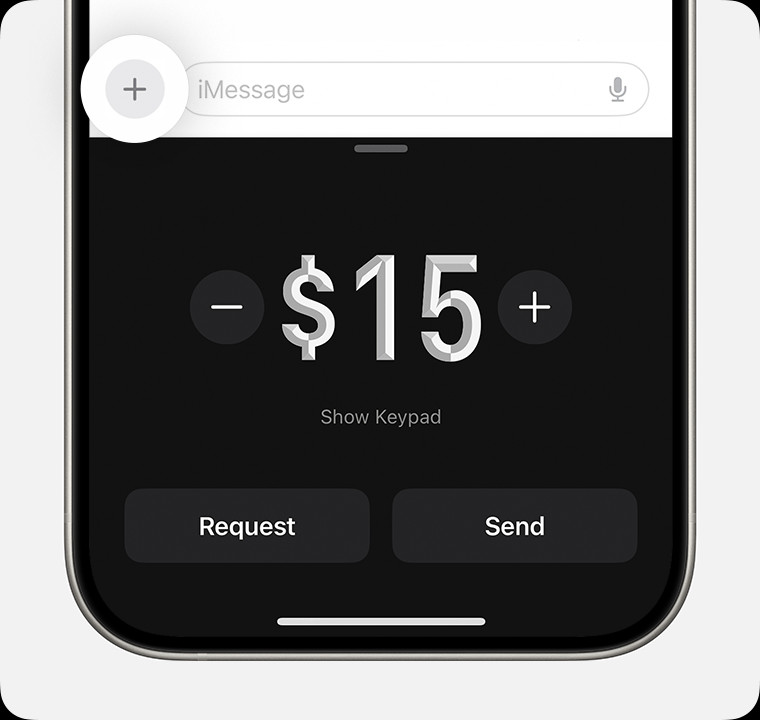 Image of iPhone receiving money in the Messages app
 -
Follow On-Screen Instructions: After tapping “Accept,” you might be prompted to verify your identity if this is your first time receiving money or if it’s required for security reasons. Follow the on-screen instructions to complete the verification process. This might involve using Face ID, Touch ID, or entering your passcode.
-
Money is in Apple Cash: Once accepted and verified (if necessary), the money will be instantly credited to your Apple Cash balance, ready for you to use.
Receiving Money in the Wallet App
While most often you’ll be notified of received money via Messages, you can also manage and potentially accept payments directly within the Wallet app. This is particularly useful for managing your Apple Cash settings and understanding your transaction history.
-
Open the Wallet App: On your iPhone, open the Wallet app and tap on your Apple Cash card.
-
Check Latest Transactions: In the transaction history, you may see pending payments if someone has sent you money that you haven’t yet accepted.
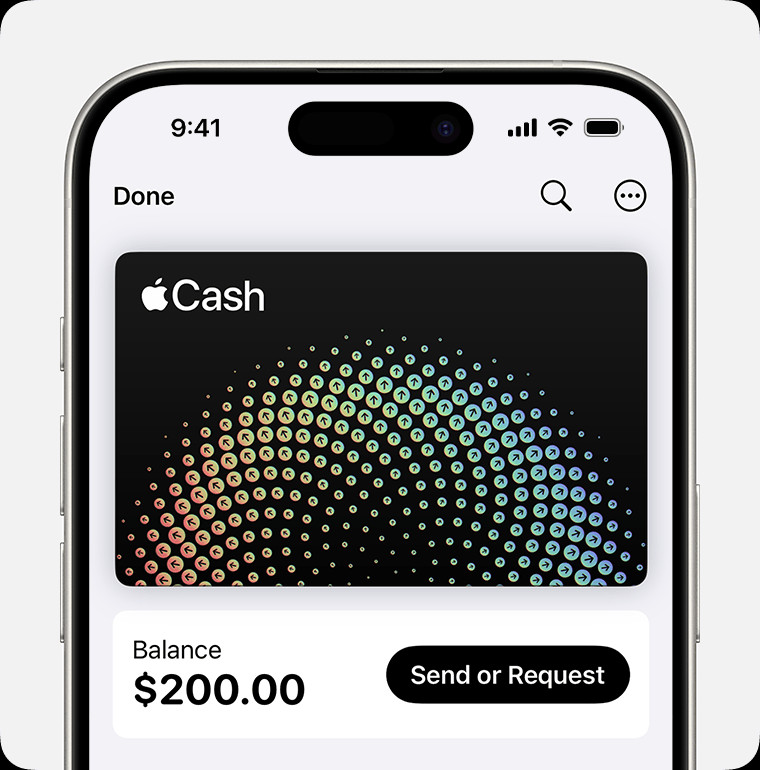 Image of iPhone sending money in the Wallet app
 -
Accept Payment (If Manual Acceptance is Enabled): If you have manual acceptance enabled (more on this below), you’ll need to tap on the pending payment transaction and then tap “Accept Payment” to receive the funds.
Managing Automatic vs. Manual Payment Acceptance
Apple Pay offers flexibility in how you receive money with two acceptance modes: Automatic and Manual. Understanding and choosing the right mode is crucial for managing incoming funds seamlessly.
Automatic Acceptance of Payments
With automatic acceptance enabled, receiving money on Apple Pay becomes completely hands-off. As soon as someone sends you money, it is automatically credited to your Apple Cash balance without requiring any action from your side.
How to Enable Automatic Acceptance:
- Open Wallet and Tap Apple Cash Card: Go to the Wallet app and tap on your Apple Cash card.
- Tap the More Button: Look for the “More” button (often represented by three dots or “…”) and tap it.
- Select “Card Details”: In the menu, choose “Card Details”.
- Tap “Automatically Accept Payments”: Toggle the switch next to “Automatically Accept Payments” to enable this feature.
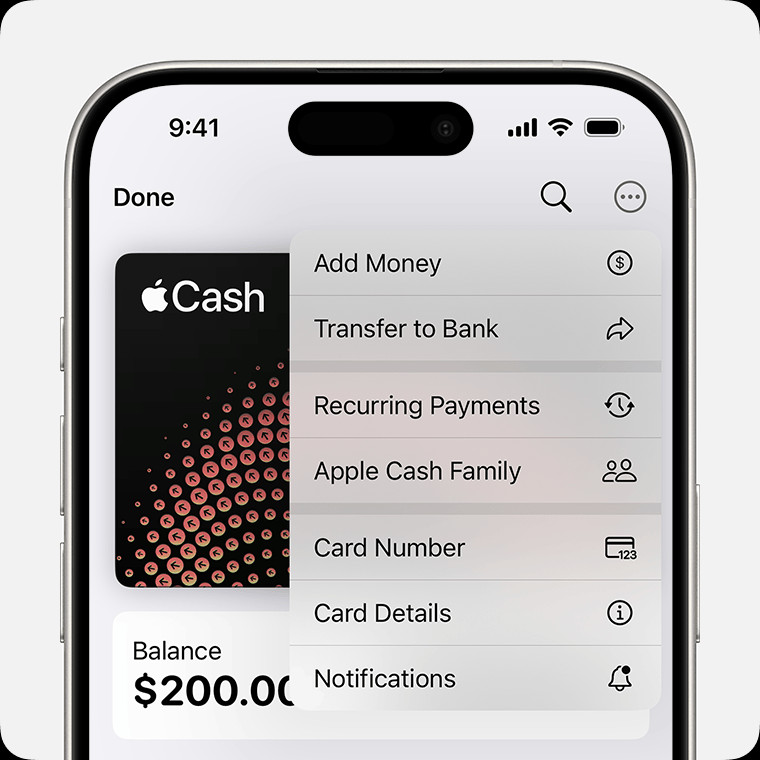 Image of iPhone showing the More menu with Recurring Payments selected
Benefits of Automatic Acceptance:
- Convenience: Money is received instantly without any manual steps.
- Seamless Experience: Ideal for frequent users who expect regular payments and want a hassle-free process.
Considerations:
- Less Control: You lose the ability to review each payment before it’s accepted.
Manual Acceptance of Payments
Manual acceptance gives you more control over incoming funds. When someone sends you money, you receive a notification and must manually accept the payment to have it credited to your Apple Cash balance.
How to Enable Manual Acceptance:
Follow the same steps as above for Automatic Acceptance, but in step 4, tap “Manually Accept Payments” instead.
Benefits of Manual Acceptance:
- Control: You can review who is sending money and the amount before accepting.
- Security: Adds an extra layer of security as you explicitly approve each incoming payment.
Considerations:
- Requires Action: You need to actively accept each payment, which might be less convenient for some users.
- Time Limit: You typically have 7 days to accept a payment manually before it might be returned to the sender.
Choosing Between Automatic and Manual:
The choice depends on your personal preference and how you use Apple Cash. For users who frequently receive payments from trusted sources, automatic acceptance can be more convenient. If you prefer to review each transaction or are concerned about receiving unexpected payments, manual acceptance is the safer option.
Setting Up Apple Cash to Receive Money for the First Time
If you’re new to Apple Cash and someone sends you money, you’ll need to set up Apple Cash to receive it.
- Receive a Payment: Ask someone to send you a small amount of money via Apple Cash through the Messages app.
- Tap “Accept” in Messages: In the message you receive, tap the “Accept” button.
- Follow Setup Instructions: You will be guided through the setup process for Apple Cash. This usually involves agreeing to the terms and conditions and verifying your identity.
- Identity Verification: For full functionality and FDIC insurance eligibility, you will likely need to verify your identity. This might require providing personal information like your name, address, and Social Security Number. Apple uses this information to comply with banking regulations and ensure the security of your account.
Once setup is complete and your identity is verified, you can seamlessly receive, send, and spend money using Apple Cash.
Rejecting a Payment
In some situations, you might need to reject an Apple Cash payment. This could be due to receiving money from an unknown sender or by mistake.
How to Reject a Payment:
- Open Wallet and Apple Cash Card: Go to the Wallet app and tap on your Apple Cash card.
- Find the Transaction: Locate the payment you wish to reject in your “Latest Transactions” list.
- Tap the Payment: Tap on the specific transaction to view its details.
- Tap “Reject Payment”: Within the transaction details, you should find an option to “Reject Payment.” Tap this to reject the incoming funds.
If you don’t see the option to reject, it might be because you have already automatically accepted the payment or the rejection window has passed.
Conclusion
Receiving money on Apple Pay is designed to be simple and efficient. Whether you choose to receive payments automatically for maximum convenience or manually for added control, Apple Cash provides a versatile solution. By understanding these methods and settings, you can confidently manage your incoming funds within the Apple Pay ecosystem. From accepting payments in Messages to managing your preferences in the Wallet app, mastering how to receive money on Apple Pay enhances your mobile financial experience.
Remember to keep your Apple devices secure and be cautious about verifying your identity and managing payment settings to ensure a safe and seamless experience with Apple Cash.