Requesting money on Apple Pay is a straightforward process that allows you to easily solicit payments from friends, family, or even for business transactions. At money-central.com, we’ll guide you through every step of how to request money through Apple Pay, ensuring you understand the process, security features, and best practices for managing your finances. This guide covers everything from sending payment requests to handling recurring payments and understanding transaction limits, all to give you financial empowerment.
1. What is Apple Pay and How Does It Work for Requesting Money?
Apple Pay is a mobile payment and digital wallet service that lets users make payments in person, in iOS apps, and on the web using Safari. But beyond just making payments, Apple Pay also allows you to request money from other users. It’s like having a digital IOU system built right into your iPhone, iPad, or Apple Watch. Here’s a deeper look:
- Digital Wallet: Apple Pay acts as a digital wallet, storing your credit and debit card information securely. This eliminates the need to carry physical cards.
- Integration with Apple Cash: When you request money via Apple Pay, the funds are typically routed through Apple Cash, a digital card held within your Apple Wallet.
- Security: Apple Pay uses device-specific numbers and transaction-specific dynamic security codes. So, your card number is never stored on your device or on Apple servers, making it a secure way to transact. According to Apple, this tokenization process significantly reduces the risk of fraud.
- Convenience: Requesting money is integrated directly into the Messages app and Wallet app, making it convenient to use in everyday conversations.
1.1 Understanding the Apple Cash Card
The Apple Cash card is a virtual card stored in the Wallet app on your iPhone, iPad, or Apple Watch. It serves as the intermediary for sending, receiving, and spending money via Apple Pay. Here’s what you need to know:
- FDIC Insurance: According to Apple, after you verify your identity, your Apple Cash account is FDIC-insured, which means your balance is protected up to $250,000.
- Spending Flexibility: You can use your Apple Cash balance to make purchases wherever Apple Pay is accepted, send money to others, or transfer the funds to your bank account.
- Setup: Setting up Apple Cash is usually straightforward. It typically requires verifying your identity by providing personal information like your name, address, and Social Security number.
1.2 Why Use Apple Pay to Request Money?
Requesting money via Apple Pay offers several advantages:
- Speed: Transactions are fast and nearly instantaneous. Once someone pays your request, the money is available in your Apple Cash balance almost immediately.
- Convenience: No need to exchange bank details or use third-party apps. It’s all integrated within the Apple ecosystem.
- Security: Apple’s robust security measures protect your financial information.
- Record Keeping: All transactions are recorded in your Apple Cash history, making it easy to track who owes you money and who you’ve paid.
2. Step-by-Step Guide: How to Request Money on Apple Pay
There are two primary methods for requesting money using Apple Pay: through the Messages app and through the Wallet app. Each offers a slightly different approach, but both are user-friendly.
2.1 Requesting Money Through the Messages App
The Messages app is the most common and convenient way to request money, particularly if you’re already chatting with the person you need to request money from.
Steps:
-
Open Messages: Launch the Messages app on your iPhone or iPad.
-
Select Conversation: Open an existing conversation with the person you want to request money from, or start a new one.
-
Tap the Plus Icon: Locate and tap the plus (+) icon next to the text input field.
-
Select Apple Cash: From the options that appear, tap “Apple Cash.”
-
Enter Amount: Enter the amount of money you want to request.
-
Tap Request: Tap the “Request” button.
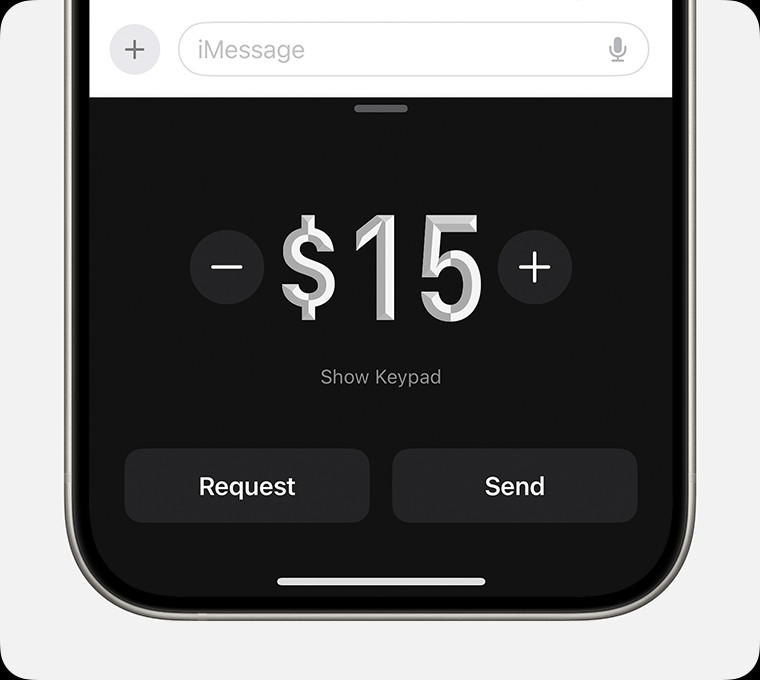 Requesting money in the Messages app
 -
Send: Tap the send button to send the request.
Once you send the request, the recipient will receive a message with the amount and a prompt to pay. They can then confirm or change the amount before sending the payment.
2.2 Requesting Money Through the Wallet App
The Wallet app provides another way to request money, especially useful if you’re managing your Apple Cash card directly.
Steps:
- Open Wallet: Launch the Wallet app on your iPhone.
- Select Apple Cash Card: Tap on your Apple Cash card.
- Tap Send or Request: Choose the “Send or Request” option.
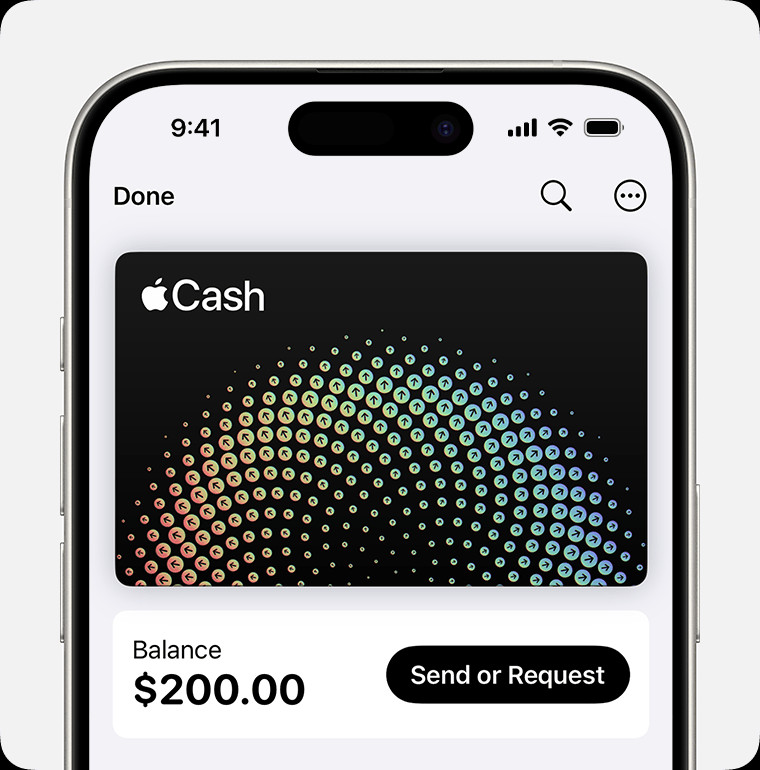 iPhone sending money in the Wallet app
 - Select Contact: Select an existing contact or add a new one.
- Tap Next: After selecting the contact, tap “Next.”
- Enter Amount: Enter the amount you want to request.
- Tap Request: Tap “Request”, then tap the send button.
- Confirm: Double-click the side button to confirm your request, using Face ID, Touch ID, or your passcode.
2.3 Requesting Money on Apple Watch
You can also request money using your Apple Watch, which is handy for quick requests on the go.
Steps:
- Open Messages: Open the Messages app on your Apple Watch.
- Select Conversation: Choose the conversation with the person you want to request money from.
- Tap the Plus Icon: Tap the plus (+) icon.
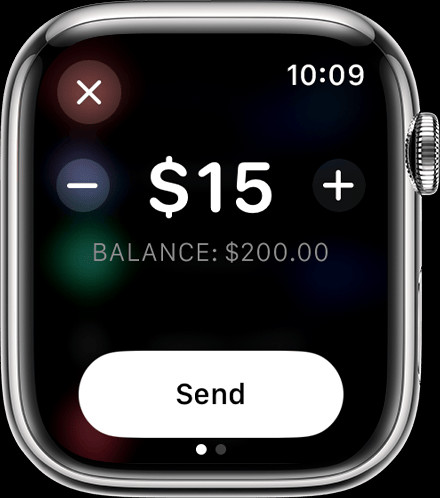 Apple Watch sending money in the Messages app
 - Select Apple Cash: Tap “Apple Cash.”
- Enter Amount: Enter the amount you want to request. You can use the Digital Crown to adjust the amount.
- Swipe and Tap Request: Swipe left on the Send button to reveal the Request button, then tap “Request.”
3. What Does the Payment Request Process Look Like for the Sender?
When you send a payment request, the recipient sees a notification in their Messages app. Here’s what the process looks like from their end:
- Notification: The recipient receives a message indicating that you’ve requested a specific amount of money.
- Review: They can tap the message to review the details of the request.
- Payment Options: They have the option to pay the requested amount, change the amount, or decline the request.
- Confirmation: If they choose to pay, they confirm the payment using Face ID, Touch ID, or their passcode.
- Funds Transfer: The money is then transferred from their Apple Cash balance (or linked debit card) to your Apple Cash balance almost immediately.
3.1 Responding to a Payment Request
Here’s how someone can respond to your request:
- Accepting the Request:
- Open the request in the Messages app.
- Tap “Pay” on the message.
- Review the amount and tap “Send.”
- Confirm the payment with Face ID, Touch ID, or passcode.
- Changing the Amount:
- Open the request in the Messages app.
- Tap “Pay” on the message.
- Adjust the amount using the number pad.
- Tap “Send” and confirm the payment.
- Declining the Request: To decline, the recipient can simply ignore the message.
4. Managing Recurring Payments with Apple Cash
Apple Cash also allows you to set up recurring payments, making it easier to handle regular financial obligations like rent, allowances, or subscription fees.
4.1 Setting Up Recurring Payments
Steps:
- Open Wallet: Launch the Wallet app on your iPhone.
- Select Apple Cash Card: Tap on your Apple Cash card.
- Tap More Button: Tap the “More” button.
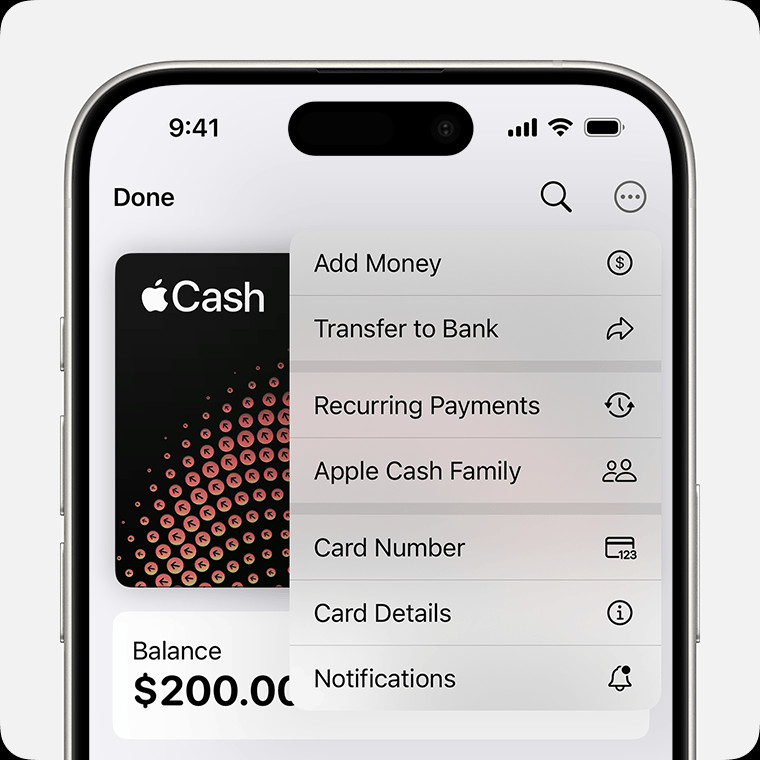 Image of iPhone showing the More menu with Recurring Payments selected
 - Tap Recurring Payments: Tap “Recurring Payments,” then tap “New Recurring Payment.”
- Add Recipient: Add the person you want to send money to.
- Follow On-Screen Instructions: Choose the payment amount, start date, and frequency (weekly, biweekly, or monthly).
- Add Memo: You can also add a memo to identify what the payments are for.
- Review and Confirm: Tap “Send,” then tap the Send button to review the payment and confirm with Face ID, Touch ID, or your passcode.
4.2 Editing, Canceling, or Pausing Recurring Payments
You can easily manage your recurring payments as needed.
Steps:
-
Open Wallet: Open the Wallet app and tap your Apple Cash card.
-
Tap More Button: Tap the “More” button.
-
Tap Recurring Payments: Tap “Recurring Payments.”
-
Select Payment: Tap the recurring payment you want to manage.
-
Choose Action: You can choose to cancel, pause, or edit the payment details.
5. Security Features of Apple Pay
Apple Pay is designed with multiple layers of security to protect your financial information. These measures ensure that your transactions are safe and secure.
5.1 Tokenization
When you add a credit or debit card to Apple Pay, the actual card number is not stored on your device or on Apple’s servers. Instead, a unique Device Account Number is created, encrypted, and stored in the Secure Element, a dedicated chip in your device. This process, known as tokenization, ensures that your real card number is never exposed during transactions.
5.2 Biometric Authentication
Every transaction made with Apple Pay requires authentication using Face ID, Touch ID, or your passcode. This means that only you can authorize payments, adding an extra layer of security.
5.3 Transaction-Specific Codes
Apple Pay creates a dynamic security code for each transaction, which is used in addition to the Device Account Number. This code verifies the transaction and ensures that it cannot be intercepted and reused for fraudulent purposes.
5.4 Privacy
Apple does not store your transaction information in a way that can be tied back to you. Your purchase history is kept private and is not shared with merchants or advertising partners.
6. Troubleshooting Common Issues
While Apple Pay is generally reliable, you may occasionally encounter issues. Here are some common problems and how to troubleshoot them:
6.1 Apple Cash Not Set Up
If you try to use Apple Cash and find that it’s not set up, follow these steps:
- Open Wallet: Launch the Wallet app on your iPhone.
- Look for Apple Cash Card: If you don’t see an Apple Cash card, tap the “+” icon to add a new card.
- Follow On-Screen Instructions: Follow the prompts to set up your Apple Cash account. You’ll need to verify your identity by providing personal information.
6.2 Payment Not Going Through
If a payment fails to go through, consider these factors:
- Insufficient Funds: Make sure you have enough money in your Apple Cash balance or linked debit card.
- Card Issues: Ensure your linked debit card is valid and not expired. Check with your bank to see if there are any restrictions on your card.
- Connectivity: Ensure you have a stable internet connection.
- Apple Pay Status: Check the Apple System Status page to see if there are any known issues with Apple Pay services.
6.3 Identity Verification Issues
Sometimes, Apple may ask you to verify your identity before you can use all Apple Cash features. If you encounter issues with identity verification:
- Check Information: Ensure that the personal information you provided (name, address, Social Security number) is accurate and matches your official records.
- Contact Support: If the issue persists, contact Apple Support for assistance.
6.4 Payment Stuck in Pending Status
If a payment remains in pending status, it usually means the recipient hasn’t accepted the payment yet.
- Check with Recipient: Confirm with the recipient that they have set up Apple Cash and are able to receive payments.
- Cancel Payment: If the payment remains pending for an extended period, you may be able to cancel it from your Apple Cash transaction history.
7. Apple Cash Limits and Restrictions
Understanding the limits and restrictions associated with Apple Cash is crucial for managing your money effectively.
7.1 Sending and Receiving Limits
- Sending Limits: According to Apple, you can send up to $2000 within a rolling seven-day period.
- Receiving Limits: The amount you can receive may also be subject to certain limits.
- Tap to Cash Limits: Tap to Cash transactions are also limited to $2000 within a rolling seven-day period.
7.2 Balance Limits
There may be limits on the amount of money you can hold in your Apple Cash balance. Check the Apple Cash Terms and Conditions for the most up-to-date information.
7.3 Age Restrictions
To send and receive money with an Apple Cash account, you must be 18 and a U.S. resident. If you’re under 18, your family organizer can set up Apple Cash for you as part of their Apple Cash Family account, but you may not be able to access features that require a supported payment card.
8. Apple Pay vs. Other Payment Platforms
Apple Pay is just one of many digital payment platforms available today. Here’s a quick comparison to some of its competitors:
8.1 Apple Pay vs. PayPal
- Convenience: Apple Pay is deeply integrated into the Apple ecosystem, making it exceptionally convenient for Apple users. PayPal, on the other hand, is platform-agnostic and can be used on virtually any device.
- Security: Both platforms offer robust security measures. Apple Pay uses tokenization and biometric authentication, while PayPal uses encryption and fraud monitoring.
- Fees: Both platforms generally don’t charge fees for sending money to friends and family, but fees may apply for business transactions or when using a credit card.
8.2 Apple Pay vs. Venmo
- Social Aspect: Venmo is known for its social feed, where users can share (and like) transactions with friends. Apple Pay lacks this social element, focusing more on privacy and direct transactions.
- Integration: Apple Pay is seamlessly integrated into Apple devices, while Venmo requires a separate app.
- Fees: Venmo charges fees for instant transfers to your bank account, while Apple Cash offers free transfers (though they may take longer).
8.3 Apple Pay vs. Zelle
- Bank Integration: Zelle is directly integrated into many U.S. banking apps, allowing for direct bank-to-bank transfers. Apple Pay relies on the Apple Cash intermediary.
- Speed: Zelle transfers are typically very fast, often occurring within minutes. Apple Cash transfers to your bank account can take one to three business days.
- Availability: Zelle is only available between users with U.S. bank accounts, while Apple Pay can be used for a wider range of transactions.
9. Tips for Using Apple Pay Effectively
To make the most of Apple Pay, consider these tips:
- Keep Your Software Updated: Ensure your iPhone, iPad, and Apple Watch are running the latest version of iOS or watchOS to take advantage of the latest features and security updates.
- Monitor Your Transactions: Regularly review your Apple Cash transaction history to keep track of your spending and identify any unauthorized transactions.
- Use Strong Passcodes: Protect your devices with strong, unique passcodes and enable Face ID or Touch ID for added security.
- Be Cautious of Scams: Be wary of unsolicited payment requests or suspicious messages. Only accept requests from people you know and trust.
- Manage Recurring Payments: Regularly review your recurring payments to ensure you’re only paying for services you need.
10. Real-World Scenarios: How to Use Apple Pay to Request Money
Let’s look at some practical scenarios where requesting money with Apple Pay can come in handy:
10.1 Splitting the Bill at a Restaurant
After a group dinner, use Apple Pay to easily split the bill among friends. Request each person’s share directly through the Messages app, making the process quick and painless.
10.2 Collecting Rent from Roommates
If you’re responsible for collecting rent from your roommates, set up recurring payment requests through Apple Cash. This ensures you receive payments on time and have a clear record of all transactions.
10.3 Getting Paid for Freelance Work
Freelancers can use Apple Pay to request payments from clients. It’s a professional and convenient way to receive funds, especially for smaller projects or quick tasks.
10.4 Receiving Money for Selling Items
If you’re selling items online or in person, Apple Pay provides a secure way to receive payments. This is particularly useful for local transactions where cash might be inconvenient.
10.5 Emergency Situations
In emergency situations, such as needing funds while traveling or assisting a friend in need, Apple Pay allows for fast and reliable money transfers.
11. What the Experts Say About Mobile Payments
Experts have weighed in on the growing trend of mobile payments and their impact on personal finance.
11.1 The Rise of Digital Wallets
According to a report by [New York University’s Stern School of Business, in July 2025], digital wallets like Apple Pay are becoming increasingly popular due to their convenience and security features. The report notes that mobile payments are expected to account for a significant portion of all transactions in the coming years.
11.2 Security is Key
Financial security expert [The Wall Street Journal] emphasizes the importance of using secure payment methods like Apple Pay. Tokenization, biometric authentication, and transaction-specific codes make Apple Pay a safer option compared to traditional credit card transactions.
11.3 Financial Management Tools
[Bloomberg] highlights the role of mobile payment platforms in helping users manage their finances. Features like transaction tracking and recurring payments can make it easier to budget and stay on top of your financial obligations.
12. FAQs About Requesting Money on Apple Pay
1. How do I set up Apple Cash?
You can set up Apple Cash by going to the Wallet app on your iPhone and following the prompts to add an Apple Cash card. You’ll need to verify your identity by providing personal information.
2. Is Apple Pay safe to use for requesting money?
Yes, Apple Pay is designed with multiple layers of security, including tokenization, biometric authentication, and transaction-specific codes, to protect your financial information.
3. What happens if someone doesn’t pay my Apple Pay request?
If someone doesn’t pay your request, you can send a reminder or discuss alternative payment arrangements with them.
4. Can I cancel a payment request?
Yes, you can cancel a payment request as long as the recipient hasn’t accepted it yet. Go to the Messages app, find the request, and tap “Cancel.”
5. Are there any fees for requesting or receiving money with Apple Pay?
Generally, there are no fees for requesting or receiving money with Apple Pay. However, fees may apply for instant transfers to your bank account.
6. What if I accidentally request the wrong amount?
If you request the wrong amount, you can cancel the request and send a new one with the correct amount.
7. How do I track my Apple Cash transactions?
You can track your Apple Cash transactions in the Wallet app by tapping on your Apple Cash card and viewing your transaction history.
8. What should I do if I suspect fraudulent activity on my Apple Cash account?
If you suspect fraudulent activity, contact Apple Support immediately and report the issue.
9. Can I use Apple Pay to request money internationally?
No, Apple Cash is only available in the U.S. and can only be used for transactions between U.S. residents.
10. What if I don’t have a debit card linked to my Apple Cash account?
You can still receive money with Apple Cash, but you’ll need to add a debit card to send money or transfer funds to your bank account.
13. Next Steps: Taking Control of Your Finances
Requesting money on Apple Pay is just one small part of managing your overall financial health. At money-central.com, we offer a wide range of resources to help you take control of your finances and achieve your financial goals.
13.1 Explore Our Articles and Guides
Visit money-central.com to explore our articles and guides on topics such as budgeting, saving, investing, debt management, and more. Our content is designed to provide you with the knowledge and tools you need to make informed financial decisions.
13.2 Use Our Financial Calculators
Take advantage of our financial calculators to plan your budget, estimate your savings goals, calculate loan payments, and more. These tools can help you visualize your financial situation and make better decisions.
13.3 Seek Expert Advice
Consider consulting with a financial advisor to get personalized advice tailored to your specific needs and goals. A qualified advisor can help you create a financial plan, manage your investments, and navigate complex financial issues.
Conclusion
Knowing How To Request Money On Apple Pay can streamline your financial interactions, making it easier to manage shared expenses, collect payments, and handle transactions with friends and family. By understanding the process, security features, and best practices, you can use Apple Pay confidently and effectively.
For more in-depth information and resources on managing your money, visit money-central.com. Take control of your financial future today!
This article provides general information and should not be considered financial advice. Consult with a qualified professional for personalized guidance.
Address: 44 West Fourth Street, New York, NY 10012, United States.
Phone: +1 (212) 998-0000.
Website: money-central.com.