Sending money efficiently and securely is a common need in today’s fast-paced world. Are you looking for a seamless way to transfer funds using your Apple Credit Card? Money-central.com is here to guide you through the process of leveraging your Apple Credit Card for sending money, exploring various options and best practices to ensure secure and convenient transactions. From understanding Apple Cash to exploring alternative money transfer services, we aim to provide you with comprehensive knowledge for effective money management. Let’s dive into the world of digital finance and discover how to make the most of your Apple Credit Card for sending money, payment solutions, and financial security.
1. Understanding Apple Cash and Apple Credit Card
Apple Cash and the Apple Credit Card are two distinct but related services offered by Apple. Knowing how they work individually and together can help you manage your finances better.
What is Apple Cash?
Apple Cash is a digital card stored in the Wallet app on your iPhone, iPad, or Apple Watch. It allows you to send and receive money from other users via Messages or the Wallet app. Think of it as a virtual debit card that lives on your Apple devices.
- Sending and Receiving Money: With Apple Cash, you can quickly send money to friends and family or receive payments from them.
- Spending Apple Cash: The balance in your Apple Cash account can be used for purchases via Apple Pay in stores, online, and in apps.
- FDIC Insurance: After verifying your identity, your Apple Cash balance is FDIC-insured, adding a layer of security and trust.
What is Apple Credit Card?
The Apple Credit Card, also known as Apple Card, is a credit card issued by Goldman Sachs. It’s designed to work seamlessly with Apple Pay and offers several benefits for Apple users.
- Cashback Rewards: The Apple Credit Card offers Daily Cash, a cashback program that gives you a percentage of your purchases back every day.
- Integration with Apple Wallet: The card lives in your Apple Wallet app, making it easy to track spending, manage payments, and view your balance.
- No Fees: Apple Credit Card boasts no annual fees, late fees, or foreign transaction fees, making it a cost-effective option for many users.
Key Differences and How They Interact
While both services are integrated into the Apple ecosystem, they serve different functions:
| Feature | Apple Cash | Apple Credit Card |
|---|---|---|
| Type | Digital debit card | Credit card |
| Function | Send, receive, and spend money | Make purchases and earn cashback |
| Funding Source | Balance from received payments or linked bank account | Credit line provided by Goldman Sachs |
| Location | Stored in Apple Wallet | Stored in Apple Wallet |
| FDIC Insured | Yes, after identity verification | Not applicable |
Interaction:
- You can use your Apple Cash balance to pay off your Apple Credit Card balance.
- When sending money via Apple Cash, the default funding source is your Apple Cash balance. If the balance is insufficient, you can use a linked debit card.
2. Can You Directly Send Money from Your Apple Credit Card?
One common question is whether you can directly send money from your Apple Credit Card to someone else. The answer isn’t straightforward, and it’s essential to understand the nuances.
Direct Transfers: Not Supported
As a standard feature, the Apple Credit Card does not directly support sending money to other individuals in the same way that Apple Cash does. The primary purpose of the Apple Credit Card is for making purchases, not for direct money transfers.
Workarounds and Alternative Methods
While you cannot directly send money from your Apple Credit Card, there are alternative methods to achieve a similar result:
-
Using Apple Cash as an Intermediary:
- Fund your Apple Cash balance: You can add money to your Apple Cash balance from a linked bank account.
- Send money via Apple Cash: Once your Apple Cash balance is funded, you can send money to others through the Messages app or Wallet app.
-
Using Third-Party Money Transfer Services:
- Services like PayPal, Venmo, and Cash App allow you to send money to others using your credit card as a funding source.
- You can link your Apple Credit Card to these services and use it to send money, although this may incur additional fees.
-
Cash Advances (Use with Caution):
- Some credit cards offer cash advances, which allow you to withdraw cash from an ATM or transfer funds directly to your bank account.
- Cash advances typically come with high fees and interest rates, so they should be used as a last resort.
Potential Fees and Interest
When using your Apple Credit Card to send money indirectly, be aware of potential fees and interest:
- Cash Advance Fees: If you use a cash advance, you’ll likely be charged a fee, often a percentage of the amount withdrawn.
- Interest Rates: Cash advances usually have higher interest rates than regular purchases.
- Third-Party Fees: Money transfer services like PayPal may charge fees for using a credit card as a funding source.
Example Scenario
Let’s say you want to send $200 to a friend. Here’s how you might do it using a third-party service:
- Link your Apple Credit Card to PayPal.
- Initiate a money transfer to your friend’s PayPal account.
- Fund the transfer with your Apple Credit Card.
- PayPal may charge a fee, for example, 2.9% + $0.30, which would be $6.10 for a $200 transfer.
Security Considerations
Whenever you use your credit card for money transfers, ensure you’re using secure platforms and methods to protect your financial information.
- Use Reputable Services: Stick to well-known and trusted money transfer services.
- Enable Two-Factor Authentication: Add an extra layer of security to your accounts.
- Monitor Transactions: Regularly check your credit card statements for any unauthorized transactions.
In summary, while you cannot directly send money from your Apple Credit Card, you can use workarounds like funding your Apple Cash balance or using third-party money transfer services. Be mindful of potential fees and interest, and always prioritize security when handling financial transactions.
 iPhone displaying Apple Cash transactions
3. Step-by-Step Guide: Sending Money via Apple Cash
Apple Cash provides a seamless way to send and receive money directly from your Apple devices. This guide will walk you through the steps to send money using Apple Cash, whether you’re on your iPhone, Apple Watch, or other Apple devices.
Prerequisites
Before you start, make sure you have the following:
- Eligible Device: An iPhone, iPad, or Apple Watch that supports Apple Pay.
- Apple Cash Account: An active Apple Cash account in the Wallet app.
- Debit Card: A linked debit card for funding your Apple Cash account if your balance is insufficient.
- Verified Identity: Your identity verified with Apple to ensure full functionality and FDIC insurance eligibility.
Sending Money on Your iPhone
-
Open the Messages App:
- Start a new conversation or open an existing one with the person you want to send money to.
-
Access Apple Cash:
- Tap the plus icon (+) next to the text field.
- Select Apple Cash from the options.
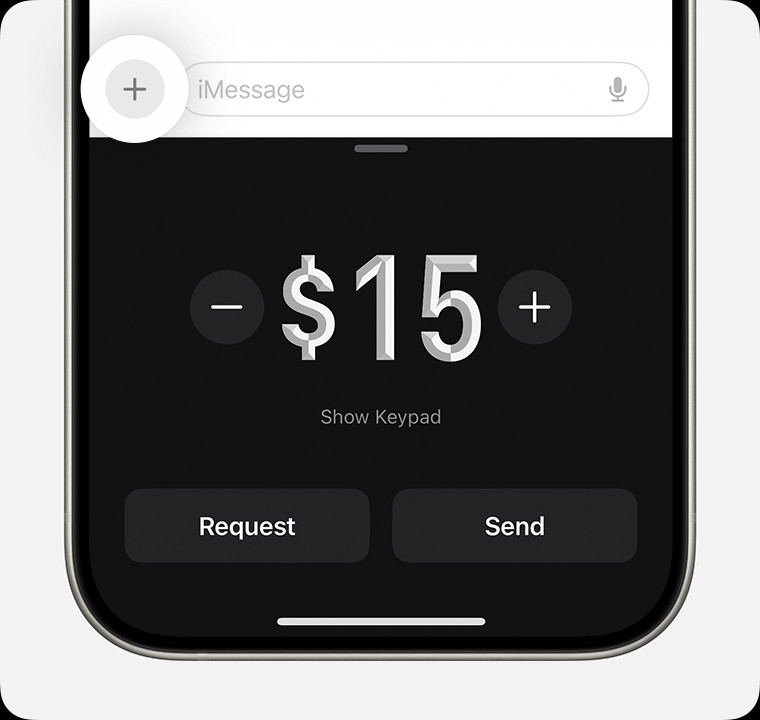 Image of iPhone sending money in the Messages app
-
Enter the Amount:
- Enter the amount you want to send.
- You can add a comment if you want it to appear in Latest Transactions for both you and the receiver.
-
Review Payment:
- Tap the Send button to review the payment.
-
Choose Payment Method (If Necessary):
- By default, Apple Cash uses your Apple Cash balance. If you want to use a debit card instead, tap Change Payment Method.
- Turn the Apple Cash slider off and select your debit card.
-
Confirm Payment:
- Double-click the side button to pay.
- Confirm your payment with Face ID, Touch ID, or your passcode.
Sending Money on Your Apple Watch
-
Open the Messages App:
- Open the Messages app and select an existing conversation.
-
Access Apple Cash:
- Tap the plus icon (+), then tap Apple Cash.
-
Enter the Amount:
- To change the amount, tap the minus (-) or plus (+) sign. You can also use the Digital Crown.
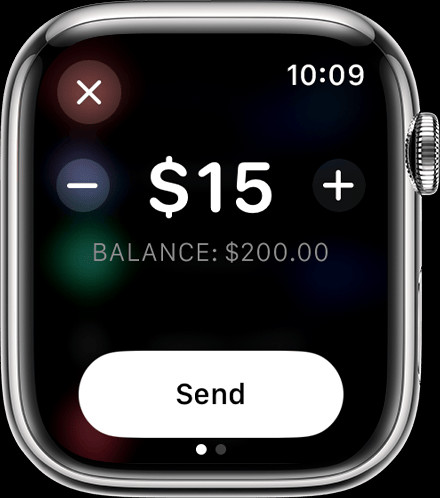 Image of Apple Watch sending money in the Messages app.
- To change the amount, tap the minus (-) or plus (+) sign. You can also use the Digital Crown.
-
Review and Send:
- Tap Send, then review or cancel the payment.
- Double-click the side button to send your payment.
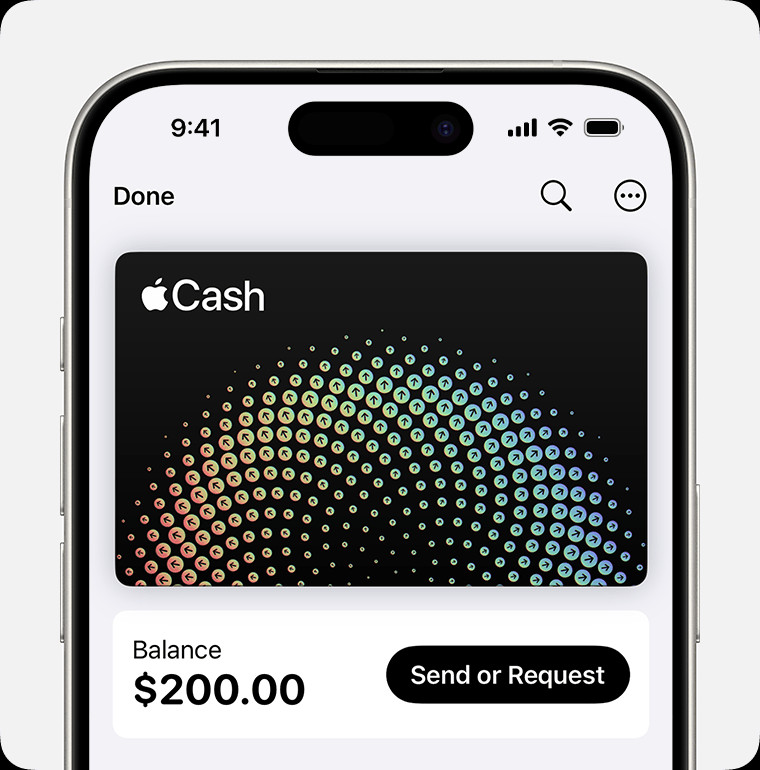
Sending Money in the Wallet App
-
Open the Wallet App:
- On your iPhone, open the Wallet app.
- Tap your Apple Cash card.
-
Send or Request:
- Tap Send or Request, then select or add the person you want to send money to.
iPhone displaying Apple Cash transactions
- Tap Send or Request, then select or add the person you want to send money to.
-
Enter the Amount:
- Tap Next, then enter the amount you want to send.
-
Confirm Payment:
- Tap Send, then tap the Send button.
- Double-click the side button to pay.
- Confirm your payment with Face ID, Touch ID, or your passcode.
Using Tap to Cash
-
Open the Wallet App:
- Open the Wallet app on both iPhones.
-
Bring Devices Together:
- Hold the top of the two iPhones near each other.
 Image of the top of two iPhones next to each other
- Hold the top of the two iPhones near each other.
Important Considerations
- Insufficient Balance: If you don’t have enough money in your Apple Cash balance, you can pay the remainder with your linked debit card.
- Debit Card Required: If you haven’t added a debit card to the Wallet app, you need to add one to send money.
- Security: Apple Cash transactions are secure, but always ensure you are sending money to people you know and trust.
- Transaction Limits: There may be limits on how much you can send or receive within a certain period. Check the Apple Cash Terms and Conditions for details.
Example Scenario
Suppose you want to send $50 to a friend for lunch.
- Open Messages, select your friend’s conversation.
- Tap the plus icon (+), select Apple Cash.
- Enter $50 and tap Send.
- Review the payment and confirm with Face ID.
By following these steps, you can easily send money using Apple Cash, making transactions quick and convenient.
4. Setting Up and Managing Recurring Payments with Apple Cash
Recurring payments are a convenient way to automate regular financial transactions, such as paying rent, subscriptions, or allowances. Apple Cash allows you to set up and manage recurring payments directly from your iPhone. Here’s how to do it:
Setting Up Recurring Payments
-
Open the Wallet App:
- On your iPhone, open the Wallet app.
- Tap your Apple Cash card.
-
Access Recurring Payments:
- Tap the More button (…).
- Tap Recurring Payments, then tap New Recurring Payment.
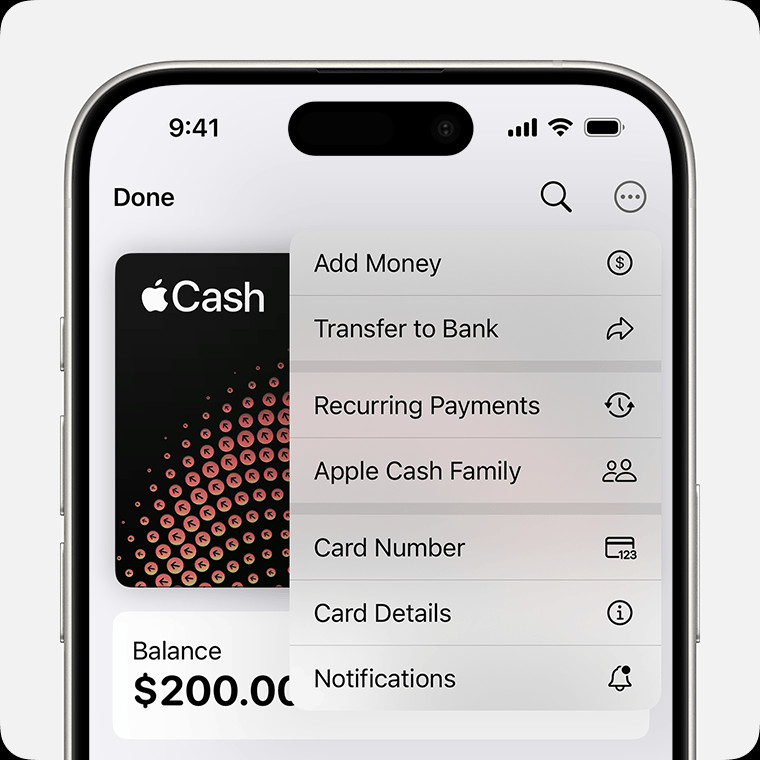 Image of iPhone showing the More menu with Recurring Payments selected
-
Add Recipient and Details:
- Add the recipient you want to send money to.
- Follow the on-screen instructions to choose the dollar amount of each payment.
- Select the date you want the payments to start and how often you’d like them sent (weekly, biweekly, or monthly).
- You can also add a memo to identify what the payments are for.
-
Review and Confirm:
- Tap Send, then tap the Send button to review the payment.
- Double-click the side button to pay.
- Confirm your payment with Face ID, Touch ID, or your passcode.
Managing Recurring Payments
Once you’ve set up a recurring payment, you can easily edit, cancel, or pause it as needed.
-
Open the Wallet App:
- Open the Wallet app on your iPhone.
- Tap your Apple Cash card.
-
Access Recurring Payments:
- Tap the More button (…).
- Tap Recurring Payments.
- Select the recurring payment you want to manage.
-
Edit, Cancel, or Pause:
- Tap Edit to change any of the payment details (amount, frequency, start date, etc.).
- Tap Cancel to stop the recurring payment.
- Tap Pause to temporarily suspend the recurring payment.
Example Scenario
Let’s say you want to set up a recurring payment of $100 to your roommate every month for rent.
- Open Wallet, tap Apple Cash card.
- Tap More (…), then Recurring Payments, then New Recurring Payment.
- Add your roommate as the recipient.
- Enter $100 as the amount, select monthly, and choose the start date.
- Review and confirm with Face ID.
Best Practices for Recurring Payments
- Set Reminders: Set reminders for upcoming payments to ensure you have sufficient funds in your Apple Cash balance.
- Monitor Transactions: Regularly check your transaction history to ensure payments are processed correctly.
- Update Payment Information: If your debit card information changes, update it promptly to avoid interruptions in your recurring payments.
- Communicate with Recipient: Inform the recipient about the recurring payment setup and any changes you make to it.
Benefits of Recurring Payments
- Convenience: Automate regular payments and avoid the hassle of manual transfers.
- Timeliness: Ensure timely payments, reducing the risk of late fees or missed payments.
- Organization: Easily track and manage your recurring expenses in one place.
Potential Issues and Troubleshooting
- Insufficient Funds: If your Apple Cash balance is insufficient, the recurring payment may fail. Make sure to add funds to your balance or link a debit card to cover the payment.
- Payment Failures: If a payment fails, you’ll receive a notification. Check your payment information and try again.
- Incorrect Details: If you entered incorrect payment details, edit the recurring payment to correct the information.
By following these steps and best practices, you can effectively set up and manage recurring payments with Apple Cash, making your financial transactions more efficient and organized.
5. Receiving Money with Apple Cash: A Comprehensive Guide
Receiving money through Apple Cash is a straightforward process that enhances convenience and security. Whether you’re selling an item, splitting a bill, or receiving a gift, Apple Cash simplifies the transaction. Here’s a comprehensive guide on how to receive money with Apple Cash.
Setting Up Apple Cash to Receive Payments
Before you can receive money, ensure your Apple Cash account is properly set up.
-
Open the Wallet App:
- On your iPhone, open the Wallet app.
-
Set Up Apple Cash:
- If you haven’t already, you’ll see a prompt to set up Apple Cash.
- Follow the on-screen instructions to activate your account.
-
Verify Your Identity:
- To ensure full functionality and FDIC insurance eligibility, you may be asked to verify your identity.
- Provide the requested information accurately.
Accepting Payments Automatically or Manually
You can choose to accept payments automatically or manually, depending on your preference.
-
Open the Wallet App:
- Open the Wallet app on your iPhone.
- Tap your Apple Cash card.
-
Access Card Details:
- Tap the More button (…).
- Tap Card Details.
-
Choose Acceptance Method:
- Tap Manually Accept Payments or Automatically Accept Payments.
- When you have Manually Accept Payments enabled, you need to accept the payment in the Messages app.
- When you choose Automatically Accept Payments, the money is immediately added to your Apple Cash balance.
Accepting a Payment Manually
-
Open the Messages App:
- Open the Messages conversation where you received the payment.
- Tap Accept in the message.
- Follow the on-screen instructions to accept the payment.
- Note: You have 7 days to accept the payment.
What Happens If You Haven’t Set Up Apple Cash?
If someone sends you money in Messages and you don’t have Apple Cash set up, you’ll see Accept in the message. When you tap Accept, you’ll be prompted to set up Apple Cash. Follow the onscreen instructions. You have 7 days to accept the payment.
Rejecting a Payment
If you don’t want to accept a payment, you can reject it.
-
Open the Wallet App:
- Open the Wallet app on your iPhone.
- Tap your Apple Cash card.
-
Find the Payment:
- Look for the payment in Latest Transactions.
-
Reject the Payment:
- Tap the payment, then tap the payment again.
- Tap Reject Payment.
- Note: If you don’t see an option to Reject Payment, you may have already accepted it.
Example Scenario
Let’s say a friend sends you $25 for your share of a dinner bill.
- If you have automatic acceptance enabled, the $25 will immediately appear in your Apple Cash balance.
- If you have manual acceptance enabled, you’ll receive a message in the Messages app. Tap Accept to add the $25 to your Apple Cash balance.
Using Received Funds
Once the money is in your Apple Cash account, you can use it in several ways:
- Spend with Apple Pay: Use the money to make purchases at stores, online, or in apps that accept Apple Pay.
- Send to Someone: Send the money to another Apple Cash user.
- Transfer to Bank Account: Transfer the money to your bank account or eligible debit card.
Benefits of Receiving Money with Apple Cash
- Convenience: Quickly receive money without needing to exchange bank details.
- Security: Transactions are secure and protected by Apple’s security measures.
- Accessibility: Funds are immediately available for spending or transferring.
- Integration: Seamlessly integrated into the Apple ecosystem.
Potential Issues and Troubleshooting
- Payment Not Received: If you haven’t received a payment, ask the sender to confirm they sent it to the correct phone number or email address.
- Verification Issues: If you have trouble verifying your identity, contact Apple Support for assistance.
- Delay in Transfer: Transfers to your bank account may take 1-3 business days to process.
By following this guide, you can efficiently receive and manage money using Apple Cash, making your financial interactions simpler and more secure.
6. Requesting Money with Apple Cash: A Simple Guide
Apple Cash makes it easy not only to send and receive money but also to request payments from others. This feature is particularly useful for splitting bills, collecting debts, or receiving payments for services rendered. Here’s a simple guide on how to request money with Apple Cash.
Requesting Money on Your iPhone
-
Open the Messages App:
- Open a conversation in the Messages app or start a new conversation with the person you want to request money from.
-
Access Apple Cash:
- Tap the plus icon (+) next to the text field.
- Tap Apple Cash from the options.
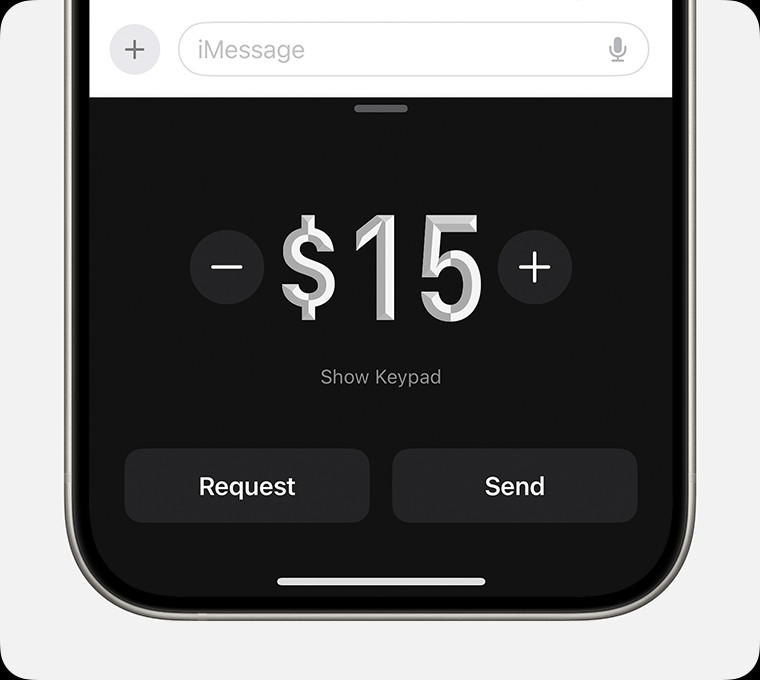 Image of iPhone requesting money in the Messages app
-
Enter the Amount:
- Enter the amount you are requesting.
-
Send the Request:
- Tap the Send button to request the payment.
Requesting Money on Your Apple Watch
-
Open the Messages App:
- Open the Messages app and choose a conversation.
-
Access Apple Cash:
- Tap the plus icon (+), then tap Apple Cash.
-
Enter the Amount:
- Enter an amount.
- Swipe left on the Send button to show the Request button.
-
Send the Request:
- Tap Request.
Responding to a Request for Payment
When someone sends you a payment request using Apple Cash, you can easily respond to it.
-
Open the Messages App:
- Open the request in the Messages app.
-
Review the Request:
- Tap Pay on the message.
-
Review and Send:
- Review the amount to send.
- Tap the Send button to continue. You can also change the amount, and then tap Send.
-
Confirm Payment:
- Double-click the side button to pay.
- Confirm your payment with Face ID, Touch ID, or your passcode.
To decline a request for money, you can simply ignore the message.
Example Scenario
Suppose you and a friend had dinner, and you need to request $30 from them for their share of the bill.
- Open Messages, select your friend’s conversation.
- Tap the plus icon (+), select Apple Cash.
- Enter $30 and tap Request.
- Send the request.
Benefits of Requesting Money with Apple Cash
- Convenience: Easily request payments directly from your Apple devices.
- Clarity: Clearly specify the amount requested, reducing confusion.
- Integration: Seamlessly integrated into the Apple ecosystem.
- Reminders: Serves as a reminder for the person to pay you back.
Best Practices for Requesting Money
- Be Clear: Clearly state what the money is for in the message.
- Be Polite: Always be courteous when requesting money.
- Set Expectations: Discuss payment terms beforehand to avoid misunderstandings.
Potential Issues and Troubleshooting
- Request Not Received: If the person claims they didn’t receive the request, ensure you sent it to the correct phone number or email address.
- Payment Delays: If the person doesn’t pay promptly, gently remind them.
- Declined Requests: If the person declines the request, discuss the issue and come to a mutual agreement.
By following this guide, you can effectively request money using Apple Cash, simplifying your financial interactions and ensuring you get paid back promptly.
7. Canceling an Apple Cash Payment: What You Need to Know
Accidents happen, and sometimes you might send an Apple Cash payment to the wrong person or for the wrong amount. Knowing how to cancel a payment can save you from potential financial headaches. Here’s what you need to know about canceling an Apple Cash payment.
When Can You Cancel a Payment?
You can only cancel an Apple Cash payment if the transaction status says “pending.” This means the recipient hasn’t accepted the payment yet. Once the recipient accepts the payment, the transaction is complete, and you cannot cancel it.
How to Cancel a Pending Payment
-
Open the Wallet App:
- On your iPhone, open the Wallet app.
- Tap your Apple Cash card.
-
View Transaction History:
- Scroll down to Latest Transactions.
- Find the pending payment you want to cancel.
-
Cancel the Payment:
- Tap the pending transaction.
- Tap Cancel Payment.
- Confirm that you want to cancel the payment.
What to Do If the Payment Has Already Been Accepted
If the payment has already been accepted, you cannot cancel it through Apple Cash. In this case, you need to:
-
Contact the Recipient:
- Reach out to the person you sent the money to and explain the situation.
- Ask them to send the money back to you.
-
If the Recipient Refuses:
- Unfortunately, if the recipient refuses to return the money, there may not be much you can do through Apple Cash or Apple Support, as these transactions are considered private transactions between two people.
- In extreme cases, you may consider legal options, but this is generally not worth the effort for small amounts.
Example Scenario
You accidentally sent $100 to the wrong contact. You check your Apple Cash transaction history and see that the payment status is “pending.”
- Open Wallet, tap Apple Cash card.
- Find the pending transaction in Latest Transactions.
- Tap the transaction and select Cancel Payment.
- Confirm the cancellation.
Preventing Accidental Payments
To avoid sending accidental payments in the future, consider these tips:
- Double-Check Details: Always double-check the recipient’s name, phone number, or email address before sending money.
- Confirm the Amount: Make sure you’ve entered the correct amount before confirming the payment.
- Use Manual Acceptance: Enable manual acceptance of payments to review and approve each transaction.
Understanding Apple Cash Terms
Apple Cash person-to-person payments are like any other private transaction between two people, so only send and receive money with people you know.
Additional Tips
- Act Quickly: If you realize you’ve made a mistake, act quickly to cancel the payment before it’s accepted.
- Keep Records: Keep records of your Apple Cash transactions for future reference.
By understanding how to cancel an Apple Cash payment and taking steps to prevent accidental payments, you can use Apple Cash with confidence and avoid potential financial issues.
8. Security Tips for Using Apple Cash and Apple Credit Card
Using Apple Cash and Apple Credit Card offers convenience, but it’s essential to prioritize security to protect your financial information. Here are key security tips to keep in mind:
General Security Practices
-
Use Strong Passwords:
- Use strong, unique passwords for your Apple ID and other online accounts.
- Avoid using easily guessable information like birthdays or pet names.
-
Enable Two-Factor Authentication:
- Two-factor authentication adds an extra layer of security to your Apple ID.
- With two-factor authentication, you’ll need to enter a verification code from your trusted device when you sign in on a new device.
-
Keep Software Updated:
- Keep your iPhone, iPad, and other Apple devices updated with the latest software.
- Software updates often include security patches that protect against vulnerabilities.
Apple Cash Specific Security Tips
-
Verify Identity:
- Verify your identity with Apple to ensure full functionality and FDIC insurance eligibility for your Apple Cash account.
-
Enable Manual Acceptance:
- Enable manual acceptance of payments to review and approve each transaction.
- This gives you more control over who can send money to your account.
-
Only Transact with People You Know:
- Apple Cash person-to-person payments are like any other private transaction between two people, so only send and receive money with people you know and trust.
-
Monitor Transactions:
- Regularly check your Apple Cash transaction history for any unauthorized transactions.
- If you see something suspicious, report it to Apple Support immediately.
-
Be Cautious of Scams:
- Be wary of phishing scams or requests for money from unknown sources.
- Never share your Apple ID or password with anyone.
Apple Credit Card Specific Security Tips
-
Monitor Transactions:
- Regularly check your Apple Credit Card transactions for any unauthorized purchases.
- Report any suspicious activity to Goldman Sachs immediately.
-
Secure Your Physical Card:
- If you have a physical Apple Credit Card, keep it in a safe place.
- Report a lost or stolen card to Goldman Sachs immediately.
-
Be Cautious Online:
- When making online purchases, ensure you’re using secure websites with HTTPS in the URL.
- Avoid using public Wi-Fi networks when making financial transactions.
Example Scenario
You receive a message from an unknown number requesting money via Apple Cash. The message claims to be from a friend in need.
-
Verify the Identity:
- Call your friend directly to verify if they sent the message.
-
Do Not Send Money:
- If you cannot verify the identity of the sender, do not send any money.
-
Report the Scam:
- Report the suspicious message to Apple Support.
Responding to Suspicious Activity
- Contact Apple Support: If you suspect fraudulent activity on your Apple Cash account, contact Apple Support immediately.
- Address: 44 West Fourth Street, New York, NY 10012, United States.
- Phone: +1 (212) 998-0000.
- Website: money-central.com.
- Contact Goldman Sachs: If you suspect fraudulent activity on your Apple Credit Card, contact Goldman Sachs immediately.
- Change Passwords: If you suspect your Apple ID or other account has been compromised, change your passwords immediately.
By following these security tips, you can use Apple Cash and Apple Credit Card safely and confidently, protecting your financial information from potential threats.
9. Alternatives to Sending Money with Apple Credit Card
While Apple Cash offers a convenient way to send money, it’s not the only option available. Several alternative money transfer services provide different features, fees, and levels of convenience. Here’s a look at some alternatives to sending money with your Apple Credit Card:
1. PayPal
- Overview: PayPal is one of the most widely used online payment platforms, allowing you to send and receive money globally.
- Features:
- Send money to friends and family.
- Make online purchases.
- Receive payments for goods and services.
- Link bank accounts, credit cards, and debit cards.
- Fees:
- Sending money to friends and family within the US using your PayPal balance or bank account is usually free.
- Using a credit card to send money may incur a fee (typically 2.9% + $0.30 per transaction).
- International transfers may have additional fees.
2. Venmo
- Overview: Venmo is a popular mobile payment app, especially among younger users, for sending and receiving money.
- Features:
- Send money to friends and family.
- Split bills.
- Add notes and emojis to transactions.
- Link bank accounts, credit cards, and debit cards.
- Fees:
- Sending money using your Venmo balance, bank account, or debit card is usually free.
- Using a credit card to send money incurs a fee (typically 3% per transaction).
3. Cash App
- Overview: Cash App is a mobile payment service developed by Block, Inc., allowing users to send and receive money.
- Features:
- Send money to friends and family.
- Receive direct deposits.
- Invest in stocks and Bitcoin.
- Get a Cash Card (Visa debit card) for spending your balance.
- Fees:
- Sending money using your Cash App balance or linked bank account is usually free.
- Using a credit card to send money incurs a fee (typically 3% per transaction).
- Instant transfers to your bank account incur a fee (typically 0.5% – 1.75%).
4. Zelle
- Overview: Zelle is a payment network integrated into many banking apps, allowing you to send and receive money directly from your bank account.
- Features:
- Send money to friends and family.
- No separate app needed if your bank supports Zelle.
- Funds are typically available within minutes.
- Fees:
- Zelle is generally free to use, but check with your bank to confirm.
5. Google Pay
- Overview: Google Pay is a digital wallet platform that allows you to send and receive money, make contactless payments, and store loyalty cards and tickets.
- Features:
- Send money to friends and family.
- Make contactless payments in stores.
- Store loyalty cards and tickets.
- Link bank accounts, credit cards, and debit cards.
- Fees:
- Sending money using your Google Pay balance or linked bank account is usually free.
- Using a credit card to send money may incur a fee.
Comparison Table
| Service | Fees for Credit Card Transfers | Other Features |
|---|---|---|
| PayPal | 2.9% + $0.30 | Online purchases, international transfers |
| Venmo | 3% | Split bills, social feed |
| Cash App | 3% | Investing, Cash Card |
| Zelle | Generally Free | Direct bank transfers |
| Google Pay | Varies | Contactless payments, loyalty card storage |
Example Scenario
You need to send $50 to a friend. Here’s how the fees might compare across different platforms:
- PayPal: $50 + (2.9% of $50 + $0.30) = $51.75
- Venmo: $50 + (3% of $50) = $51.50
- Cash App: $50 + (3% of $50) = $51.50
- Zelle: $50 (typically no fee)
Factors to Consider When Choosing an Alternative
- Fees: Compare the fees for using a credit card to send money.
- Convenience: Consider how easy it is to use the platform and whether
