Are you looking for an easy and secure way to send and receive money? How To Transfer Money On Apple Pay might be the solution. At money-central.com, we offer a comprehensive guide on how to use Apple Pay for your financial transactions, making money transfers a breeze. Discover the convenience of digital payments and streamline your financial life today with our insights on mobile payments, digital wallets, and secure transactions.
1. What is Apple Pay and How Does it Work?
Apple Pay is Apple’s mobile payment and digital wallet service that allows users to make payments in person, in iOS apps, and on the web using Safari. It digitizes and can replace a credit or debit card chip and PIN transaction on a contactless-capable point-of-sale terminal. Let’s explore the inner workings of this digital payment solution.
1.1 Setting Up Apple Pay
The first step in using Apple Pay is setting it up on your compatible device.
- Open the Wallet App: On your iPhone or iPad, locate and open the Wallet app.
- Add a Card: Tap the plus (+) icon to add a new credit or debit card. You can either manually enter your card details or use the camera to scan the card.
- Verification: Your bank will verify your card information. This might involve a text message, email, or a call to confirm your identity.
- Activation: Once verified, your card is activated and ready to use with Apple Pay.
 iPhone showing the Wallet app with a credit card added for Apple Pay
1.2 Making Payments In-Store
Making payments with Apple Pay in physical stores is a quick and secure process.
- Look for the Symbol: Check for the Apple Pay or contactless payment symbol at the checkout terminal.
- Authenticate: Depending on your device, use Face ID, Touch ID, or your passcode to authenticate the payment.
- Hold Near Reader: Hold your iPhone or Apple Watch near the contactless reader. A checkmark and the word “Done” will appear on your screen to confirm the payment.
1.3 Online and In-App Payments
Apple Pay can also be used for online and in-app purchases, streamlining the checkout process.
- Select Apple Pay: When making a purchase online or in an app, look for the Apple Pay option at checkout.
- Confirm Details: Review your payment and shipping details.
- Authenticate: Use Face ID, Touch ID, or your passcode to authorize the payment.
2. How to Send Money Via Apple Pay: Step-by-Step
Sending money through Apple Pay is a straightforward process, whether you’re using Apple Cash or transferring directly from a debit card. Here’s how to do it.
2.1 Using Apple Cash
Apple Cash is a digital card stored in your Wallet app that allows you to send and receive money with other Apple Pay users.
- Open the Messages App: Start by opening the Messages app on your iPhone.
- Select a Conversation: Choose an existing conversation or start a new one with the person you want to send money to.
- Tap the Apple Cash Icon: Tap the plus (+) icon, then select Apple Cash.
- Enter the Amount: Enter the amount you wish to send.
- Add a Comment (Optional): Add a comment if you want it to appear in Latest Transactions for both you and the recipient.
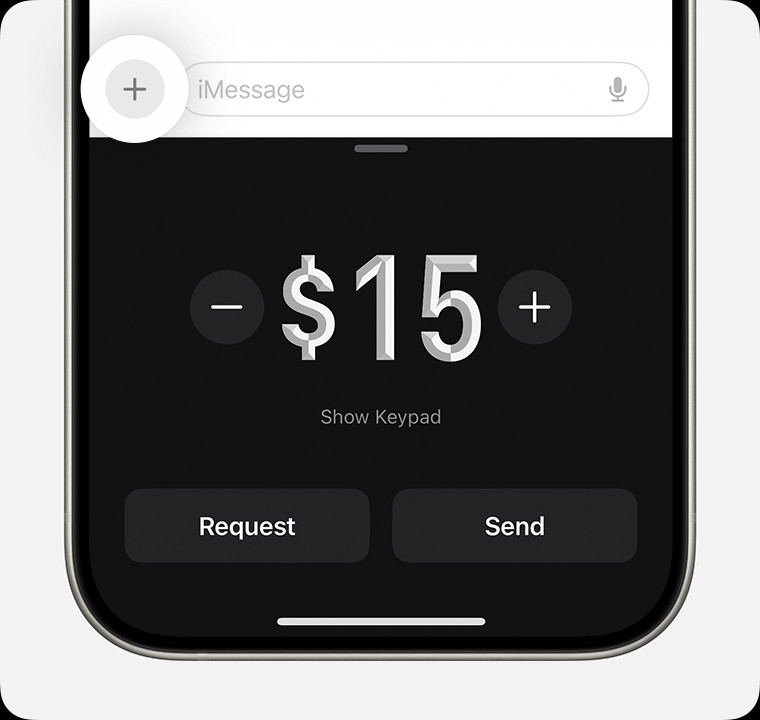 iPhone sending money in the Messages app using Apple Cash
 - Review and Send: Tap the Send button to review the payment.
- Authenticate: Double-click the side button to pay, then confirm with Face ID, Touch ID, or your passcode.
2.2 Using a Debit Card
If you prefer to send money directly from your debit card, you can do so within the Messages app.
- Open the Messages App: Open the Messages app on your iPhone.
- Select a Conversation: Choose an existing conversation or start a new one.
- Tap the Apple Cash Icon: Tap the plus (+) icon, then select Apple Cash.
- Enter the Amount: Enter the amount you want to send.
- Change Payment Method: Tap Change Payment Method.
- Turn Off Apple Cash Slider: Turn the Apple Cash slider off.
- Select Debit Card: Tap your debit card to select it.
- Review and Send: Tap the Send button to review the payment.
- Authenticate: Double-click the side button to pay, then confirm with Face ID, Touch ID, or your passcode.
2.3 Using the Wallet App
You can also send money directly from the Wallet app using your Apple Cash card.
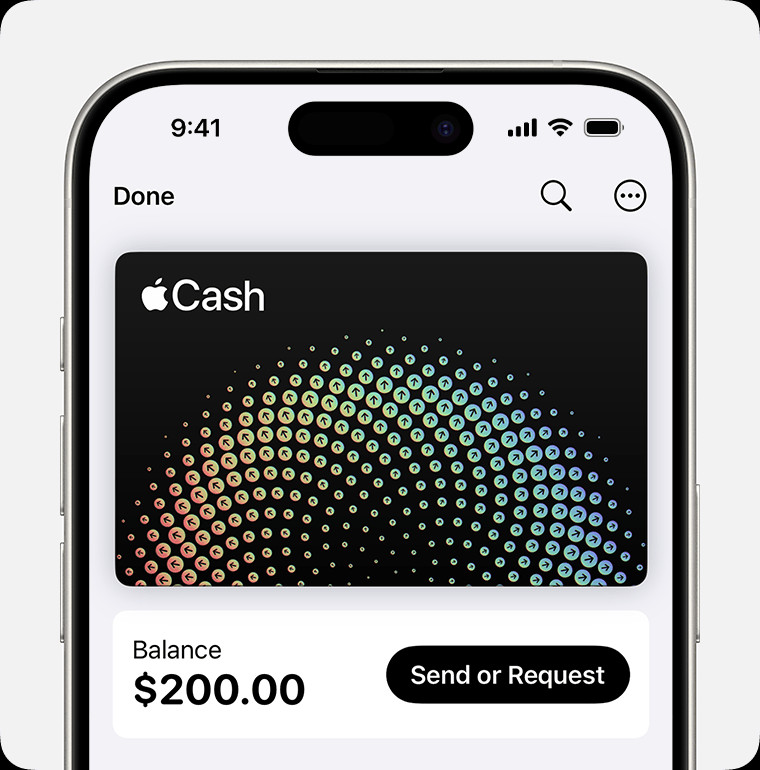
- Open the Wallet App: On your iPhone, open the Wallet app.
- Tap Your Apple Cash Card: Tap your Apple Cash card.
- Tap Send or Request: Tap Send or Request, then select or add the person you want to send money to.
- Enter the Amount: Tap Next, then enter the amount you want to send.
- Review and Send: Tap Send, then tap the Send button.
- Authenticate: Double-click the side button to pay, then confirm with Face ID, Touch ID, or your passcode.
3. How to Receive Money on Apple Pay: A Simple Guide
Receiving money through Apple Pay is just as easy as sending it. Here’s a step-by-step guide to help you get started.
3.1 Accepting Payments Automatically
By default, Apple Cash is set to automatically accept payments, making the process seamless.
- Notification: When someone sends you money, you’ll receive a notification in the Messages app.
- Funds Added: The money is automatically added to your Apple Cash balance.
- Spend or Transfer: You can then use the money to spend with Apple Pay, send it to someone else, or transfer it to your bank account.
3.2 Accepting Payments Manually
If you prefer to manually accept payments, you can change your settings in the Wallet app.
- Open the Wallet App: Open the Wallet app on your iPhone.
- Tap Your Apple Cash Card: Tap your Apple Cash card.
- Tap the More Button: Tap the More button, then tap Card Details.
- Select Manually Accept Payments: Tap Manually Accept Payments.
- Accept the Payment: When you receive money, open the Messages conversation, tap Accept, and follow the onscreen instructions.
3.3 What if You Haven’t Set Up Apple Cash?
If someone sends you money and you don’t have Apple Cash set up, you’ll see an Accept option in the message. Tapping Accept will prompt you to set up Apple Cash, which involves:
- Following Onscreen Instructions: Follow the onscreen instructions to set up your Apple Cash account.
- Verification: You may be asked to verify your identity to enable full functionality.
4. Setting Up Recurring Payments with Apple Cash
For regular payments, setting up recurring payments can save time and ensure you never miss a payment.
4.1 Step-by-Step Guide
- Open the Wallet App: On your iPhone, open the Wallet app.
- Tap Your Apple Cash Card: Tap your Apple Cash card.
- Tap the More Button: Tap the More button, then tap Recurring Payments, then tap New Recurring Payment.
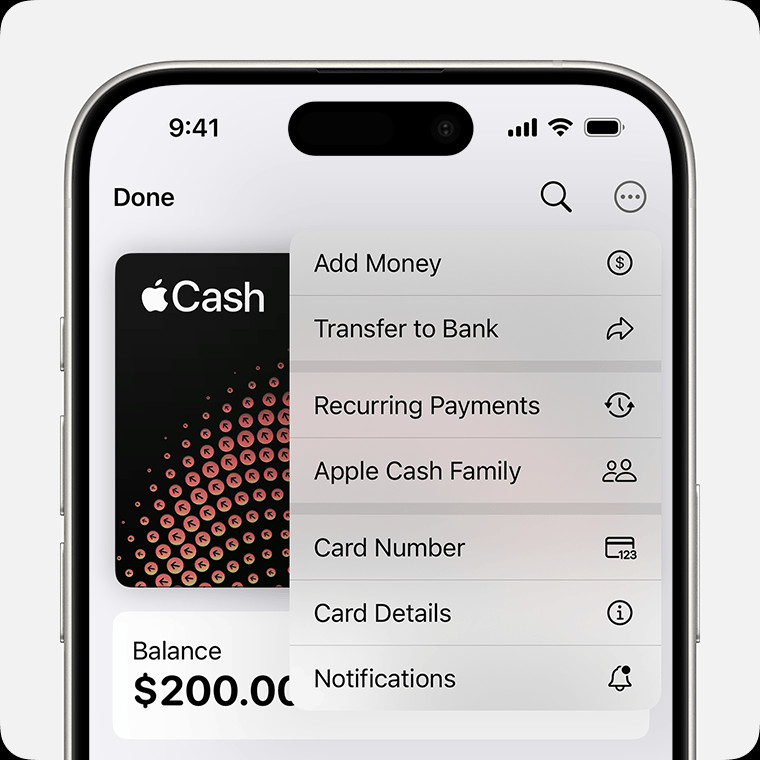 iPhone showing the More menu with Recurring Payments selected in the Wallet app
 - Add the Recipient: Add the recipient and follow the on-screen instructions to choose the dollar amount of each payment.
- Set the Schedule: Choose the date you want the payments to start and how often you’d like them sent (weekly, biweekly, or monthly).
- Add a Memo (Optional): You can also add a memo to identify what the payments are for.
- Review and Send: Tap Send, then tap the Send button to review the payment.
- Authenticate: Double-click the side button to pay, and confirm with Face ID, Touch ID, or your passcode.
4.2 Editing, Canceling, or Pausing Recurring Payments
You have full control over your recurring payments and can edit, cancel, or pause them at any time.
- Open the Wallet App: Open the Wallet app, tap your Apple Cash card, then tap the More button.
- Tap Recurring Payments: Tap Recurring Payments, then tap the recurring payment you want to manage.
- Choose an Action: Tap Cancel, Pause, or Edit to change any of the payment details.
5. Requesting Payments Via Apple Pay
Need to request money from someone? Apple Pay makes it easy to send a payment request.
5.1 How to Request Money
- Open the Messages App: Open a conversation in the Messages app or start a new one.
- Tap the Apple Cash Icon: Tap the plus (+) icon, tap Apple Cash, enter the amount, then tap Request.
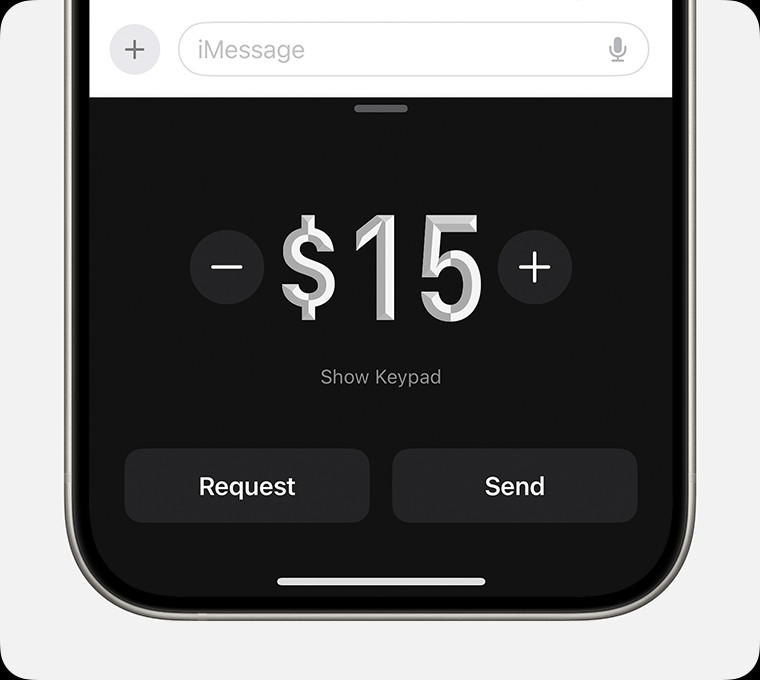 iPhone requesting money in the Messages app using Apple Cash
 - Send the Request: Tap the Send button to request the payment.
5.2 Responding to Payment Requests
When you receive a payment request, responding is simple.
- Open the Request: Open the request in the Messages app, then tap Pay on the message.
- Review the Amount: Review the amount to send. You can also change the amount if needed.
- Send the Payment: Tap the Send button to continue.
- Authenticate: Double-click the side button to pay, then confirm your payment with Face ID, Touch ID, or your passcode.
To decline a request for money, simply ignore the message.
6. Canceling a Payment on Apple Pay
If you’ve sent a payment to the wrong person or need to cancel it for any reason, here’s what you need to know.
6.1 How to Cancel a Payment
- Check Transaction History: In your Apple Cash transaction history, find the payment you want to cancel.
- Pending Status: If the transaction status says pending, the recipient hasn’t accepted your payment yet.
- Cancel the Payment: You can cancel it by tapping on the transaction and selecting Cancel Payment.
Keep in mind that once a payment has been accepted, it cannot be canceled.
7. Tap to Cash: A Convenient Feature
Apple’s Tap to Cash feature offers a seamless way to send and receive money with someone nearby without needing to share phone numbers or email addresses.
7.1 How Tap to Cash Works
- Bring Devices Together: Bring the tops of two iPhones near each other.
- Follow Prompts: Follow the prompts on the screen to complete the transaction.
 Two iPhones using Tap to Cash to send money
This feature is particularly useful for quick, in-person transactions.
8. Security and Privacy of Apple Pay
Apple Pay is designed with security and privacy in mind, offering a safe way to handle your financial transactions.
8.1 Tokenization
When you add a credit or debit card to Apple Pay, the actual card number is not stored on your device or on Apple’s servers. Instead, a unique Device Account Number is created, encrypted, and stored in the Secure Element, a dedicated chip in your device.
8.2 Transaction Security
Each transaction is authorized with a one-time unique dynamic security code. This ensures that your card details are never shared with merchants, reducing the risk of fraud.
8.3 Privacy Measures
Apple does not store your transaction information in a way that can be tied back to you. Your card numbers and identity are not shared with merchants. This helps to keep your financial information private and secure.
9. Troubleshooting Common Apple Pay Issues
Even with its ease of use, you might encounter some issues while using Apple Pay. Here are some common problems and how to troubleshoot them.
9.1 Card Not Added
If you’re having trouble adding a card to Apple Pay, try the following:
- Check Compatibility: Ensure your card is compatible with Apple Pay. Most major credit and debit cards are supported, but it’s always good to confirm.
- Verify Information: Double-check that you’ve entered your card details correctly.
- Contact Your Bank: Your bank may need to verify your card before it can be added to Apple Pay.
9.2 Payment Not Going Through
If your payment is not going through, consider these solutions:
- Check Internet Connection: Ensure you have a stable internet connection.
- Verify Card Balance: Make sure you have sufficient funds in your account.
- Update Software: Ensure your device is running the latest version of iOS.
- Contact Apple Support: If the issue persists, contact Apple Support for further assistance.
9.3 Face ID or Touch ID Not Working
If you’re having trouble with authentication, try these steps:
- Clean the Sensor: Make sure the Face ID or Touch ID sensor is clean and free from obstructions.
- Restart Your Device: Sometimes, a simple restart can resolve authentication issues.
- Reset Face ID or Touch ID: Go to Settings > Face ID & Passcode or Touch ID & Passcode and reset your authentication method.
10. Apple Pay vs. Other Payment Methods
Apple Pay offers several advantages over traditional payment methods, but it’s essential to understand the differences.
10.1 Apple Pay vs. Credit Cards
- Security: Apple Pay uses tokenization and dynamic security codes, providing enhanced security compared to traditional credit cards.
- Convenience: Apple Pay allows for contactless payments, which are faster and more convenient than inserting a card and entering a PIN.
- Privacy: Apple Pay does not share your card details with merchants, protecting your privacy.
10.2 Apple Pay vs. Other Digital Wallets
- Integration: Apple Pay is tightly integrated with Apple devices, offering a seamless user experience.
- Security: Apple Pay’s security features are among the best in the industry, providing peace of mind.
- Acceptance: Apple Pay is widely accepted at merchants that support contactless payments.
10.3 Apple Pay vs. Cash
- Convenience: Apple Pay is more convenient than carrying cash, especially for larger transactions.
- Security: Apple Pay is more secure than carrying cash, as you can cancel your card if your device is lost or stolen.
- Tracking: Apple Pay allows you to track your transactions, making it easier to manage your finances.
11. Tips for Maximizing Your Apple Pay Experience
To get the most out of Apple Pay, consider these tips:
11.1 Add Multiple Cards
Add all your credit and debit cards to Apple Pay to have a variety of payment options at your fingertips.
11.2 Use Rewards Cards
Add your rewards cards to Apple Pay to earn points and rewards on your purchases automatically.
11.3 Set a Default Card
Set your preferred card as the default card in Apple Pay to streamline the payment process.
11.4 Stay Updated
Keep your device’s software updated to ensure you have the latest security features and improvements.
12. The Future of Apple Pay
Apple Pay continues to evolve, with new features and capabilities being added regularly.
12.1 New Features
Apple is continuously working on new features to enhance the Apple Pay experience, such as:
- Expanded Merchant Support: Apple is working to expand the number of merchants that accept Apple Pay.
- New Payment Options: Apple may introduce new payment options, such as support for cryptocurrencies.
- Enhanced Security: Apple is always working on improving the security of Apple Pay to protect users from fraud.
12.2 Industry Trends
The mobile payment industry is growing rapidly, driven by the increasing popularity of smartphones and the demand for convenient and secure payment methods. According to a report by New York University’s Stern School of Business, mobile payments are expected to account for over $4.7 trillion in transactions by 2025, reflecting a significant shift towards digital payment solutions.
13. Apple Cash for Families: A Comprehensive Look
Apple Cash for Families allows parents to set up Apple Cash accounts for their children, providing a way to manage their spending and teach them about financial responsibility.
13.1 Setting Up Apple Cash for Family
- Family Sharing: Ensure you have Family Sharing set up on your Apple device.
- Invite Family Members: Invite your children to join your Family Sharing group.
- Set Up Apple Cash: Set up Apple Cash accounts for your children through the Wallet app.
13.2 Benefits of Apple Cash for Families
- Spending Limits: Parents can set spending limits for their children, helping them learn to budget.
- Transaction Monitoring: Parents can monitor their children’s transactions, providing oversight and guidance.
- Financial Education: Apple Cash for Families offers a valuable tool for teaching children about financial responsibility.
13.3 Limitations
Apple Cash Family accounts can only send or receive up to $2000 within a rolling seven-day period, as per the Terms and Conditions.
14. Real-World Examples of Using Apple Pay
To illustrate the versatility of Apple Pay, here are a few real-world examples:
14.1 Paying at Grocery Stores
Use Apple Pay at grocery stores to quickly and securely pay for your purchases.
14.2 Buying Coffee
Grab your morning coffee and pay with Apple Pay for a seamless transaction.
14.3 Online Shopping
Shop online and use Apple Pay for a fast and secure checkout experience.
14.4 Splitting Bills
Use Apple Cash to easily split bills with friends and family.
15. How to Transfer Apple Cash to Your Bank Account
Transferring your Apple Cash balance to your bank account is a simple process.
15.1 Step-by-Step Guide
- Open the Wallet App: Open the Wallet app on your iPhone.
- Tap Your Apple Cash Card: Tap your Apple Cash card.
- Tap Transfer to Bank: Tap Transfer to Bank.
- Enter the Amount: Enter the amount you want to transfer.
- Confirm Details: Confirm your bank account details.
- Authorize: Authorize the transfer with Face ID, Touch ID, or your passcode.
15.2 Transfer Times
Transfers to your bank account typically take 1-3 business days to complete. Instant transfers to an eligible debit card are also available for a small fee.
16. Managing Multiple Apple Cash Cards
If you have multiple Apple Cash cards, managing them is straightforward.
16.1 Viewing Your Cards
- Open the Wallet App: Open the Wallet app on your iPhone.
- Scroll Through Cards: Scroll through your cards to view all your Apple Cash cards.
16.2 Setting a Default Card
- Go to Settings: Go to Settings > Wallet & Apple Pay.
- Default Card: Select your preferred card as the default card.
17. Apple Pay on Different Devices
Apple Pay is available on a variety of Apple devices, offering a consistent experience across platforms.
17.1 iPhone
Apple Pay is fully integrated with iPhone, allowing you to make payments in-store, online, and in-app.
17.2 Apple Watch
Use Apple Pay on your Apple Watch for convenient contactless payments on the go.
17.3 iPad
Use Apple Pay on your iPad to make online and in-app purchases.
17.4 Mac
Use Apple Pay on your Mac to make online purchases in Safari.
18. Maximizing Rewards and Benefits with Apple Pay
Take advantage of rewards and benefits offered by your credit and debit cards when using Apple Pay.
18.1 Earning Rewards
Earn rewards points, cashback, and other benefits when you use your eligible cards with Apple Pay.
18.2 Special Offers
Keep an eye out for special offers and promotions when using Apple Pay at participating merchants.
19. Scenarios Where Apple Pay Excels
Apple Pay is particularly useful in certain situations.
19.1 Travel
Use Apple Pay while traveling to make secure and convenient payments without carrying large amounts of cash.
19.2 Emergency Situations
In emergency situations, Apple Pay can provide a quick and easy way to access funds.
19.3 Online Subscriptions
Use Apple Pay to manage and pay for your online subscriptions.
20. Staying Informed About Apple Pay Updates
Stay informed about the latest updates and features related to Apple Pay.
20.1 Apple’s Website
Visit Apple’s website for the latest news and information about Apple Pay.
20.2 News Outlets
Follow technology news outlets for updates on Apple Pay and the mobile payment industry.
20.3 Money-Central.com
Keep an eye on money-central.com for comprehensive guides, tips, and updates on Apple Pay and other financial topics.
FAQ: How to Transfer Money on Apple Pay
Can you transfer money from Apple Pay to a bank account?
Yes, you can transfer money from your Apple Cash account to your bank account. Open the Wallet app, tap your Apple Cash card, tap Transfer to Bank, enter the amount, and confirm your bank details.
How do I send money through Apple Pay?
You can send money through Apple Pay using the Messages app or the Wallet app. In the Messages app, tap the Apple Cash icon, enter the amount, and send. In the Wallet app, tap your Apple Cash card, tap Send or Request, select the recipient, enter the amount, and send.
Is there a fee to transfer money on Apple Pay?
There is no fee to transfer money from your Apple Cash account to your bank account. However, instant transfers to an eligible debit card may incur a small fee.
What if I sent money to the wrong person on Apple Pay?
If the transaction status says pending, you can cancel the payment. If the payment has already been accepted, you cannot cancel it. It’s essential to double-check the recipient’s information before sending money.
Can I set up recurring payments with Apple Pay?
Yes, you can set up recurring payments with Apple Cash. Open the Wallet app, tap your Apple Cash card, tap the More button, tap Recurring Payments, and follow the onscreen instructions.
Is Apple Pay safe to use?
Yes, Apple Pay is designed with security in mind. It uses tokenization and dynamic security codes to protect your financial information. Your card details are never shared with merchants.
How do I request money from someone using Apple Pay?
Open the Messages app, tap the Apple Cash icon, enter the amount, tap Request, and send the request.
Can I use Apple Pay on my Apple Watch?
Yes, Apple Pay is available on Apple Watch. You can use it to make contactless payments at merchants that support Apple Pay.
What should I do if my Apple Pay isn’t working?
Check your internet connection, verify your card balance, update your device’s software, and contact Apple Support if the issue persists.
Are there any limits to how much money I can send or receive with Apple Cash?
Yes, there are limits to how much money you can send or receive with Apple Cash. Apple Cash Family accounts can only send or receive up to $2000 within a rolling seven-day period. Other limits may apply as per the Terms and Conditions.
Conclusion: Embracing the Convenience of Apple Pay
Apple Pay offers a secure, convenient, and versatile way to handle your financial transactions. From sending and receiving money to setting up recurring payments and managing your Apple Cash balance, Apple Pay simplifies your financial life. By understanding how to use Apple Pay effectively, you can take full advantage of its many benefits and stay informed about the latest updates and features.
Ready to take control of your finances and simplify your money transfers? Visit money-central.com today for more insightful articles, helpful tools, and expert advice. Explore our resources to learn how to budget effectively, save smarter, and invest wisely. Don’t wait—start your journey to financial empowerment with money-central.com now! Address: 44 West Fourth Street, New York, NY 10012, United States. Phone: +1 (212) 998-0000.