Sending money to friends and family has never been easier, especially for those within the Apple ecosystem. Apple Pay, coupled with Apple Cash, provides a seamless and secure way to transfer funds directly from your iPhone, Apple Watch, or iPad. This guide will walk you through the various methods to use Apple Pay to send money, ensuring you can quickly and efficiently manage your peer-to-peer transactions.
Whether you are splitting a bill, sending a gift, or paying someone back, Apple Pay offers multiple convenient options. Let’s explore how to leverage Apple Pay and Apple Cash to send money to the people you know.
Sending Money via Messages App with Apple Cash
The Messages app is a straightforward way to send money using Apple Cash, ideal for casual transactions within conversations. Here’s how to do it on your iPhone:
-
Open Messages: Launch the Messages app on your iPhone and either start a new conversation or select an existing one.
-
Access Apple Cash: Tap on the plus (+) icon located to the left of the text input field. From the options that appear, tap on “Apple Cash”.
-
Enter Amount and Send: Input the amount of money you wish to send. Then, tap “Send”.
-
Add a Comment (Optional): You have the option to add a comment, which will be visible in the transaction history for both you and the recipient. This can be helpful for record-keeping.
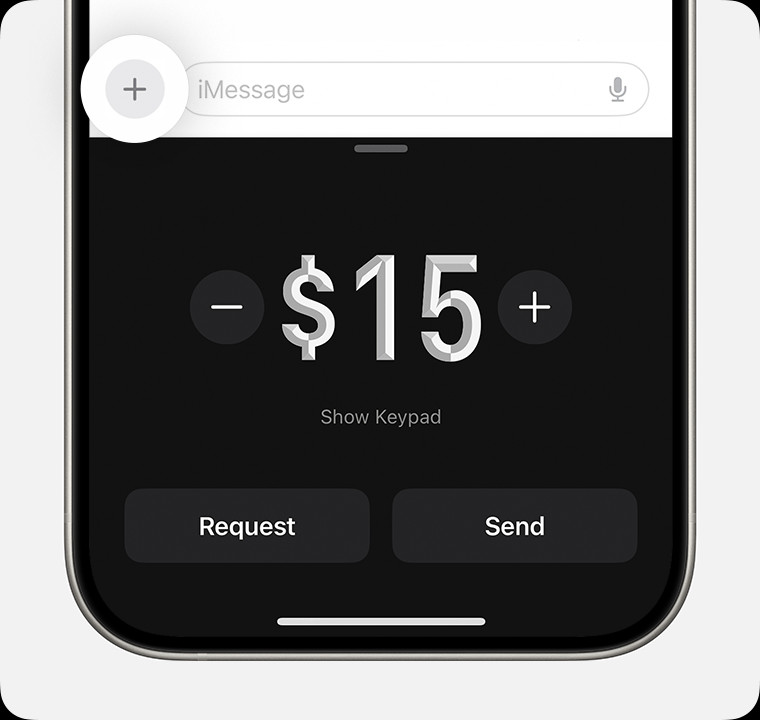 iPhone screen showing how to send money via Apple Cash in Messages app
Alt text: Sending money using Apple Cash within the Messages app on an iPhone. The interface shows the Apple Cash icon and the send money screen.
-
Review and Confirm Payment: Tap the “Send” button to review your payment details.
-
Choose Payment Method (If Needed): By default, Apple Cash uses your Apple Cash balance. If you prefer to use a debit card directly, tap “Change Payment Method”. You can then toggle off the Apple Cash slider and select your preferred debit card.
-
Debit Card Top-Up: If your Apple Cash balance is insufficient, you can use a debit card to cover the remaining amount. The screen will display both your Apple Cash card and debit card, showing the respective amounts to be deducted from each.
-
Authenticate Payment: Double-click the side button on your iPhone to initiate the payment. Confirm the transaction using Face ID, Touch ID, or your passcode for secure authorization.
If you haven’t yet added a debit card to your Wallet app, you’ll need to do so to use it for sending money.
You can also send money via Apple Cash through your Apple Watch, which is convenient for quick transactions:
-
Open Messages on Apple Watch: Open the Messages app on your Apple Watch and select an existing conversation.
-
Access Apple Cash: Tap the plus (+) icon, then tap the Apple Cash icon.
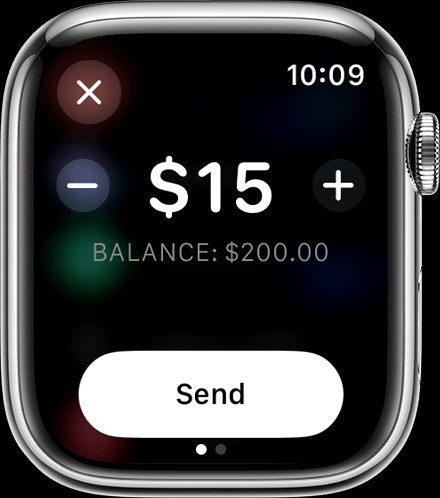 Apple Watch interface for sending money via Messages app
Alt text: Sending money with Apple Cash using the Messages app on an Apple Watch. The screen displays the amount selection and send button.
-
Adjust Amount: Use the Digital Crown or tap the plus (+) or minus (-) signs to adjust the amount you want to send.
-
Review and Send: Tap “Send”, review the payment details, and then double-click the side button to send the payment.
Sending Money Directly from the Wallet App
The Wallet app provides another avenue for sending money using Apple Cash, offering a dedicated interface for managing your finances. Here’s how to send money through the Wallet app on your iPhone:
-
Open Wallet App: Launch the Wallet app on your iPhone and tap on your Apple Cash card.
-
Initiate Send or Request: Tap either “Send” or “Request”. Then, select a contact from your list or add a new recipient to send money to.
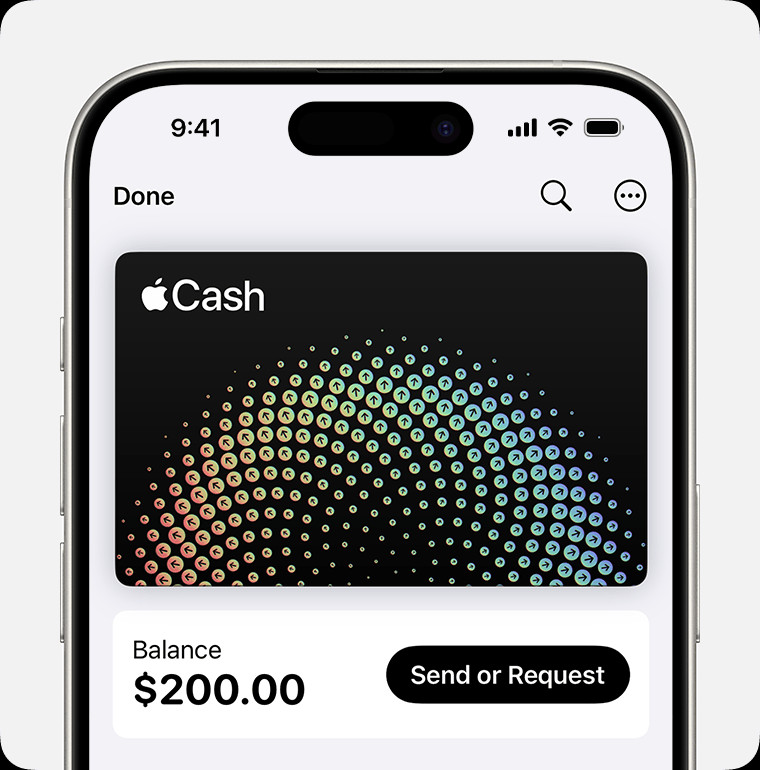 iPhone Wallet app showing options to send or request money using Apple Cash
Alt text: The Wallet app interface on an iPhone, highlighting the ‘Send’ and ‘Request’ options within Apple Cash transactions.
-
Enter Amount: Tap “Next” and enter the amount you wish to send.
-
Confirm and Send: Tap “Send”, then tap the “Send” button to proceed.
-
Authenticate Payment: Double-click the side button to finalize the payment and confirm with Face ID, Touch ID, or your passcode.
Utilizing Tap to Cash for In-Person Transfers
For those moments when you are physically with the person you need to pay, Tap to Cash provides a quick and contactless method to send money:
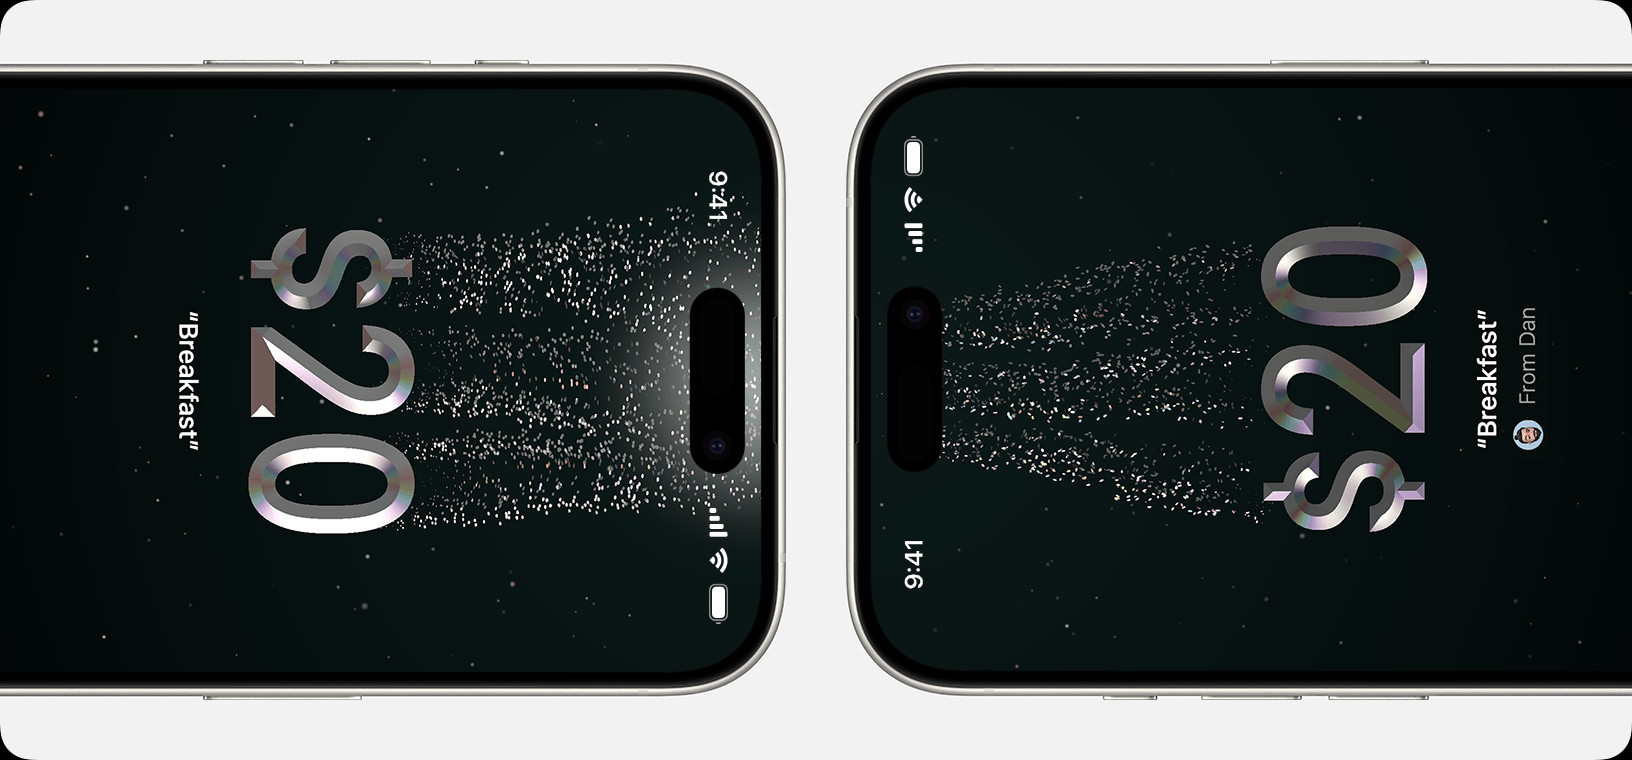 Two iPhones using Tap to Cash to send money
Alt text: Two iPhones positioned top-to-top to demonstrate the Tap to Cash feature for sending money via Apple Pay.
Tap to Cash allows you to send and receive Apple Cash with someone nearby without needing to exchange phone numbers or email addresses. Simply bring your iPhones close together to initiate the transfer. You can learn more about using Tap to Cash for seamless in-person transactions on Apple Support.
Setting Up Recurring Payments in Wallet
For regular payments, such as allowance or rent, Apple Cash allows you to set up recurring payments directly within the Wallet app. Here’s how to schedule these payments:
-
Open Wallet and Apple Cash Card: Open the Wallet app on your iPhone and tap on your Apple Cash card.
-
Access Recurring Payments: Tap the “More” button (represented by three dots), then select “Recurring Payments”, and finally tap “New Recurring Payment”.
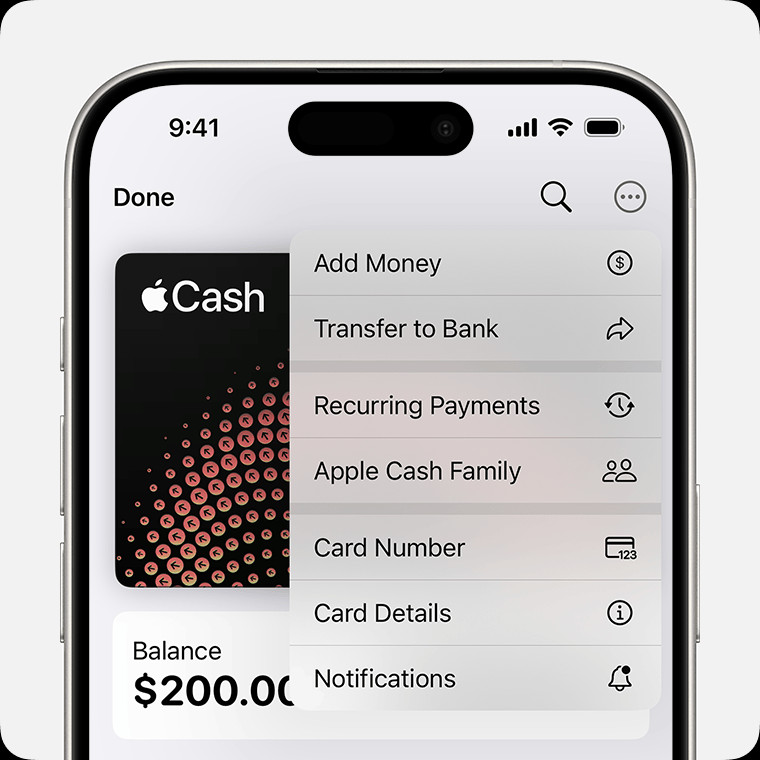 iPhone Wallet app showing the More menu with Recurring Payments option selected
Alt text: The ‘More’ menu within the Apple Cash card in the Wallet app on iPhone, with ‘Recurring Payments’ highlighted.
-
Configure Payment Schedule: Add the recipient, and then follow the on-screen prompts to specify the payment amount, the start date, and the frequency (weekly, biweekly, or monthly). You can also add a memo for identification.
-
Review and Confirm Recurring Payment: Tap “Send”, then tap the “Send” button to review the recurring payment schedule.
-
Authenticate Setup: Double-click the side button to confirm and authenticate the setup using Face ID, Touch ID, or your passcode.
You can easily edit, cancel, or pause these recurring payments at any time through the Recurring Payments section in your Apple Cash card settings.
Accepting and Managing Payments
When someone sends you money via Apple Cash, it is securely deposited into your Apple Cash balance. You can use this money to make purchases with Apple Pay, send it to others, or transfer it to your bank account or an eligible debit card.
Upon receiving a payment, you might be prompted to verify your identity to ensure the security and functionality of your Apple Cash account.
You can also manage how you accept payments:
-
Access Card Details: Open the Wallet app, tap your Apple Cash card, tap the “More” button, and then select “Card Details”.
-
Choose Acceptance Mode: Tap either “Manually Accept Payments” or “Automatically Accept Payments” to set your preference.
With manual acceptance enabled, you will need to open the Messages conversation and tap “Accept” to receive the money. You have 7 days to accept a payment sent to you. If you don’t have Apple Cash set up when someone sends you money, tapping “Accept” will guide you through the setup process.
Rejecting a Payment
If you need to reject a payment, you can do so through the Wallet app:
-
Find Payment in Transaction History: Open the Wallet app on your iPhone, tap your Apple Cash card, and locate the payment in your “Latest Transactions”.
-
Reject Payment: Tap on the payment, tap it again to view details, and then tap “Reject Payment”. If you don’t see this option, it might be because you have already accepted the payment.
Requesting Payments
Need to request money from someone? Apple Cash makes it easy to send payment requests:
On iPhone:
-
Start or Open a Message Conversation: Open the Messages app and either start a new conversation or select an existing one.
-
Access Apple Cash Request: Tap the plus (+) icon, tap “Apple Cash”, enter the amount you are requesting, and then tap “Request”.
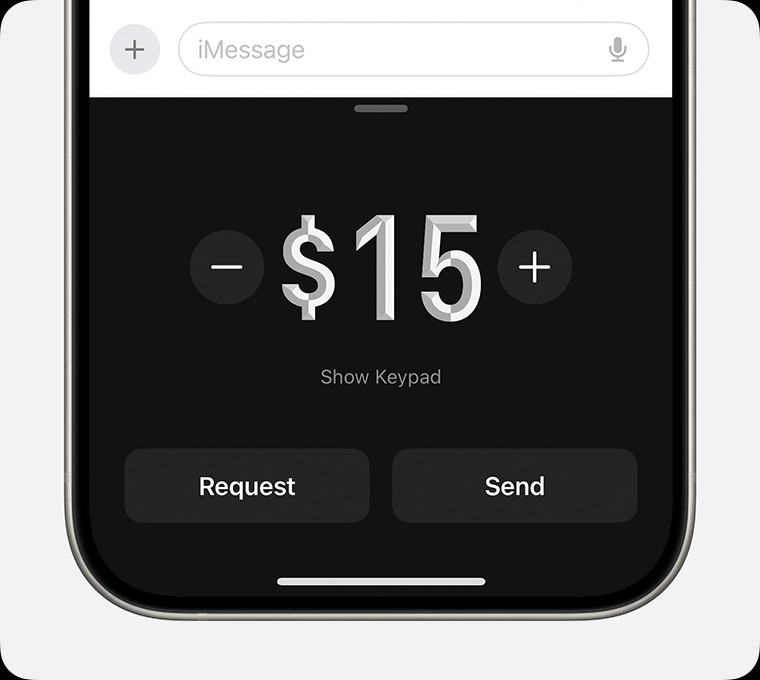 iPhone Messages app showing how to request money via Apple Cash
Alt text: Requesting money using Apple Cash within the Messages app on an iPhone. The interface shows the Apple Cash icon and the request money screen.
-
Send Request: Tap the “Send” button to send your payment request.
On Apple Watch:
-
Open Messages and Apple Cash: Open the Messages app on your Apple Watch, choose a conversation, tap the plus (+) icon, and then tap “Apple Cash”.
-
Enter Amount and Request: Enter the amount, then swipe left on the “Send” button to reveal the “Request” button. Tap “Request” to send your request.
Responding to Payment Requests
When you receive a payment request, responding is straightforward:
On iPhone:
-
Open Request in Messages: Open the payment request in the Messages app and tap “Pay” on the message.
-
Review and Send Payment: Review the amount, tap “Send” to continue (you can adjust the amount if needed), and then double-click the side button to pay.
-
Authenticate Payment: Confirm your payment with Face ID, Touch ID, or your passcode.
To decline a request, simply ignore the message.
On Apple Watch:
-
Open Request and Pay: Open the request in Messages, tap “Pay” on the message.
-
Review and Send: Review the amount, tap “Send” to continue (use the Digital Crown to adjust the amount if necessary), and double-click the side button to confirm and send the payment.
Cancelling a Sent Payment
If you’ve sent a payment and need to cancel it, you can do so if the transaction is still pending (i.e., the recipient hasn’t accepted it yet). Check your Apple Cash transaction history for the payment status and cancel it if possible.
Apple Cash person-to-person payments are designed for transactions with people you know and trust, similar to any private financial transaction.
Conclusion
Using Apple Pay to send money offers a suite of convenient, secure, and integrated solutions for iPhone, iPad, and Apple Watch users. From quick transfers in Messages to scheduled recurring payments in Wallet, Apple Cash provides versatile options to manage your peer-to-peer transactions. By understanding these methods, you can efficiently handle your financial exchanges within the Apple ecosystem. Embrace the ease and security of Apple Pay and Apple Cash for all your money-sending needs.
